

If you've mastered the basics from our creator affiliate marketing starter pack, it’s time to get practical.
In this guide, you’ll learn how to start a creator affiliate marketing blog and craft the content that both ranks and converts…
... step-by-step.
Let's get started.
Step 1: Choose/Refine Your Niche
In the creator affiliate marketing starter pack, I shared a video that helped me find my (tentative) niche:
If you haven’t watched it, I recommend doing so.
But if you want a quick summary, here are the core steps:
- Product Inventory: Go through every room in your house and list all the products you see. Yes, all of them.
- Categorize: Group these products into categories that make sense to you.
- Personal Filter: Cross out categories you're not confident talking about. If someone asked you a random question about it, could you answer confidently?
- Highlight Potentials: Mark the categories where you have knowledge and passion. These are your potential niches.
- Narrow Down: You should end up with 1-3 potential niches. If you have more, you're probably kidding yourself, and you should repeat #3.
Next, use AI to refine your potential niches.
We'll be using a framework inspired by Adam Enfroy (shout out to Adam — the full details are in the following video).
This AI framework consists of two parts:
- System Prompt 1: Generates 5 sub-niches for a given main niche, plus 5 content ideas per sub-niche
- System Prompt 2: Produces 20 content ideas (15 informational & 5 transactional) for each sub-niche
We'll discuss System Prompt 2 later. For now, here’s how System Prompt 1 works:
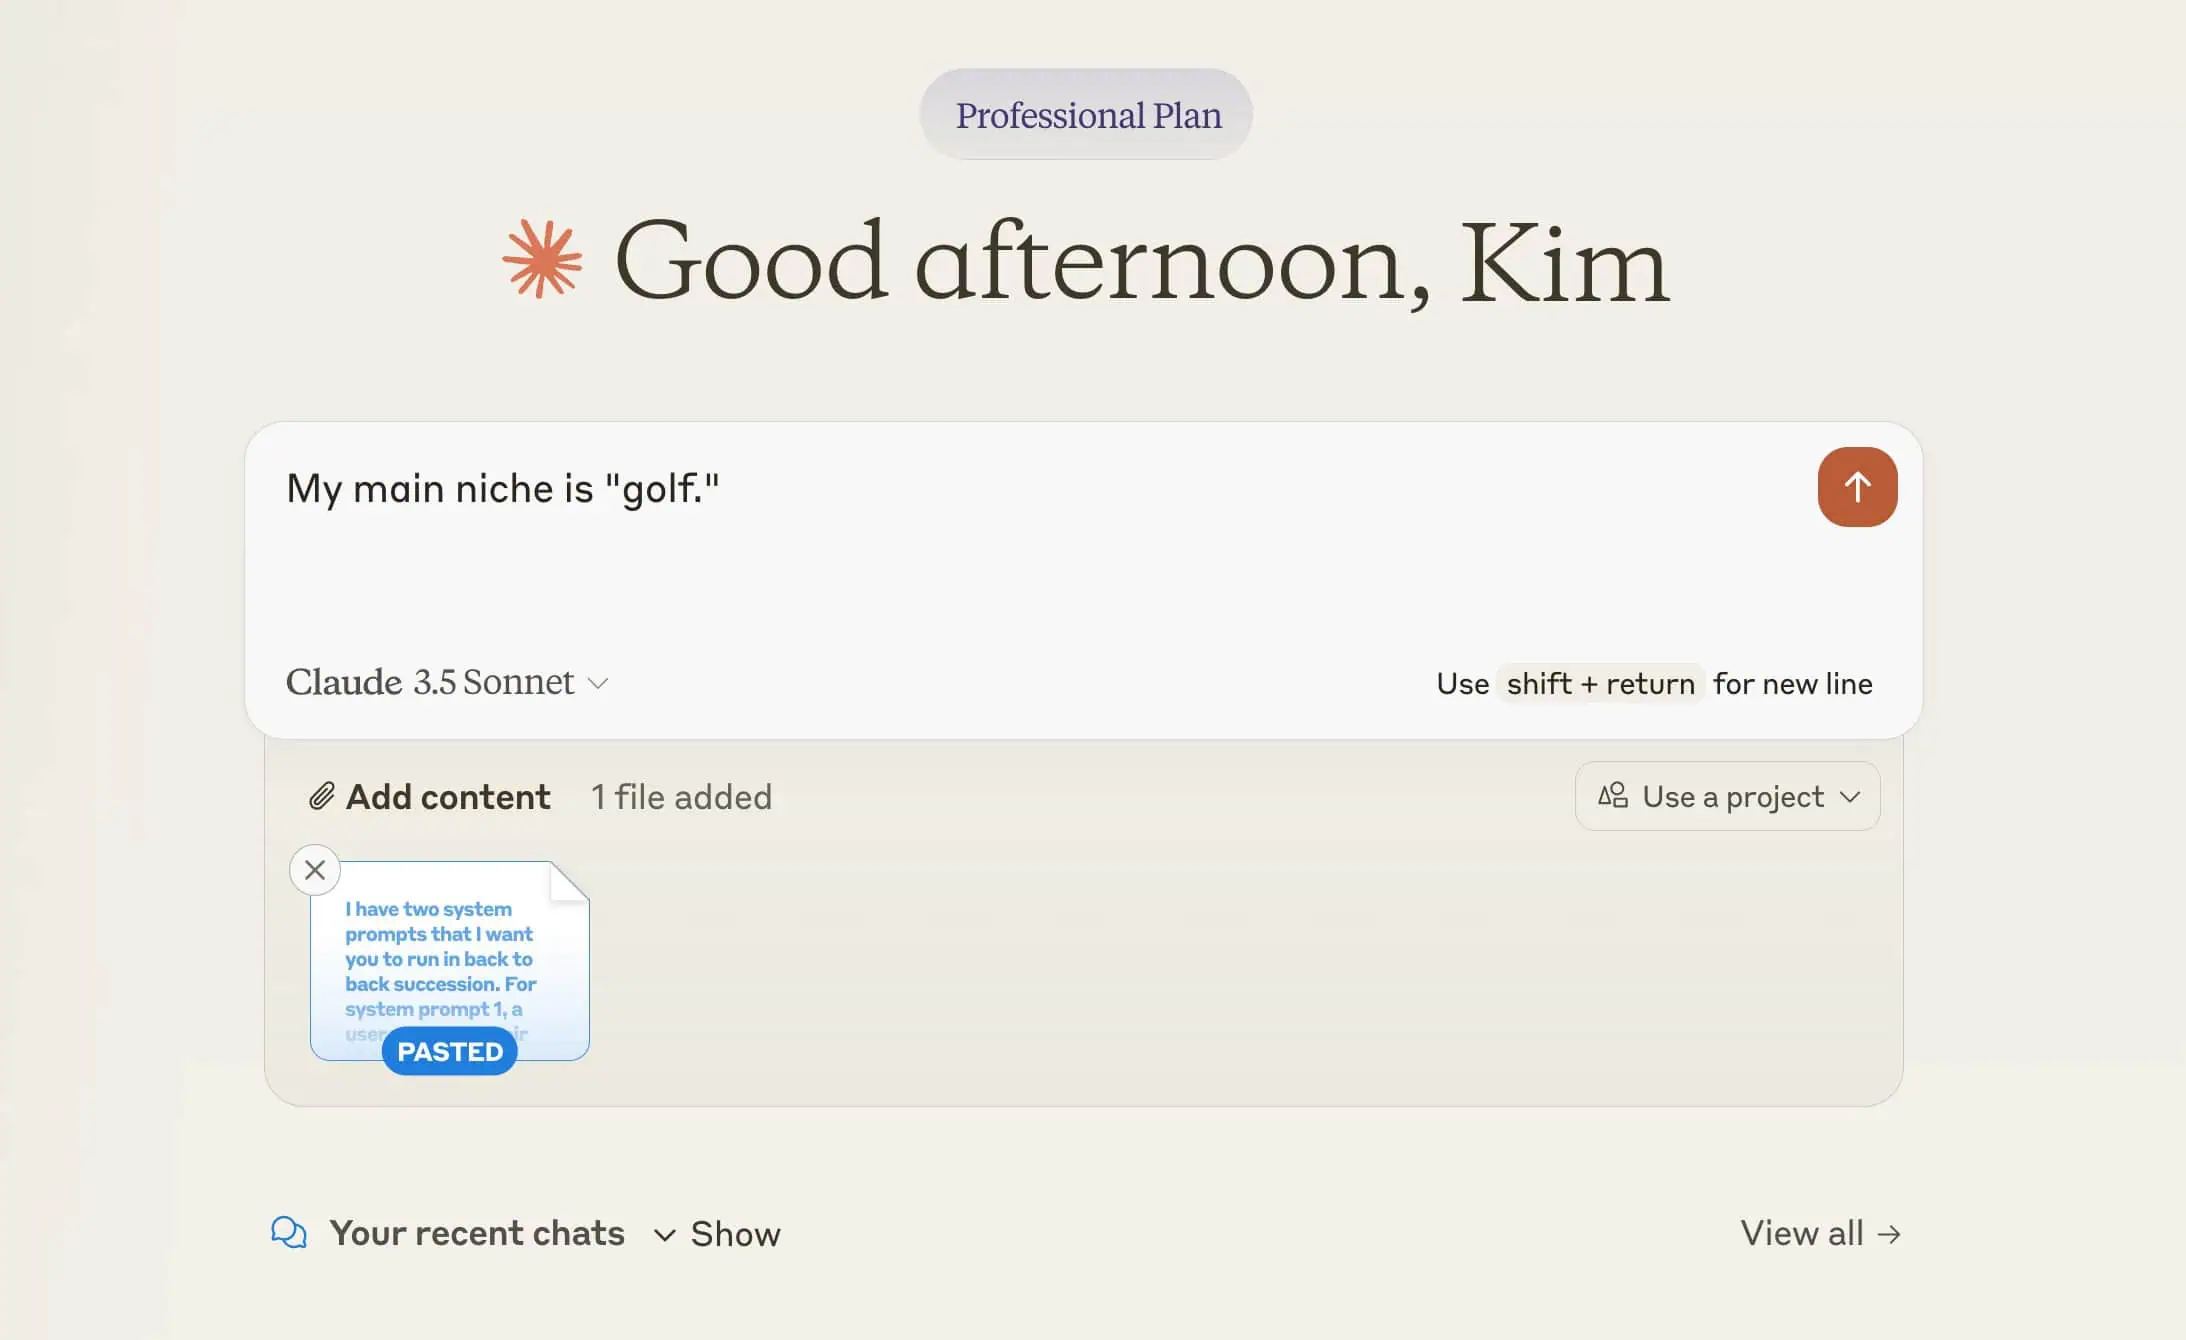
- Run the system prompt using Claude (or any other AI tools, though I prefer Claude) and input your main niche.
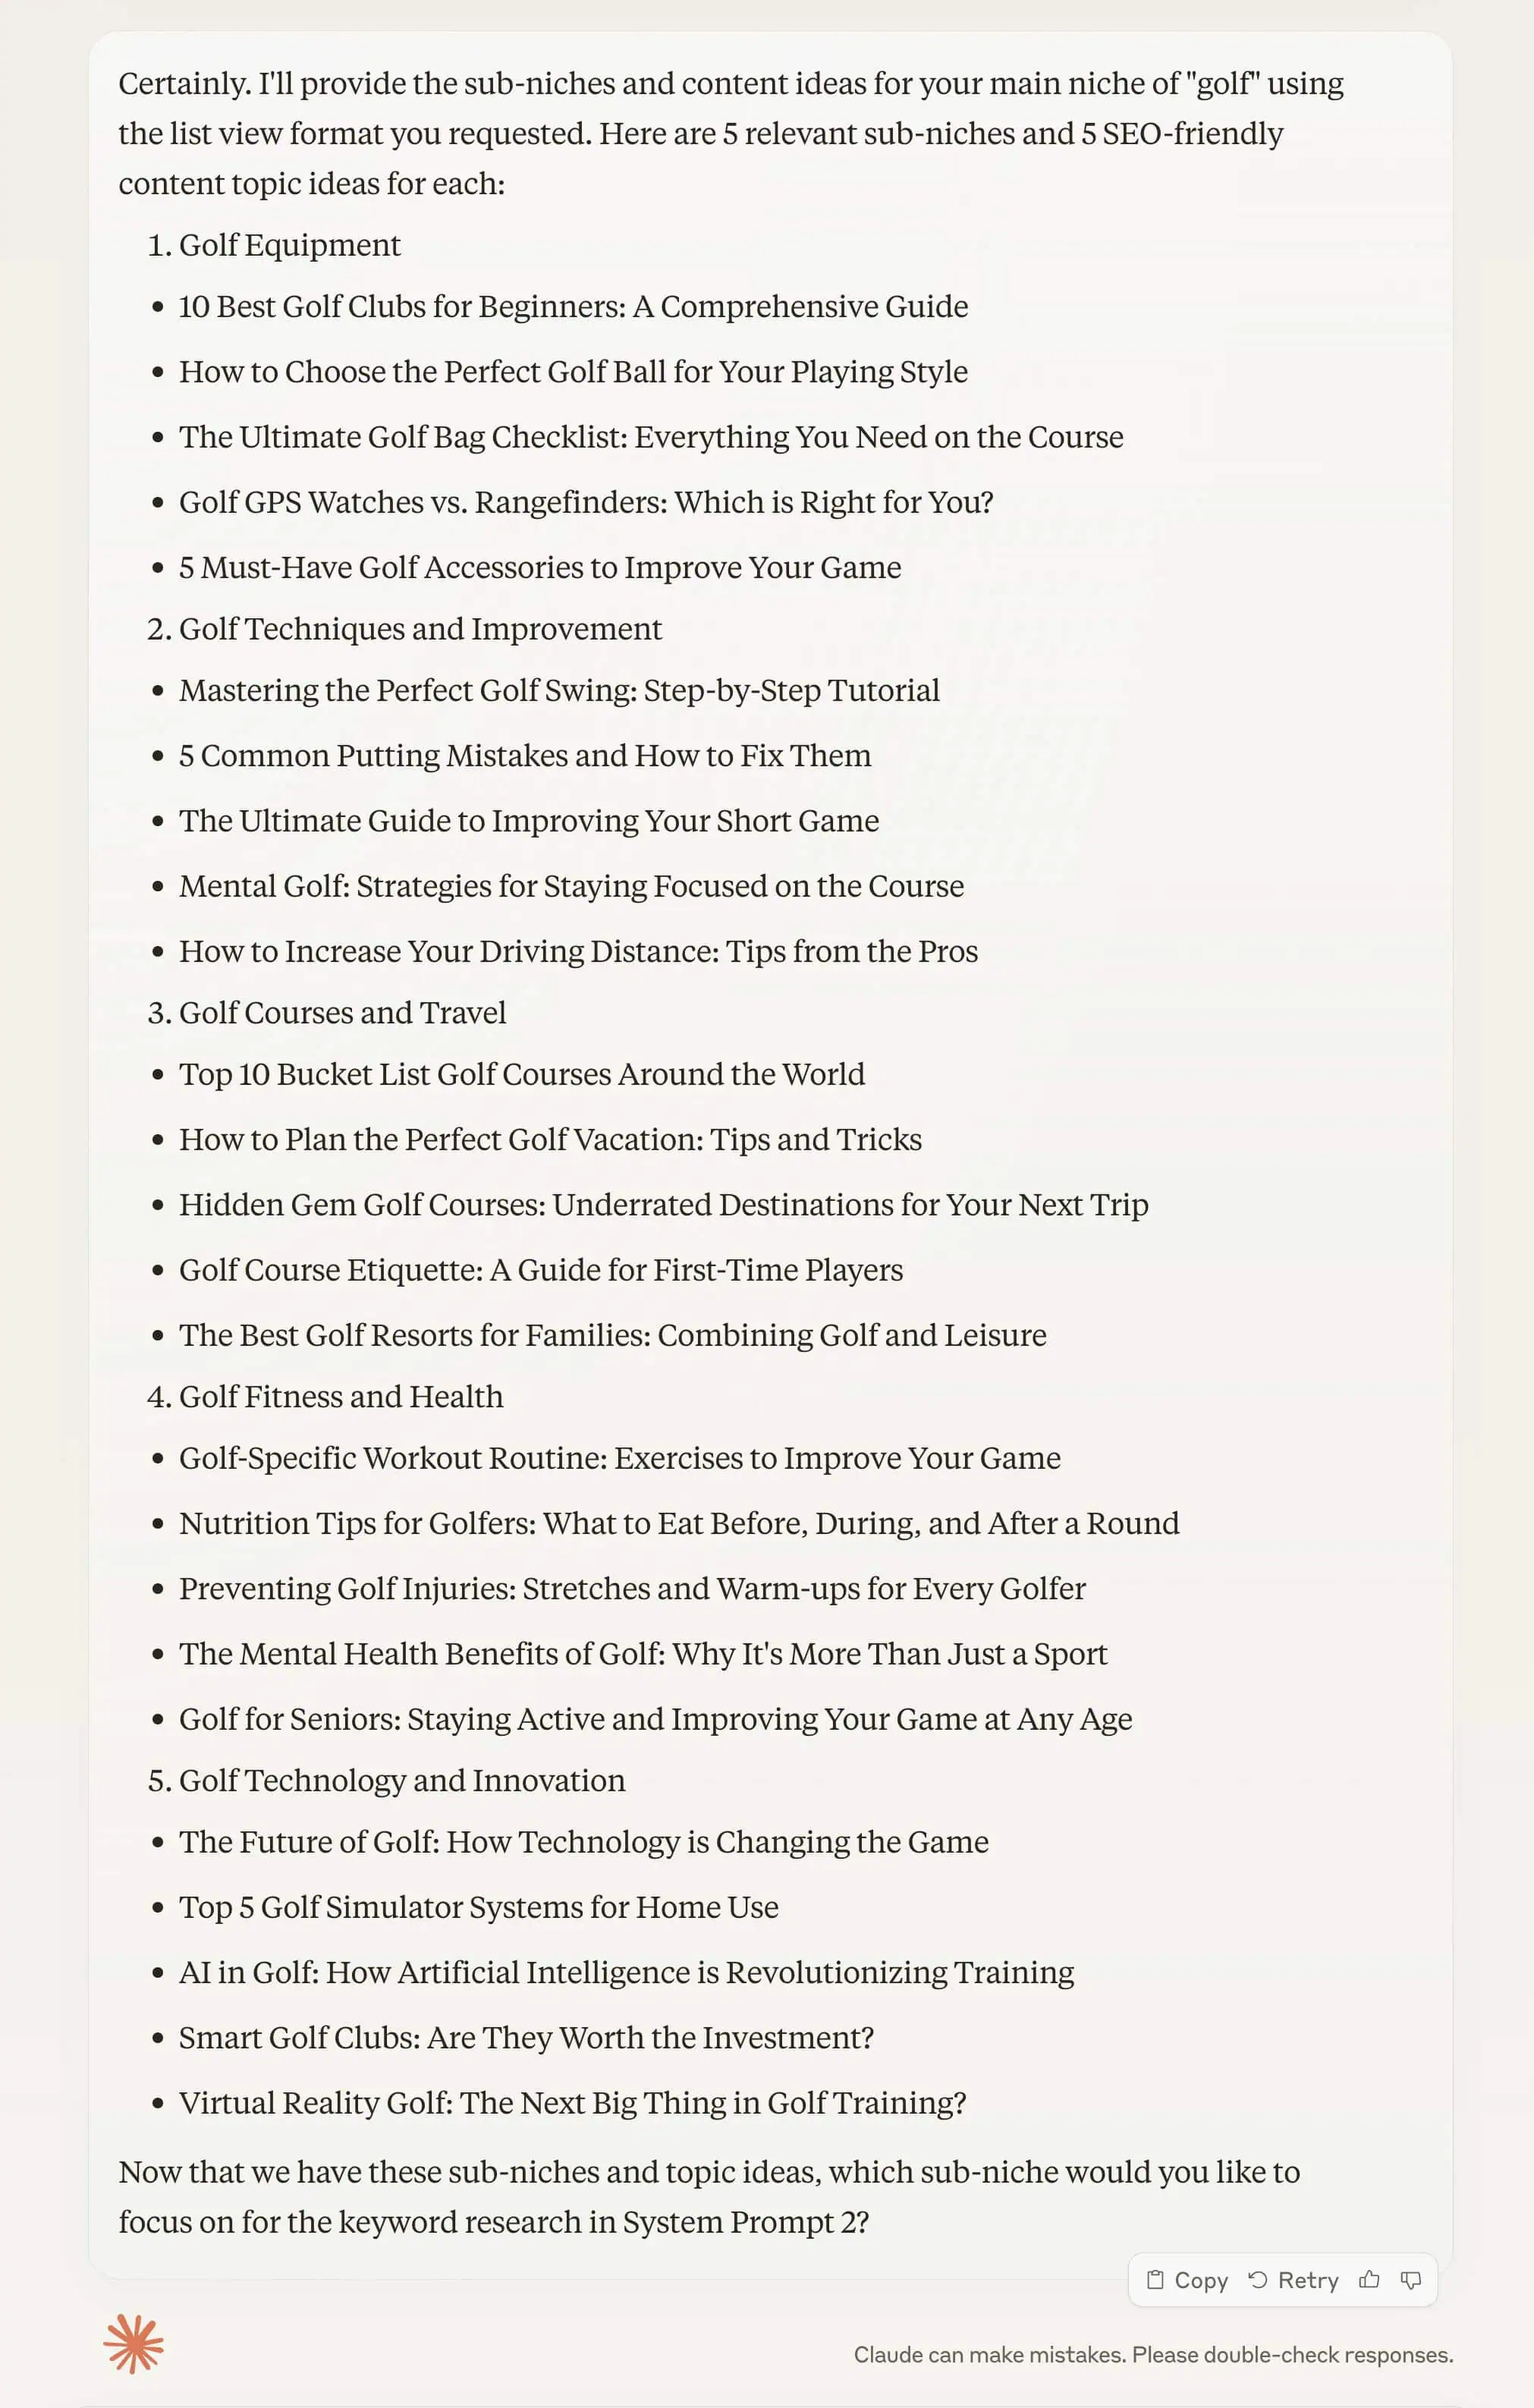
- Claude will return 5 sub-niches, each with 5 topic ideas.
- Evaluate all the sub-niche and content ideas to determine if they align with your vision.
- If you have multiple niche ideas, repeat this process for each one.
Generating Sub-Niches and Topics
Using your initial niche ideas, head over to Claude and enter your system prompt in a new chat.
Now, assess the sub-niche and content ideas Claude provides to see if they resonate with you.
If anything seems off, discuss further with Claude to explore their reasoning:
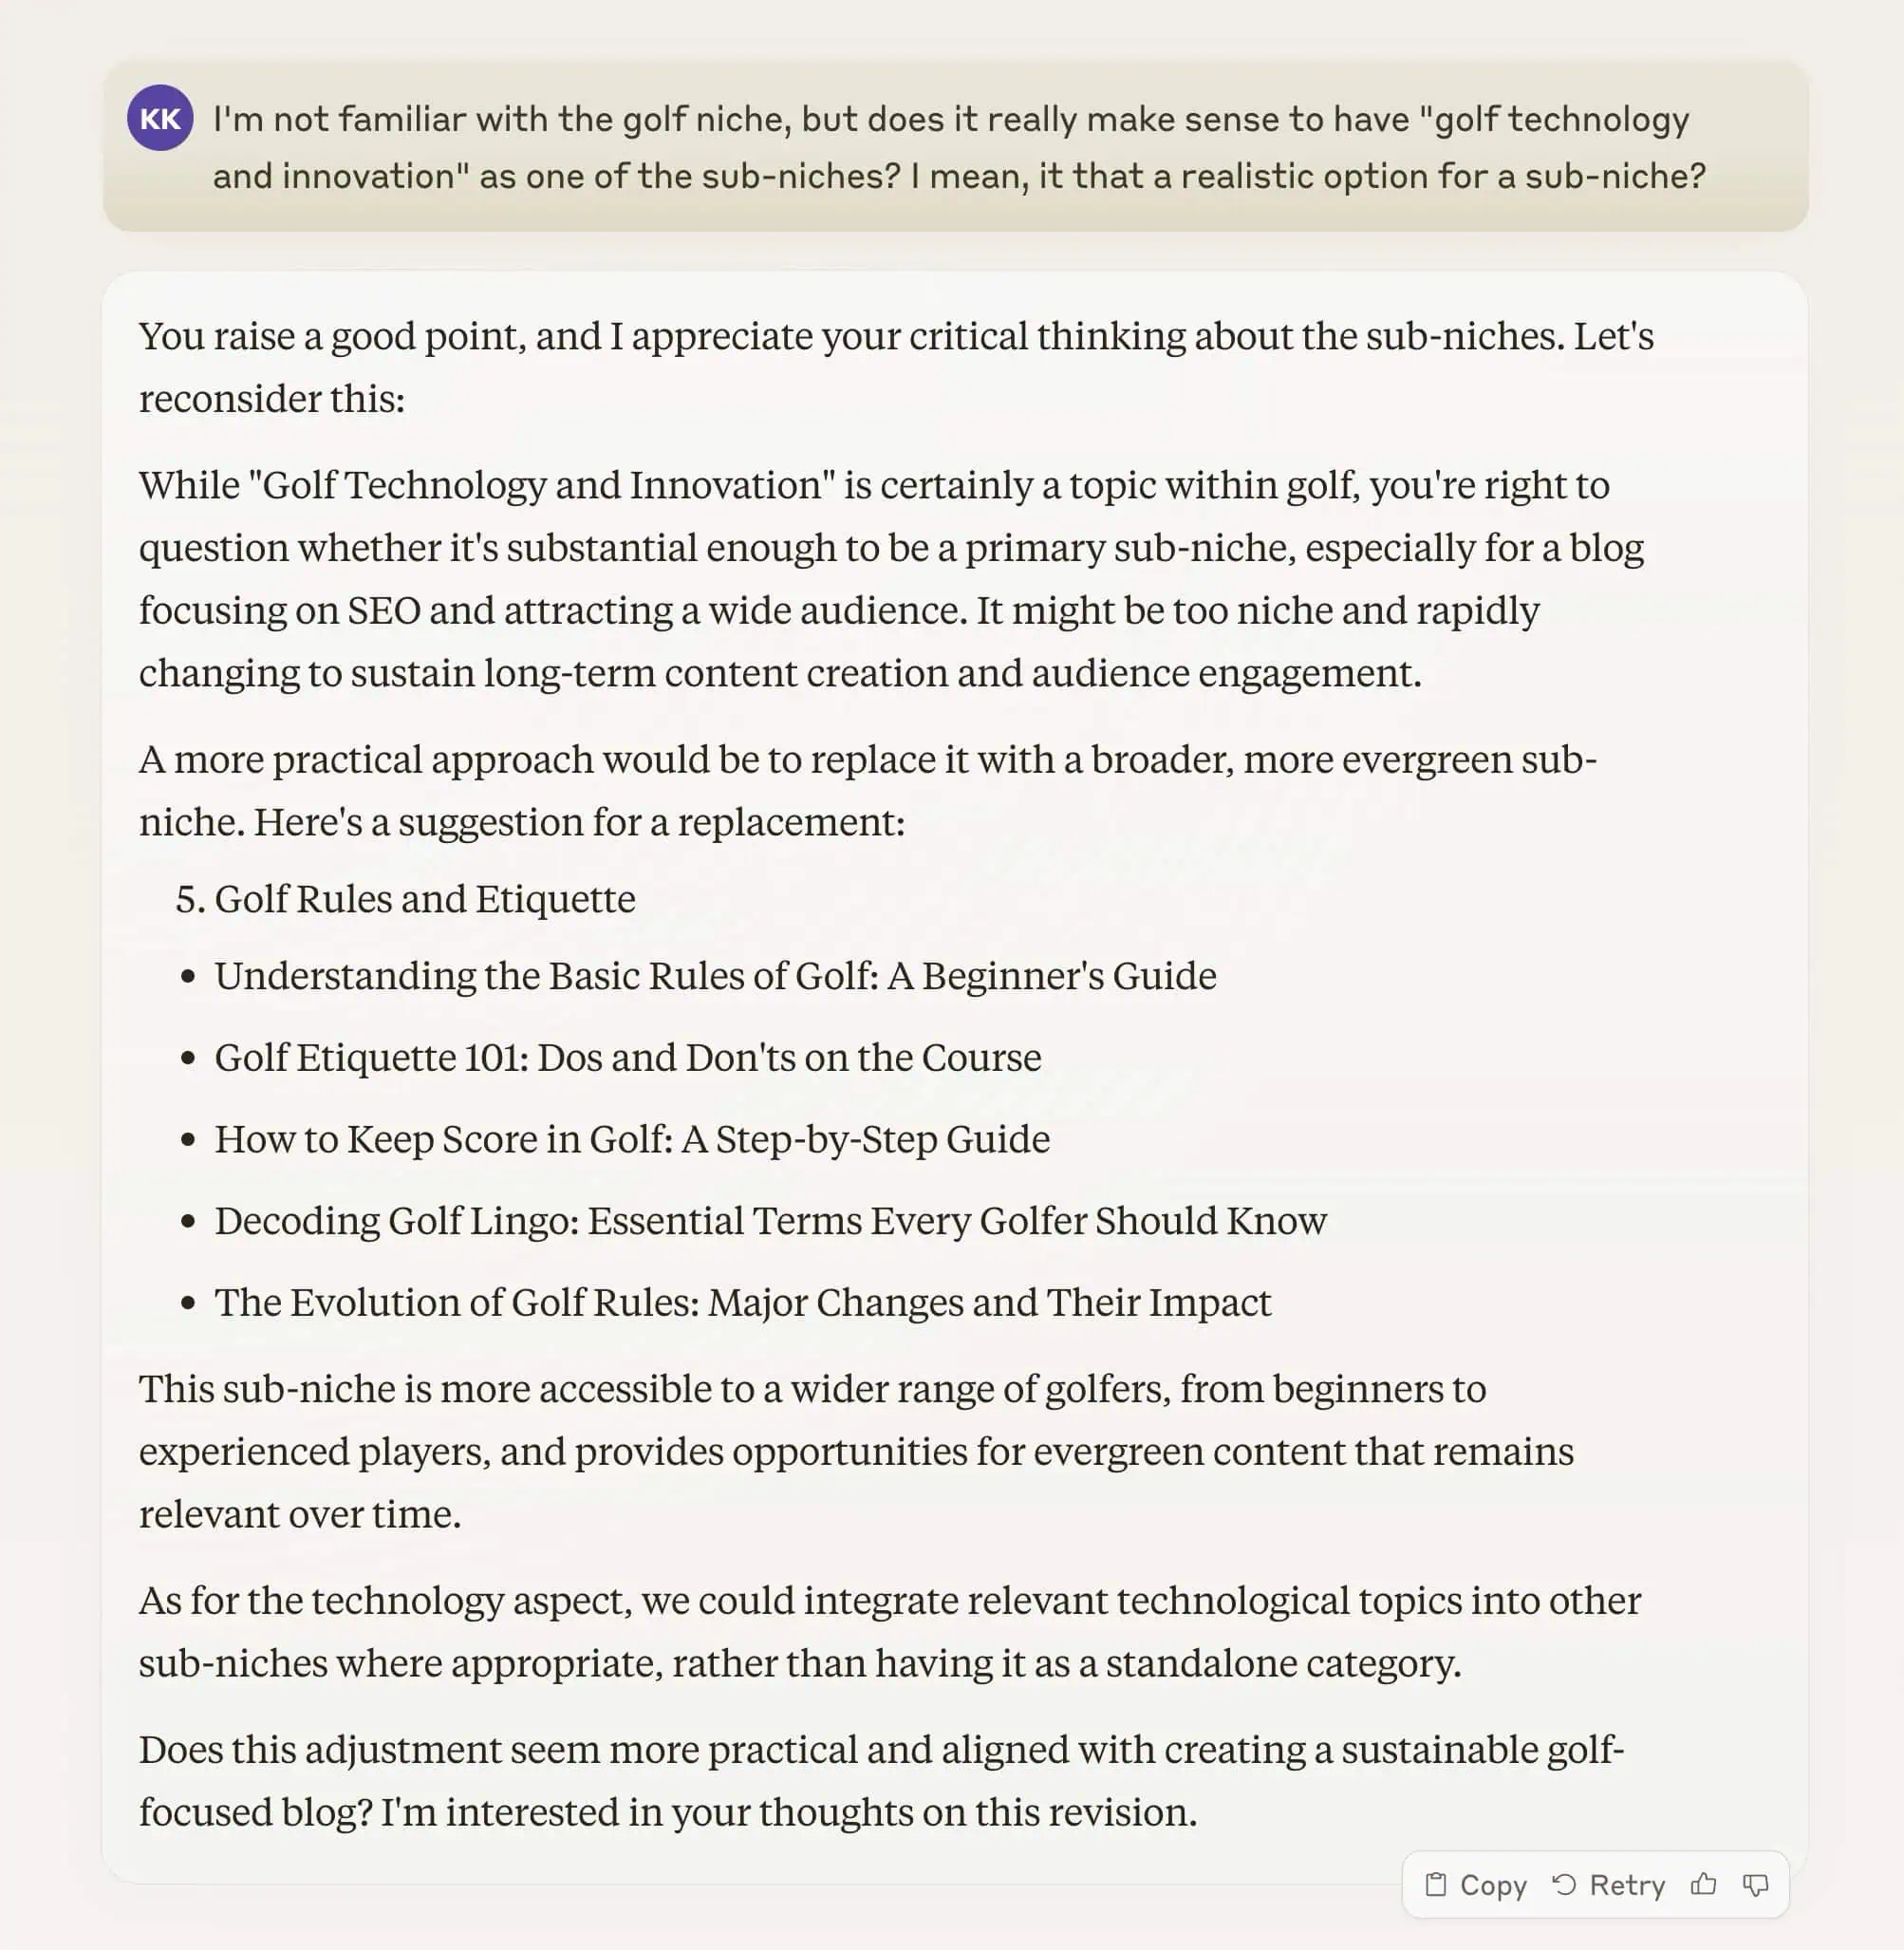
But don’t let Claude’s compliments get to your head — pretty sure they’re trained to shower you, the user, with praise, no matter how ridiculous you might sound, lol.
Analyzing Your Options
Now that you have sub-niche ideas generated by AI, it's time to apply your personal filter and assess market potential.
AI can generate endless possibilities, but only you can determine which niche aligns with your passions, skills, and has genuine market potential.
Ask yourself these key questions:
- Natural Fit: Which sub-niches and topics feel most natural for you to create content about?
Consider your existing knowledge and experiences. If you could talk about a topic for hours without preparation, that's a good sign. - Passion and Interest: Which ones spark your interest and excitement?
Remember, you'll be diving deep into this niche for years to come. Genuine enthusiasm will fuel your content creation and help you push through challenges. - Long-Term Vision: Which aligns best with your long-term vision as a creator? Can you write about this topic for the next 5 years?
Envision yourself as an expert in each potential niche. Which future excites you the most? - Your Unique Angle: Where can you offer a unique point of view? How do your personal experiences align with the content ideas?
- Expertise Development: Which niche offers the best opportunity for you to grow your skills and become a recognized authority?
- Audience Connection: Can you envision building a community around this niche and having a good time in that community for years to come?
Remember:
There's no “perfect” niche. The key is to choose one that resonates with you and commit to it.
Your unique perspective and dedication will set you apart in even the most competitive niches.
As long as you don't box yourself in with a super-specific domain name, you can always switch gears and explore other niches down the road.
Step 2: Develop Your Content Strategy
Remember TOFU and BOFU from our starter pack?
TOFU is your informational stuff — the posts that educate and build trust. BOFU? That's where you bring in the affiliate links and start making some cash.
But here's the thing:
You need both.
Too much BOFU and you'll come off salesy. Too much TOFU and you're running a charity.
Aim for a mix that keeps your readers happy and your bank account growing.
Generating Content Ideas
When it comes to generating content ideas, we're not going the traditional route here.
We're leveraging AI to stay ahead of the game.
Remember System Prompt 2 from our AI framework? Here's a quick refresher:
- It generates 20 content ideas for each sub-niche
- 15 are TOFU (informational content)
- 5 are BOFU (transactional, affiliate-friendly content)
This balance ensures you're not just pushing products but building authority in your niche.
Continuing where we left off, input your chosen sub-niche to Claude and you should end up with something like this:
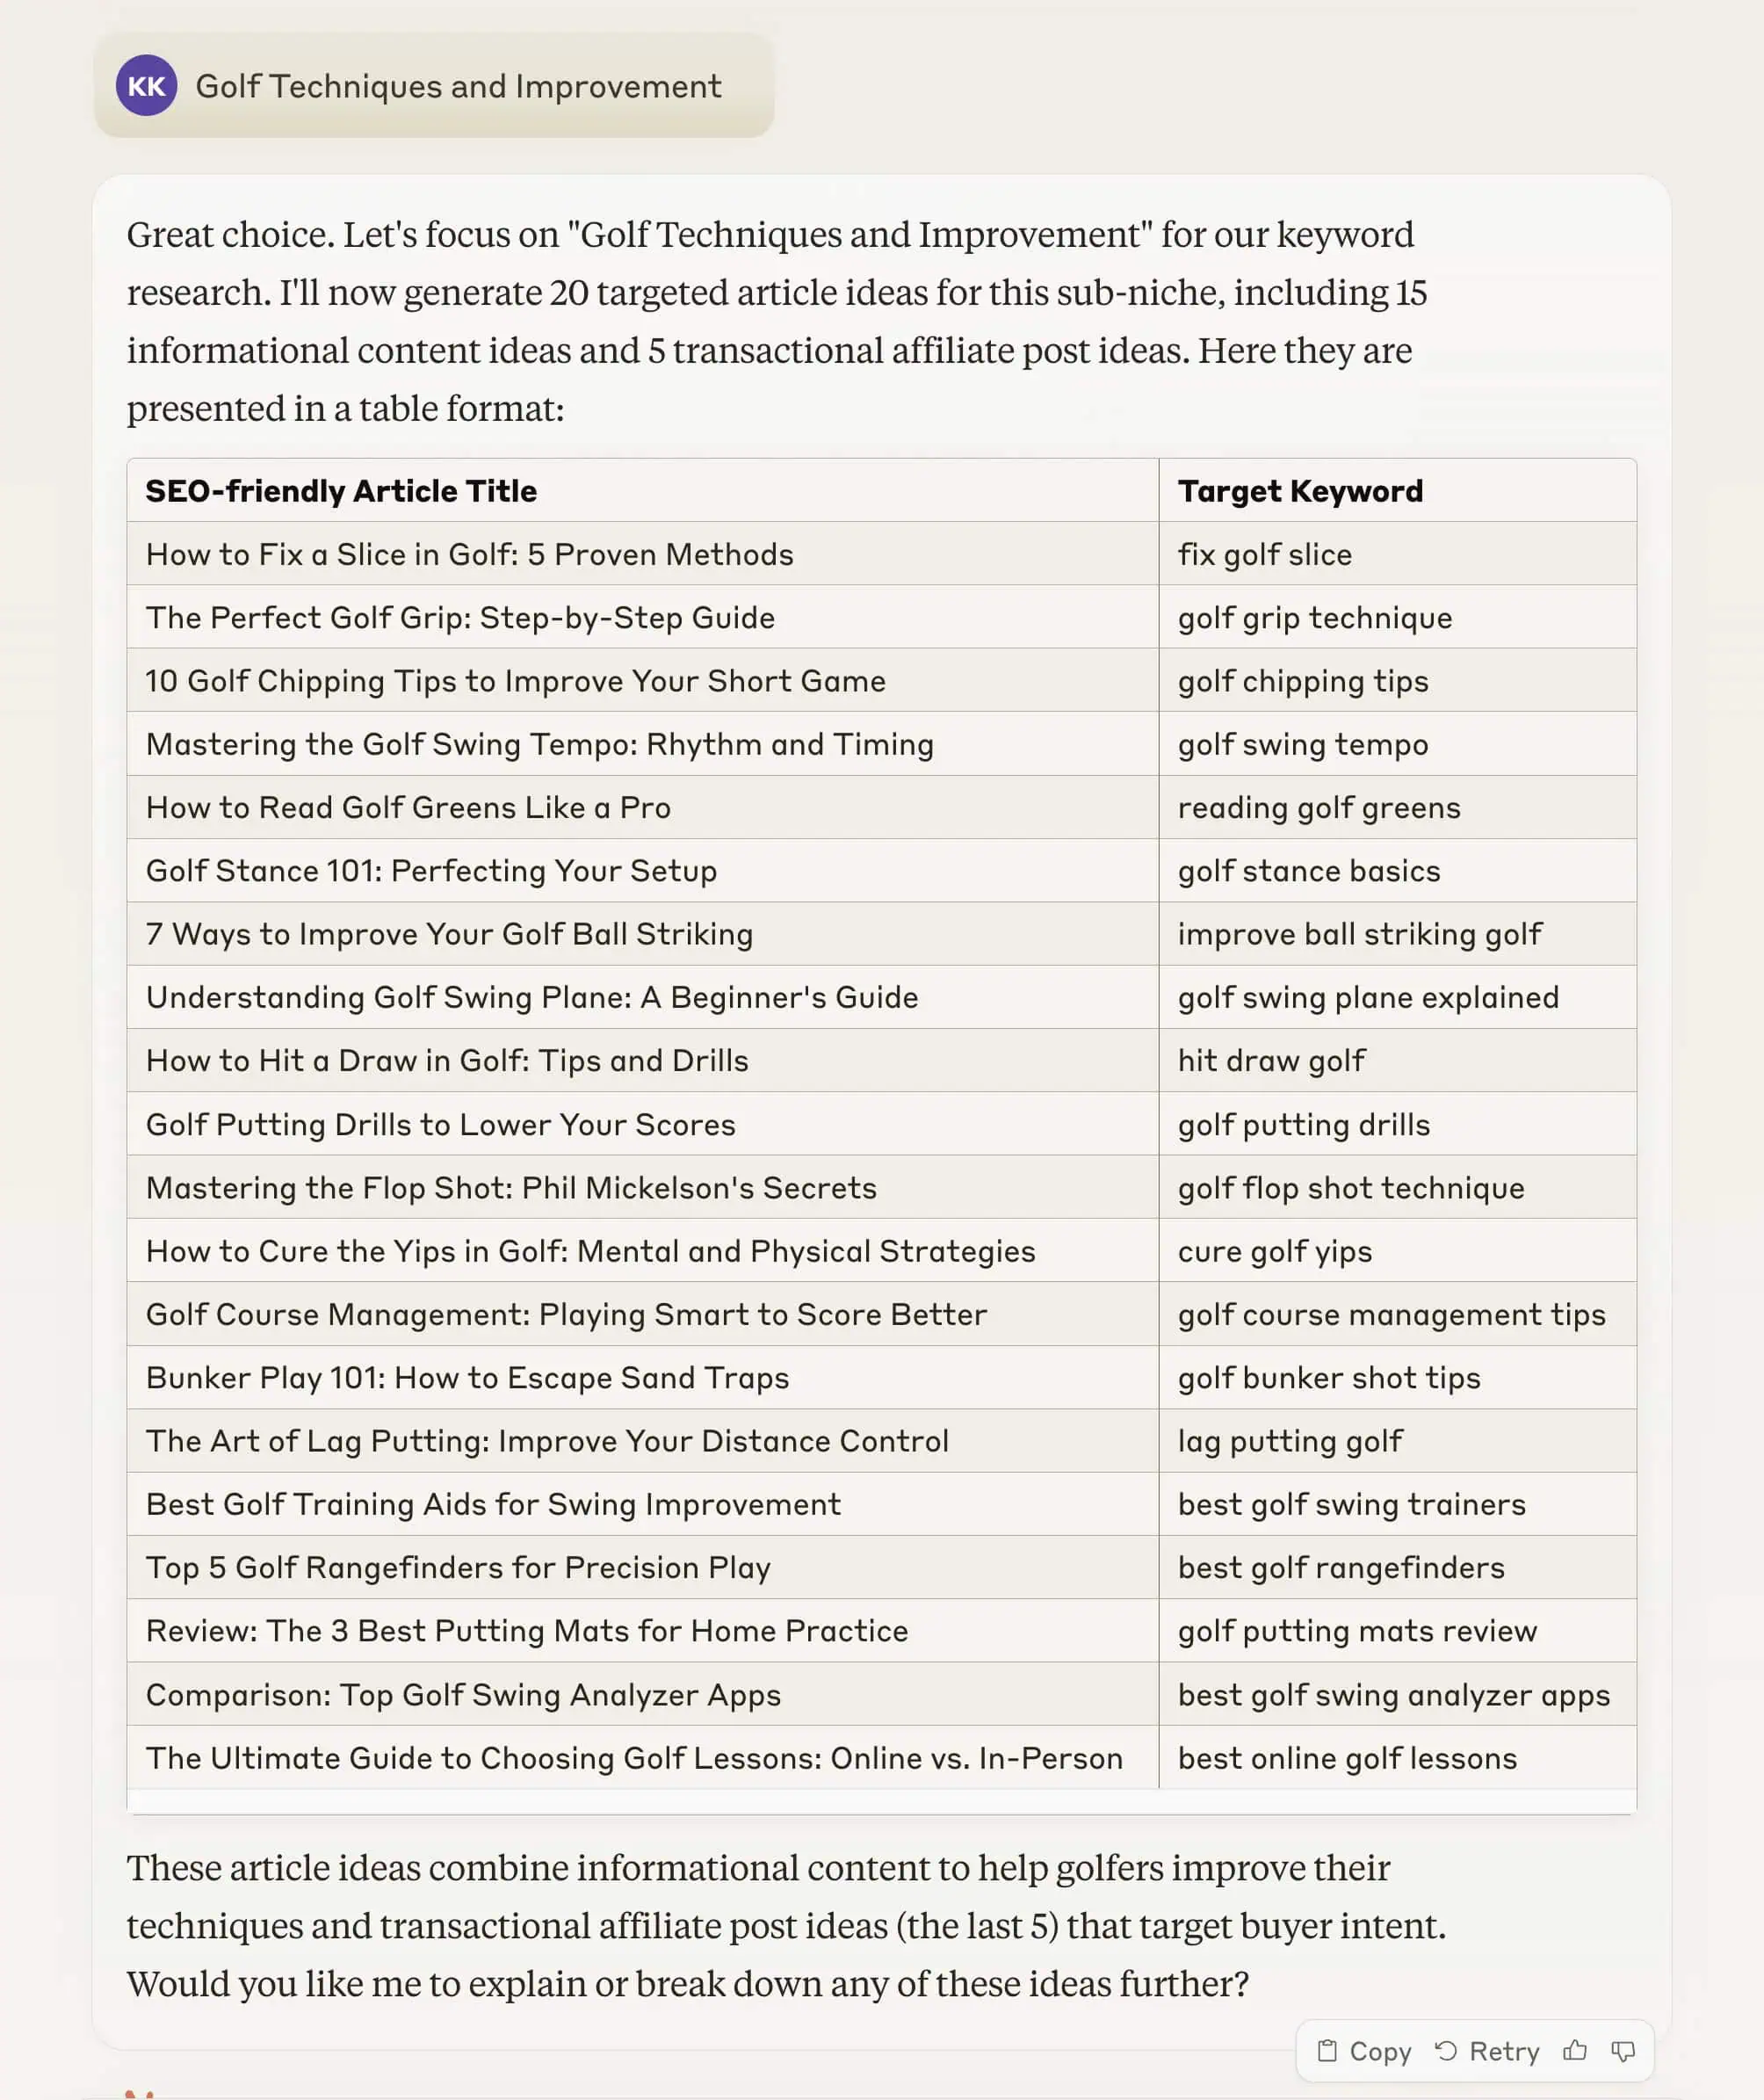
Now, it's time to sift through these ideas. Most of them should be on point, but you still need to give them a once-over to make sure they all make sense.
As you review them, consider:
- Are they relevant to the given sub-niche?
- Are they effortless for you to write about?
- Could they provide real value to your readers?
- For BOFU ideas, can you naturally incorporate affiliate products?
The goal is to have 20 solid content ideas within the same sub-niche to start building topical authority.
If some ideas don't cut it, just ask Claude to whip up a few more to choose from.
Planning Your Content Calendar
Once you've got your top ideas, plan your content calendar with a mix of TOFU and BOFU content.
But remember:
Consistency trumps frequency. Better to publish regularly than burn out trying to post too often.
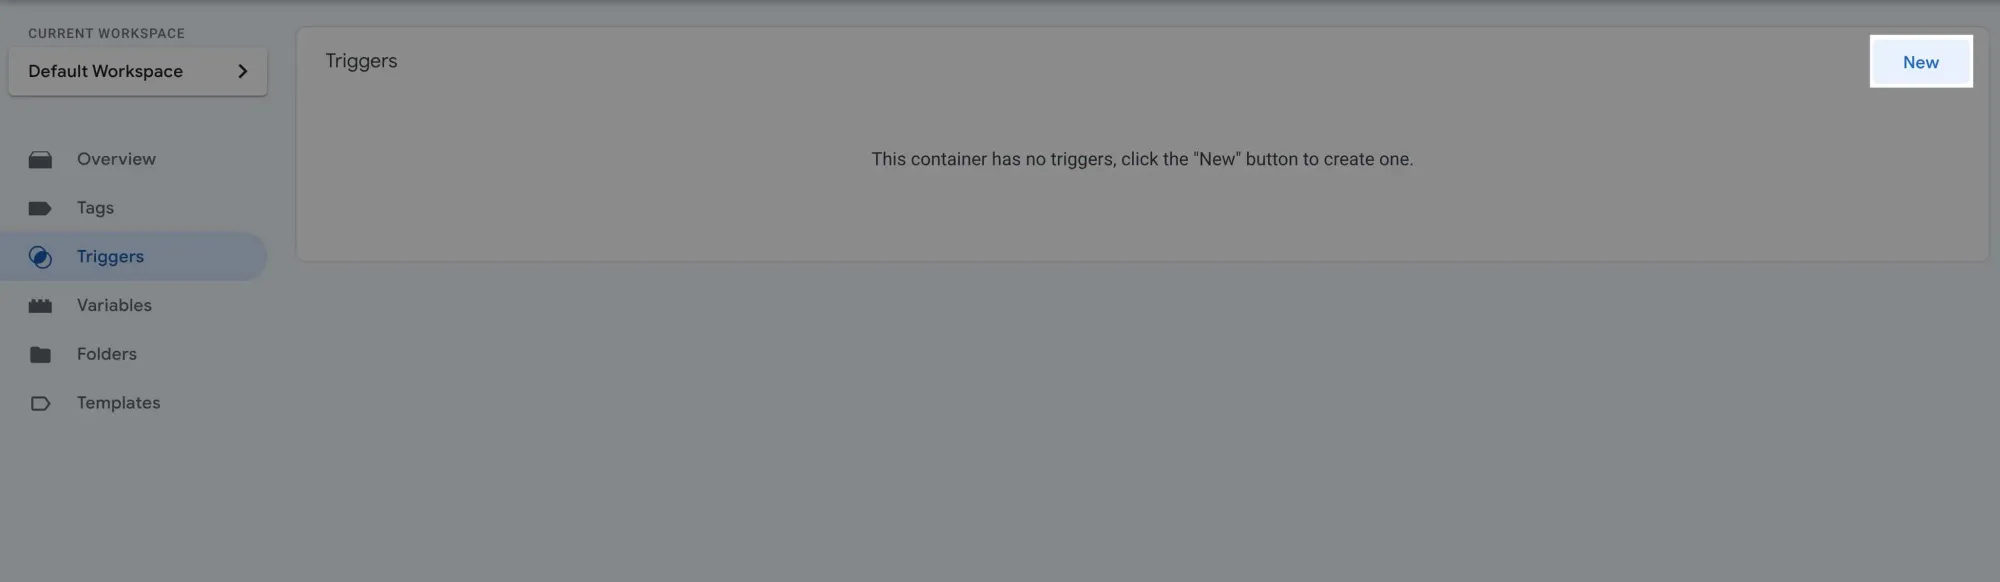
Step 3: Set Up Your Blog
When it comes to setting up your blog, there are several key decisions to make and key steps to take.
Let's start with one of the most crucial choices.
Choosing Your Blogging Platform
There are many blogging platforms out there, but for serious blogging and affiliate marketing, WordPress is the way to go.
I've been building websites since 2015, mostly with WordPress. My current site runs on Ghost, but that's because I tend to go against the grain sometimes...
... and maybe I enjoy a bit of a challenge 🫠
I find tweaking HTML and CSS fun, but here's the thing:
Making a Ghost blog work for affiliate marketing is significantly more work and can be a massive pain in the ass.
So don't make your life harder than it needs to be — just go with WordPress.
(I might even switch back in a few months, but we'll see.)
WordPress.com vs. WordPress.org
WordPress comes in two flavors - WordPress.com and WordPress.org.
WordPress.com is the managed version — easier to use, but can get expensive and limited when you need more customization.
WordPress.org is open-source, offering more flexibility and options for expandability.
My recommendation?
Go with WordPress.org.
Yeah, the UI looks like it's stuck in 2010, but it's got all the bells and whistles you need (and probably don't need) for affiliate marketing.
So you can’t really go wrong with it.
Choosing Your Domain Name
If you're starting a personal blog (which I highly recommend), go with yourname.com.
This gives you flexibility. If a niche doesn't work out, you can easily pivot to another.
For a business blog you might want to sell in the future, a brandable name makes more sense.
I used to use Lean Domain Search for name ideas, but these days, AI tools like Claude or ChatGPT are much easier.
But don't overthink this:
You're probably the only one who cares about your domain name. Trust me, I've been there — spending way too much time on this decision.
Once you've decided, register your domain with Namecheap:
Find a domain starting at $0.99
I always separate my domain names from my hosting provider.
Here's why:
As your site grows, you'll likely switch your hosting provider to get the best value. But for domain names? Unless something goes wrong, you'll probably stick with the same registrar for years.
Separating them from day one saves you from unnecessary hassle down the road.
Plus, Namecheap offers FREE WHOIS privacy protection for life, unlike GoDaddy, which charges extra for this.
Choosing Your Web Hosting Provider
I've used a bunch of hosting providers over the years:
HostGator, Bluehost, Siteground, WPX, and Cloudways. Currently, I use Hostinger for my WordPress site that hosts my affiliate links.
Right off the bat, let's cross HostGator and Bluehost off the list. They're owned by EIG, a conglomerate notorious for poor customer support and product quality.
(Feel free to dive down that rabbit hole if you're curious.)
Let's break down the remaining options:
- Siteground: Decent pricing and customer support. Nothing spectacular, but solid.
- WPX: Managed hosting, so it's pricier but offers exceptional customer support.
- Cloudways: Most flexible for server and backend customization but requires more technical know-how.
- Hostinger: Exceptional pricing (one of the cheapest out there) with decent customer support.
In my opinion, Hostinger matches or beats Siteground at more affordable prices, so Siteground's out.
Cloudways is great but more technical, so I wouldn't recommend it for beginners unless you need that level of control on the server.
That leaves us with Hostinger and WPX.
Here's my take:
Hostinger is great for beginners. It has everything you need to get started and it's very affordable.
Remember, SEO is a long game. It'll take a while before you start seeing traction with your blog. So it makes sense to keep your initial costs low to make your journey less stressful.
That said, WPX shines in one area: lightning-fast customer support. If you contact them via live chat, you'll get help in literally seconds.
Some folks hate dealing with technical issues and want someone always available for help. If that's you, then WPX might be your best bet from day one.
For me? I don't mind the technical stuff. I actually find it fun.
So if I were starting a new WordPress blog today, I'd go with Hostinger and consider upgrading to a more robust host down the line if needed.
Installing WordPress
Alright, let's walk through setting up a hosting account with Hostinger and installing WordPress.
If you went with WPX, don't worry. The process is similar — the UI will be different, but the general steps are the same. Plus, you've got that stellar customer support at your fingertips if you need it.
Let's dive in. Click the banner below to follow along:
On the WordPress Hosting page, you'll see three plans. They recently removed the Single plan (starting at $1.99), so now you're choosing between Premium or Business:
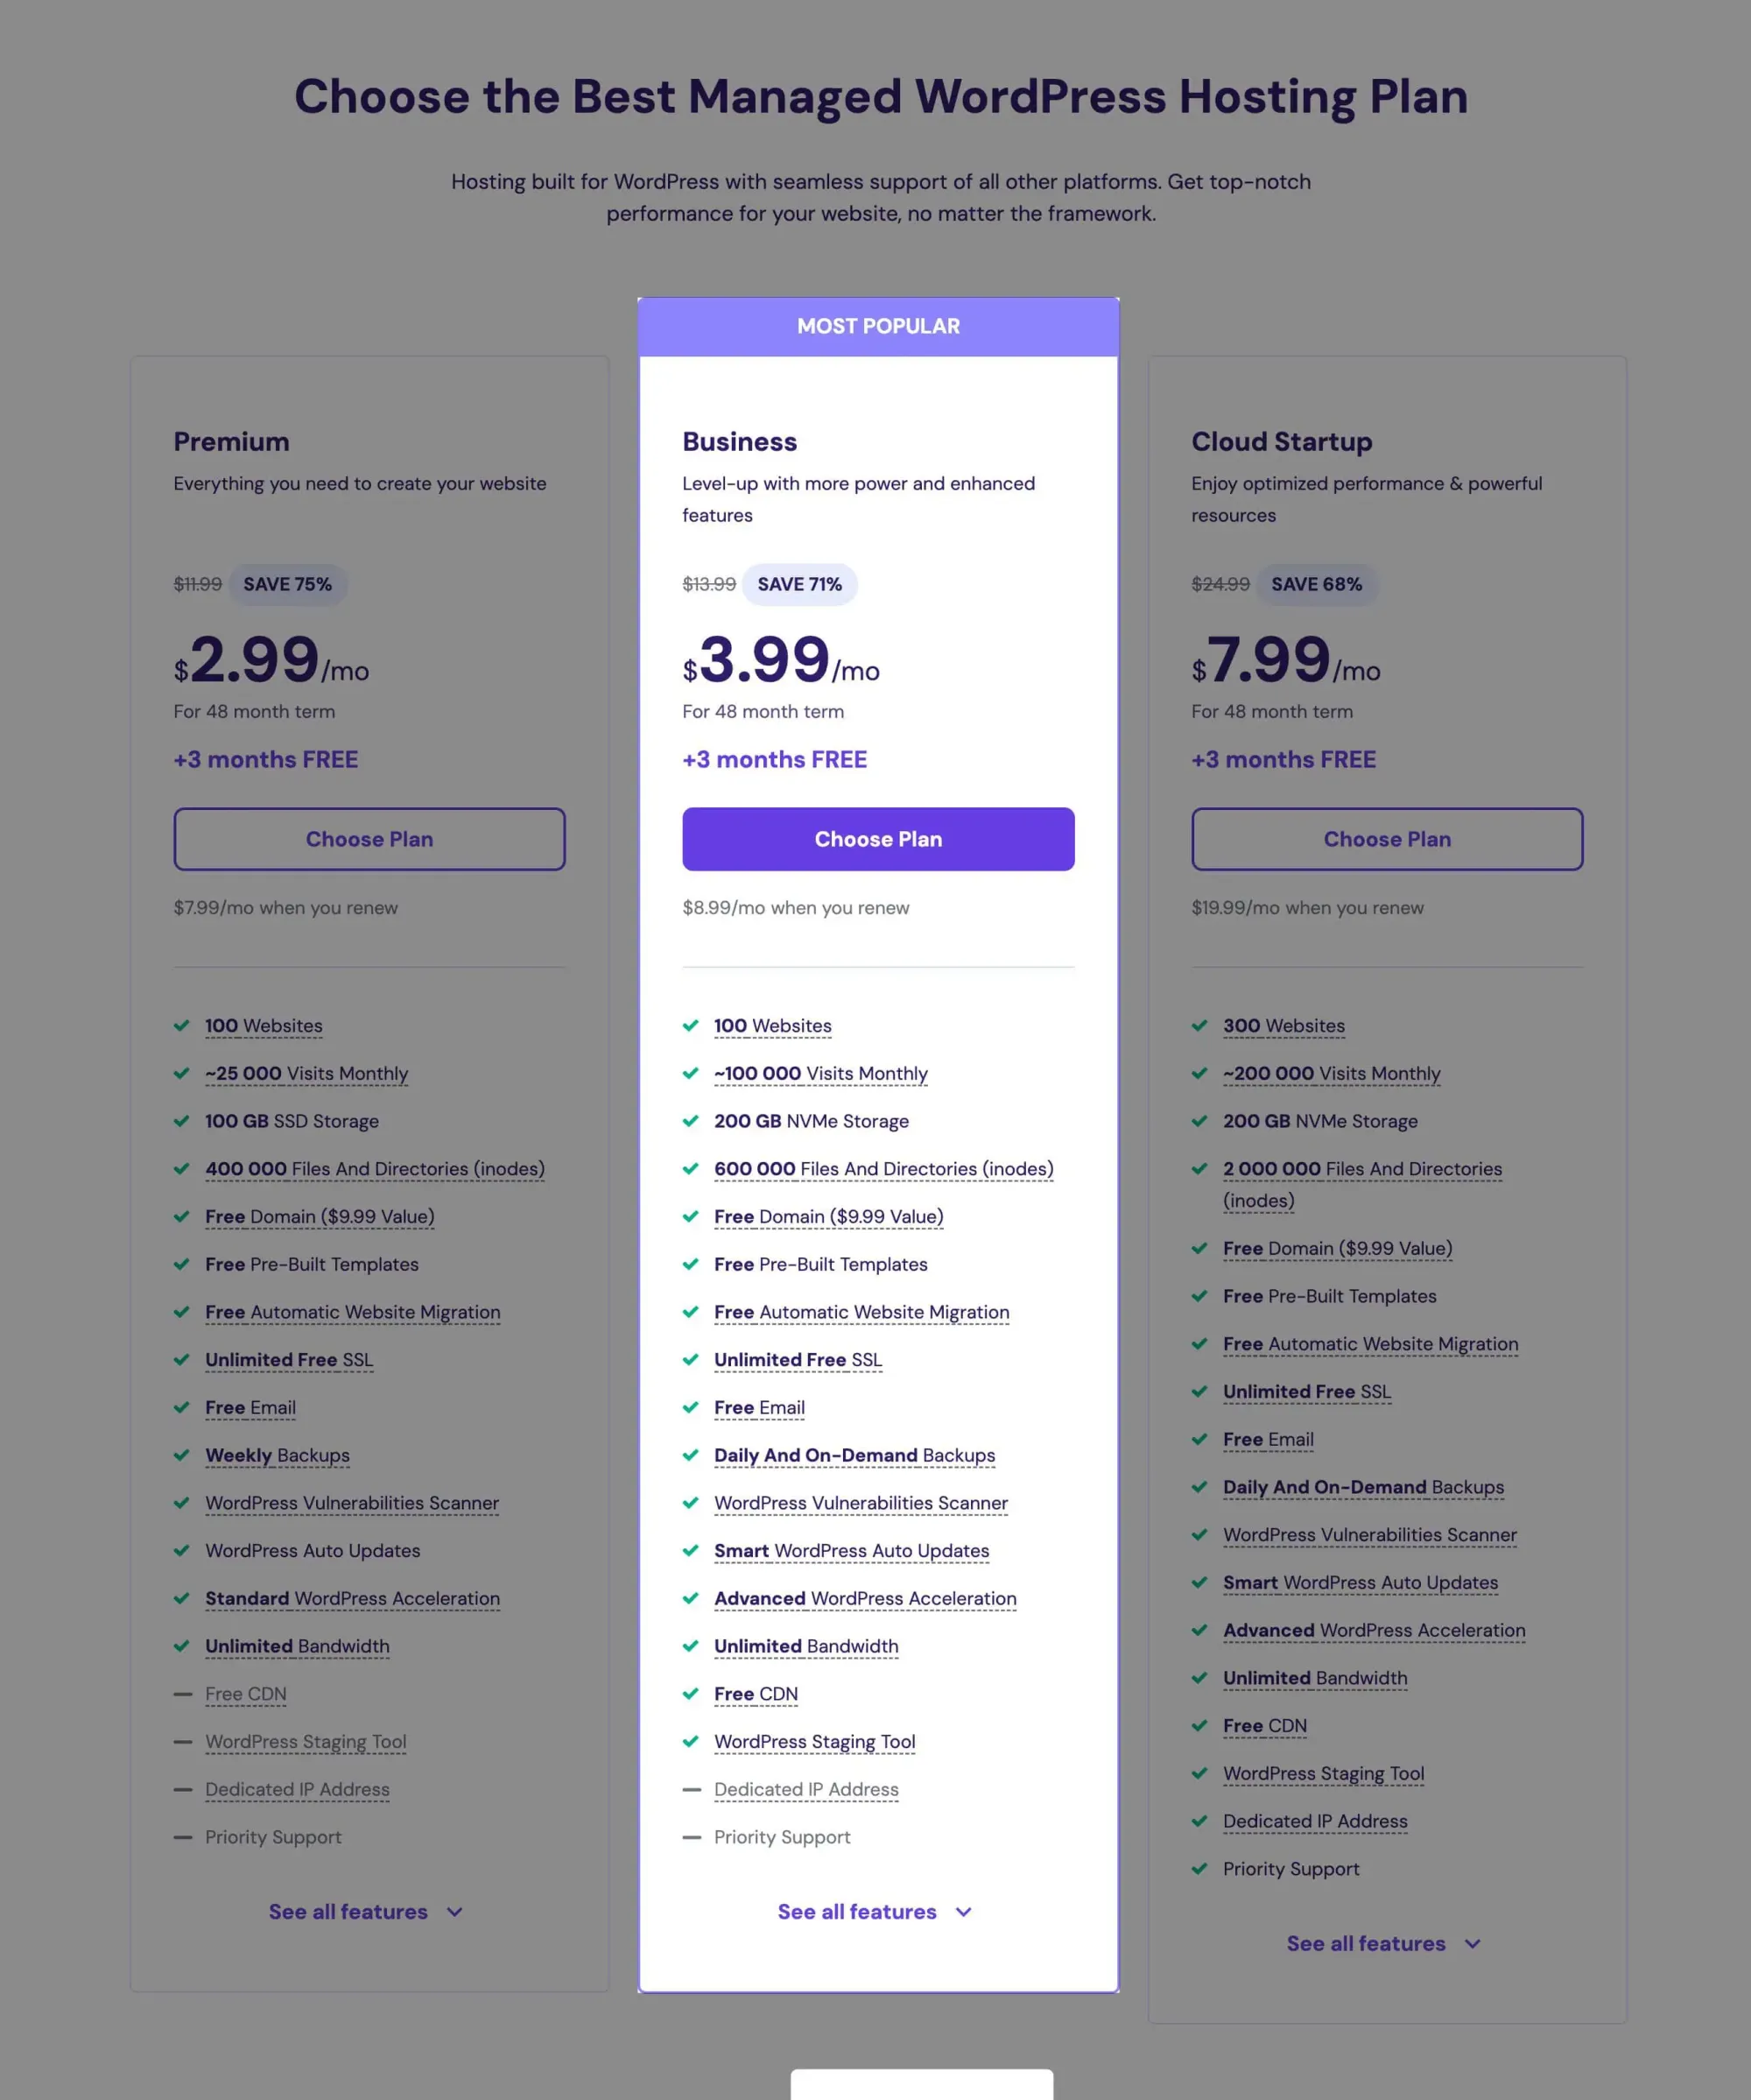
Both plans are similar, but Business offers some extra perks:
- NVMe Storage instead of SSD
- Daily backups (instead of weekly)
- FREE CDN
- Enhanced DDoS protection (instead of standard)
I recommend the Business plan — it's just $1 more per month and the extras are worth it. But if you're on a tight budget, Premium will do the job.
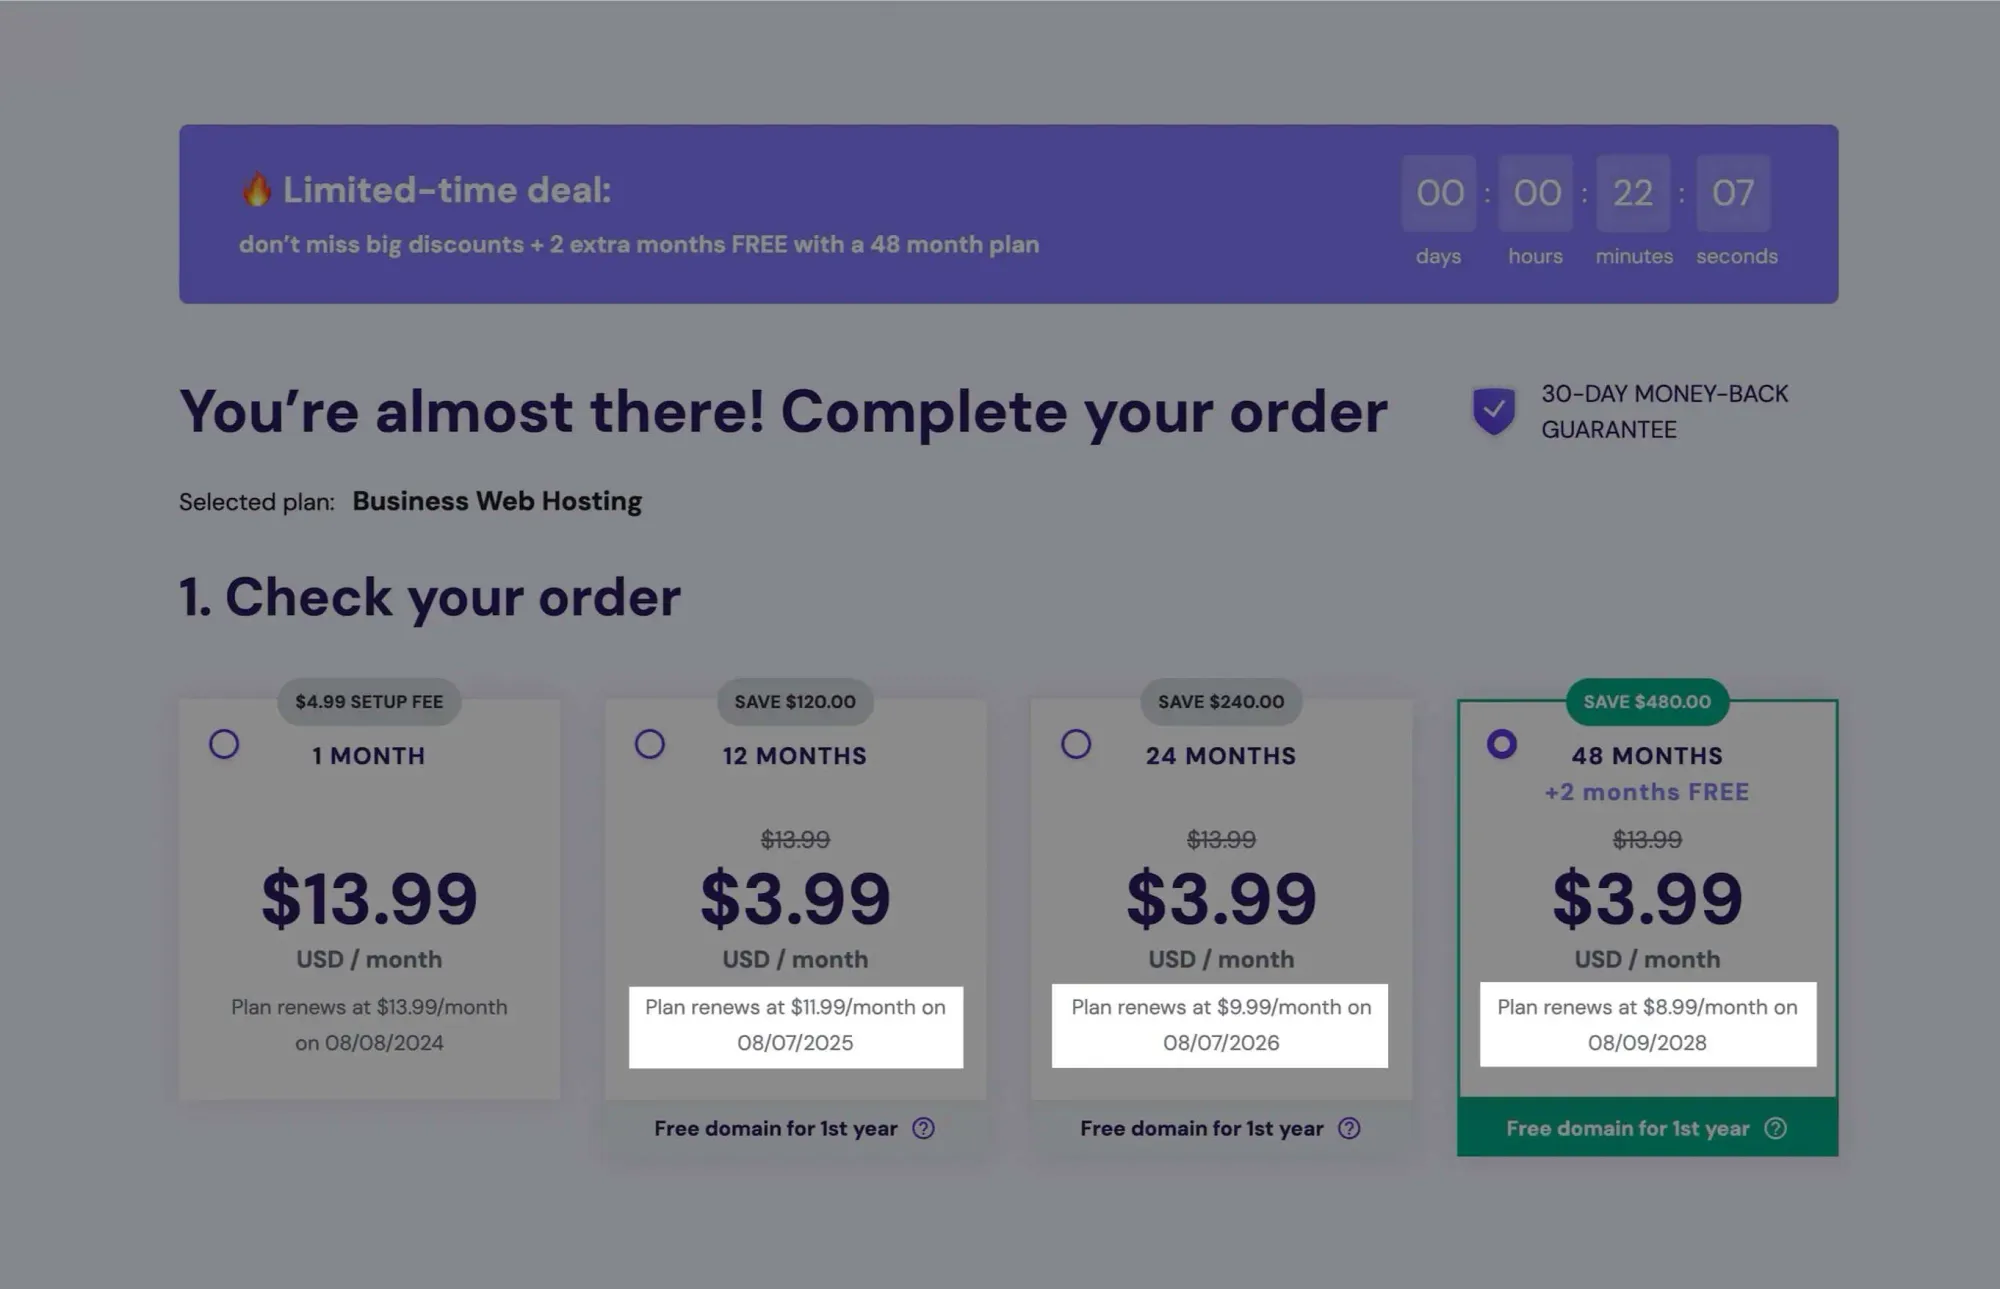
On the checkout page, you'll choose your commitment period:
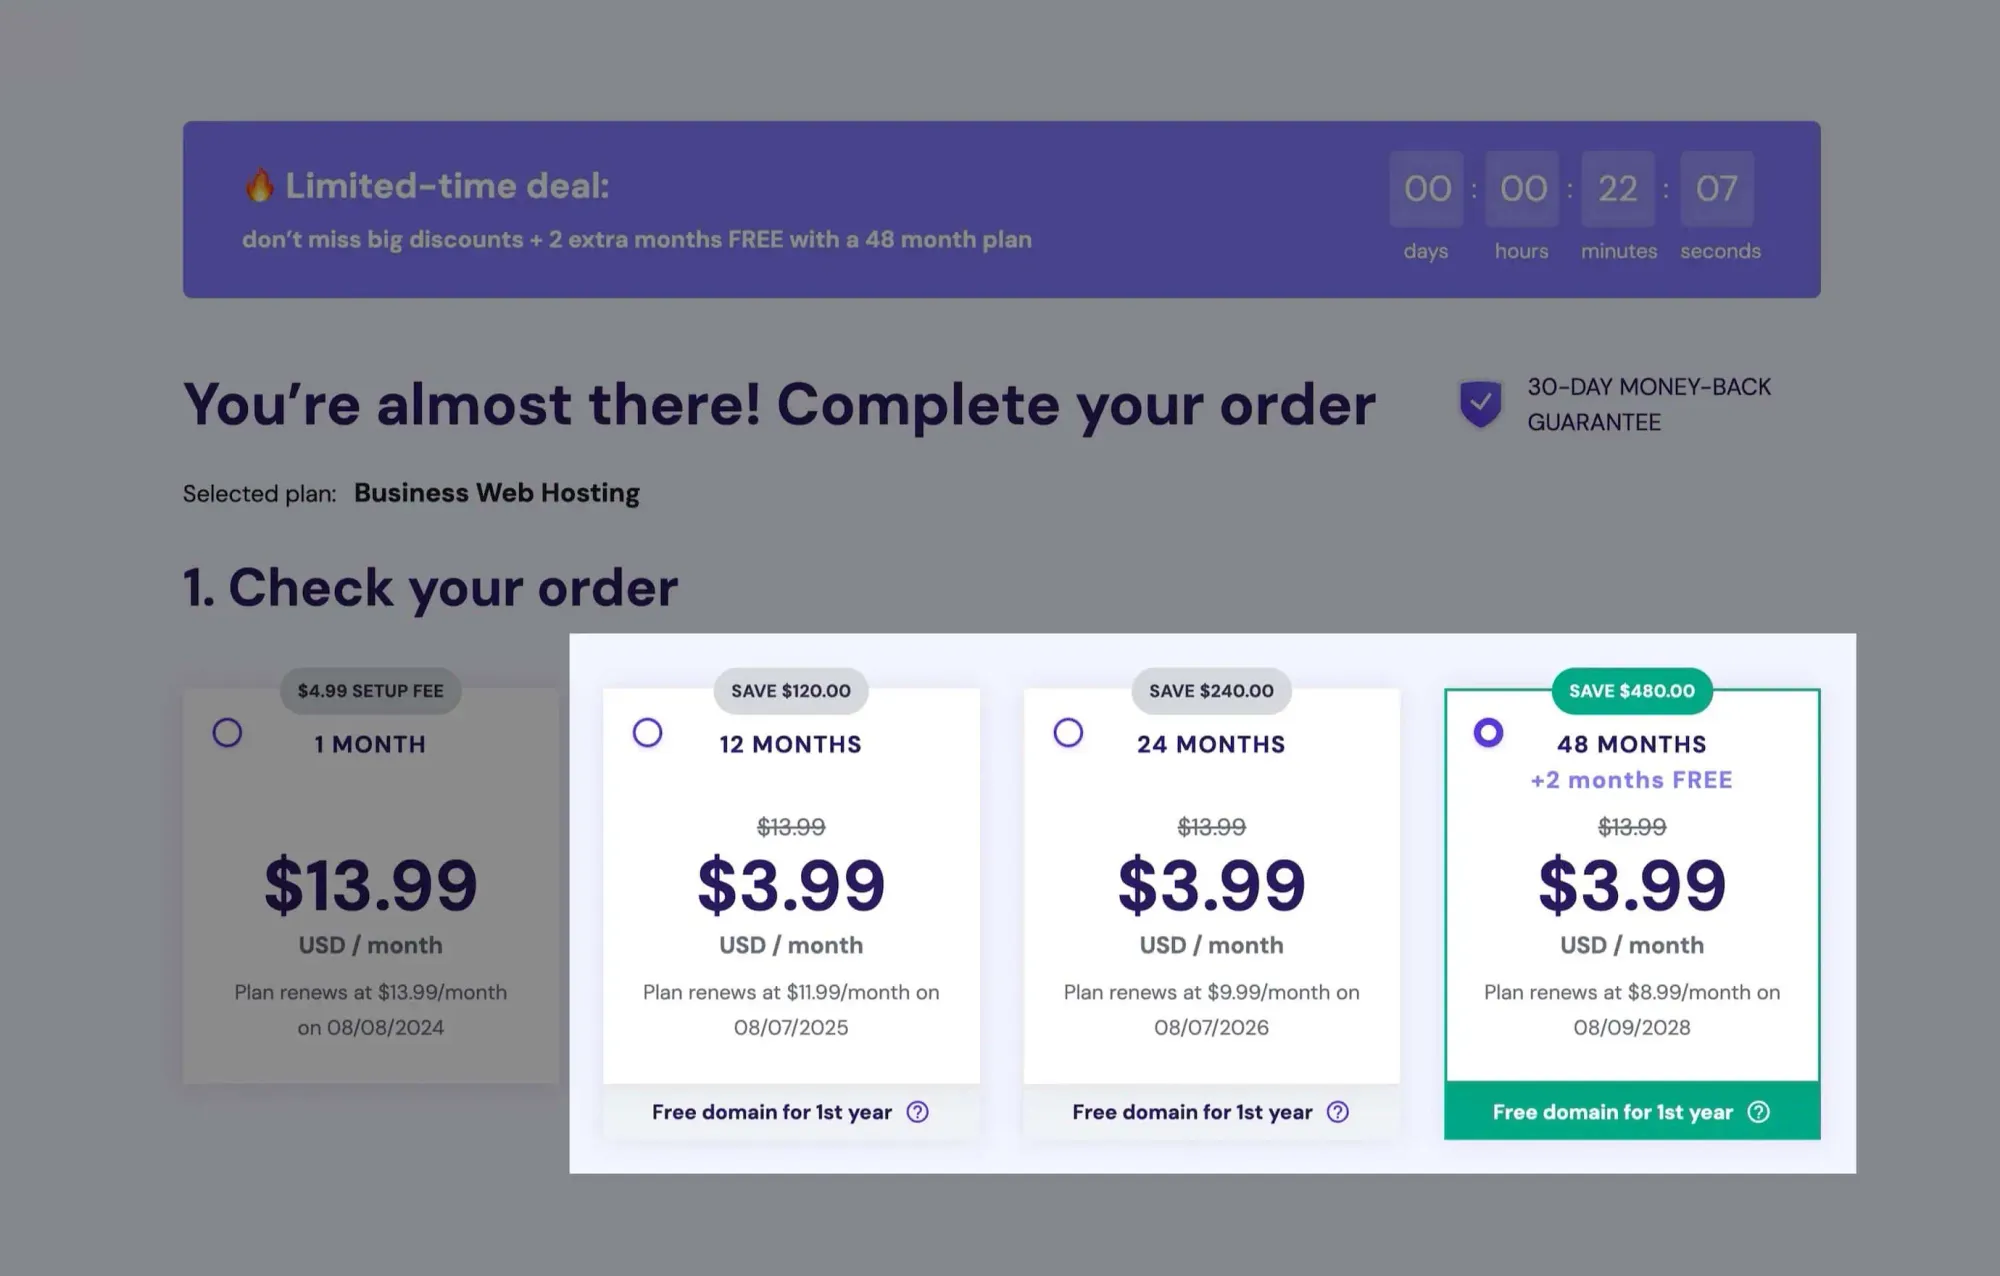
Interestingly, I'm seeing the same price for all options — 12, 24, and 48 months.
Usually, the longer plans offer better rates. If you're seeing the same, the main thing to consider is the renewal price:
Even if the initial prices differ, the differences usually mirror the renewal price differences.
Typically, the 12-month plan is pricier than the 24-month, which is slightly more than the 48-month plan.
I'd say go for the 24-month or 48-month plan. The monthly rates are similar — the main difference is how much you pay upfront.
Choose what works for you, fill out your account details, and place the order.
After ordering, you'll answer some first-time setup questions. This process can be a bit buggy — I had some errors.
But don't worry if you experience this — just follow my detailed guide below.
First question: hit Skip.

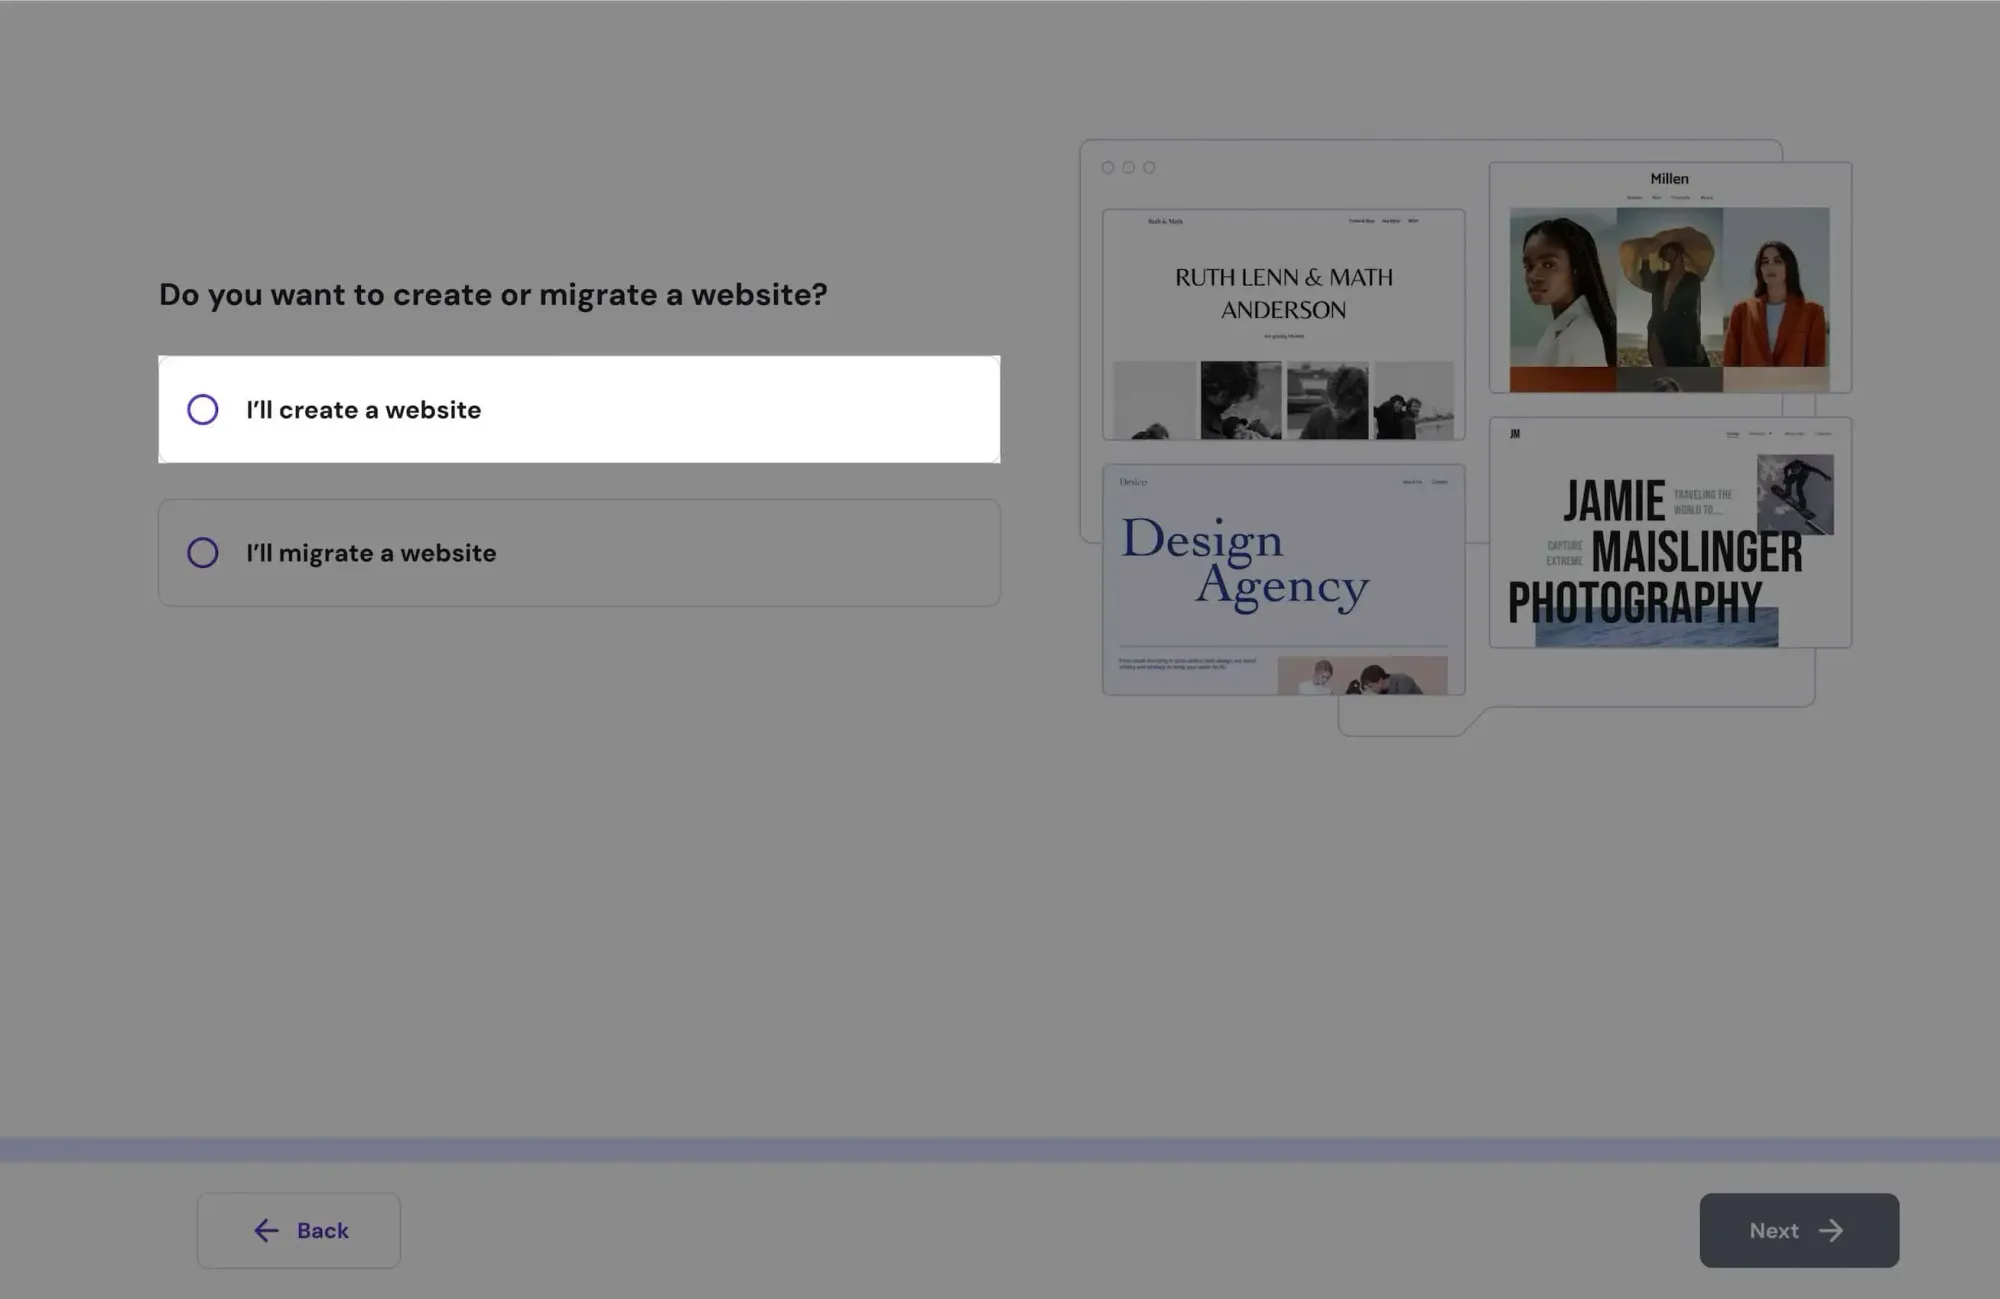
Next, choose I'll create a website then click Next:
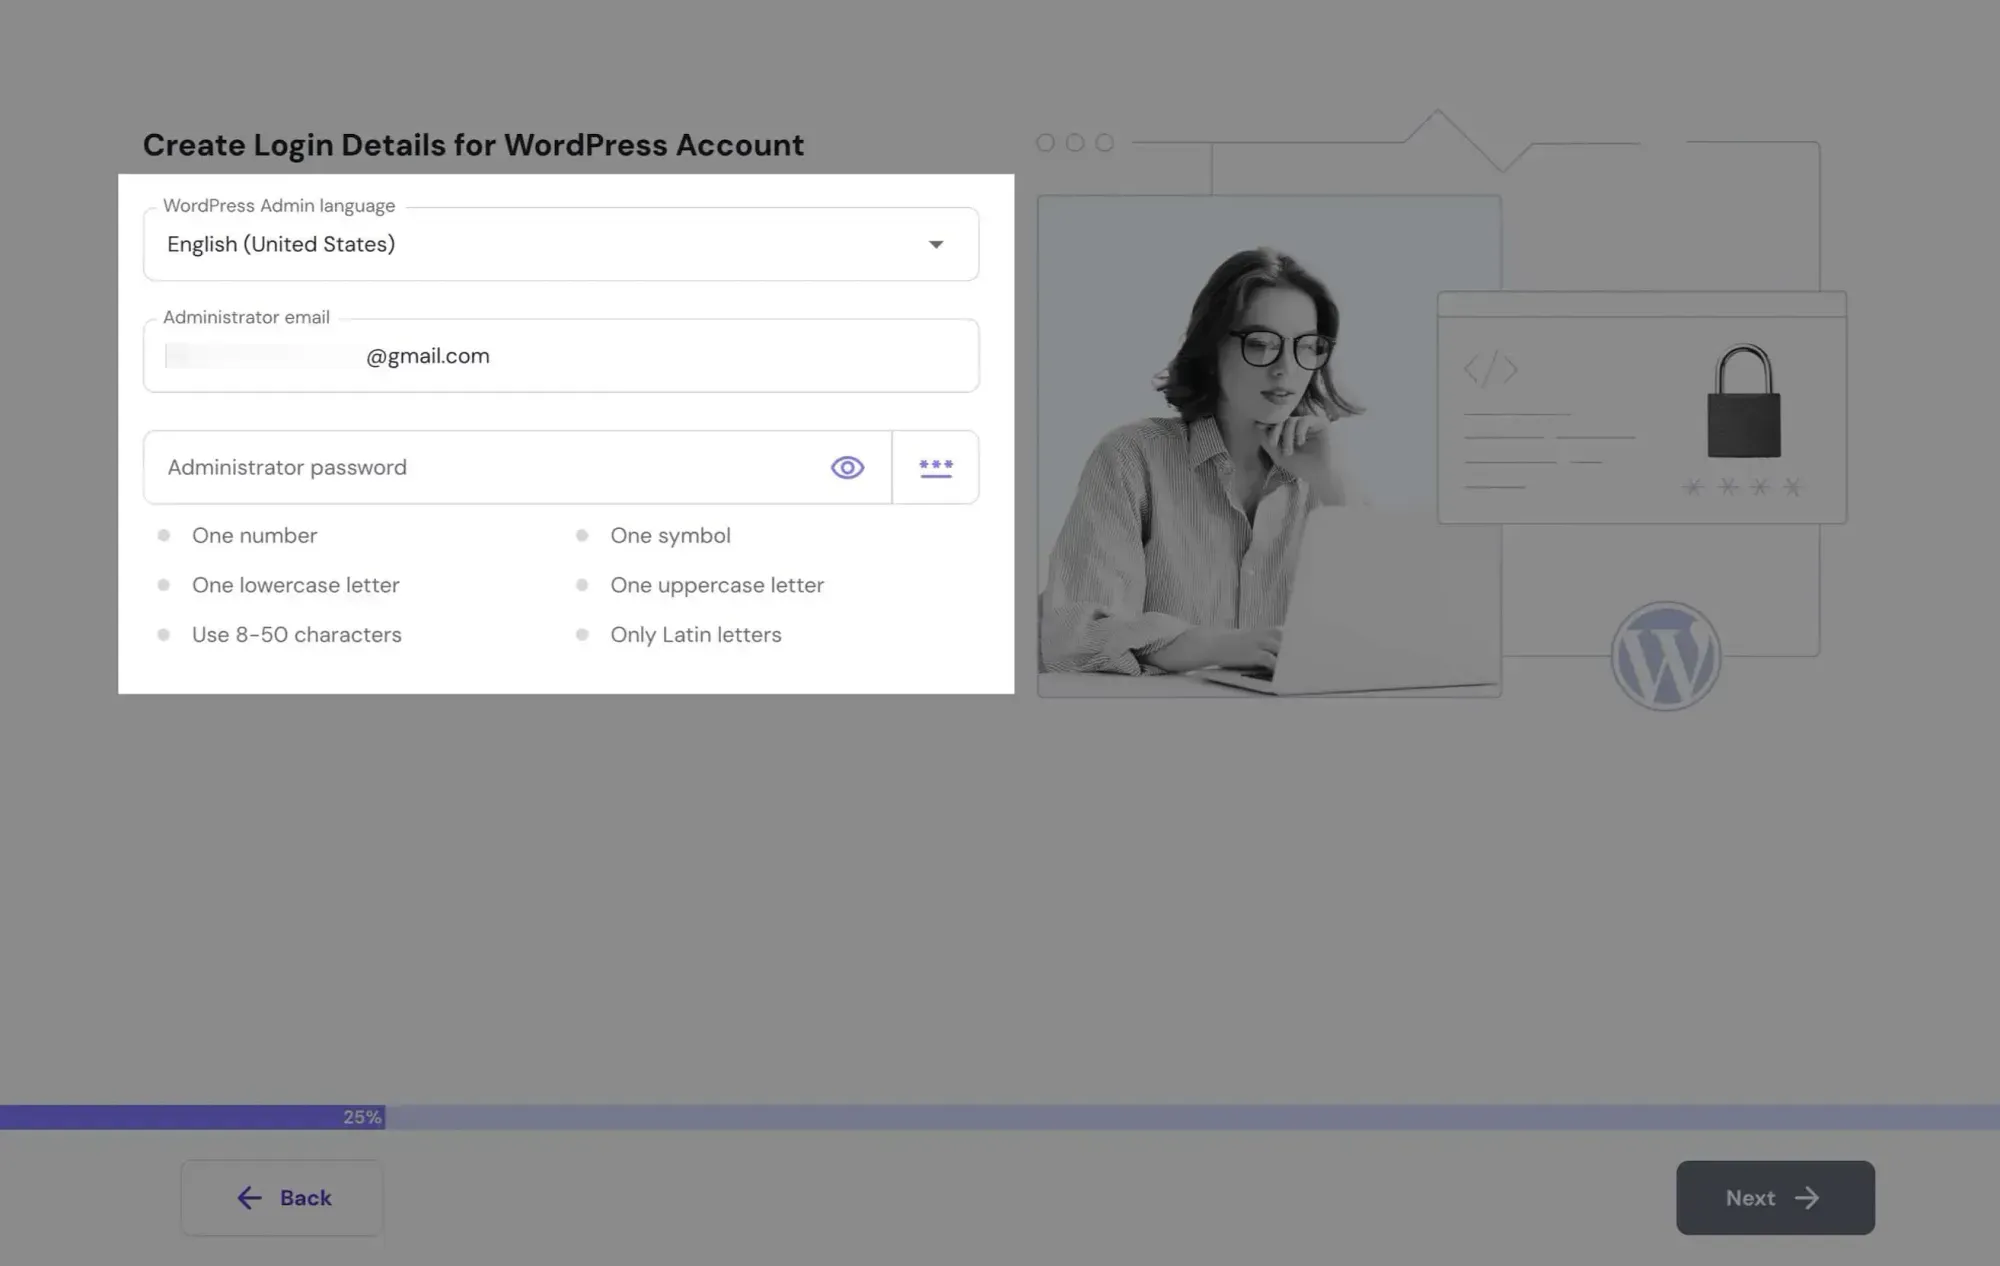
Now, set up your WordPress login details. You'll use these to access your WordPress admin dashboard. Click Next when done:
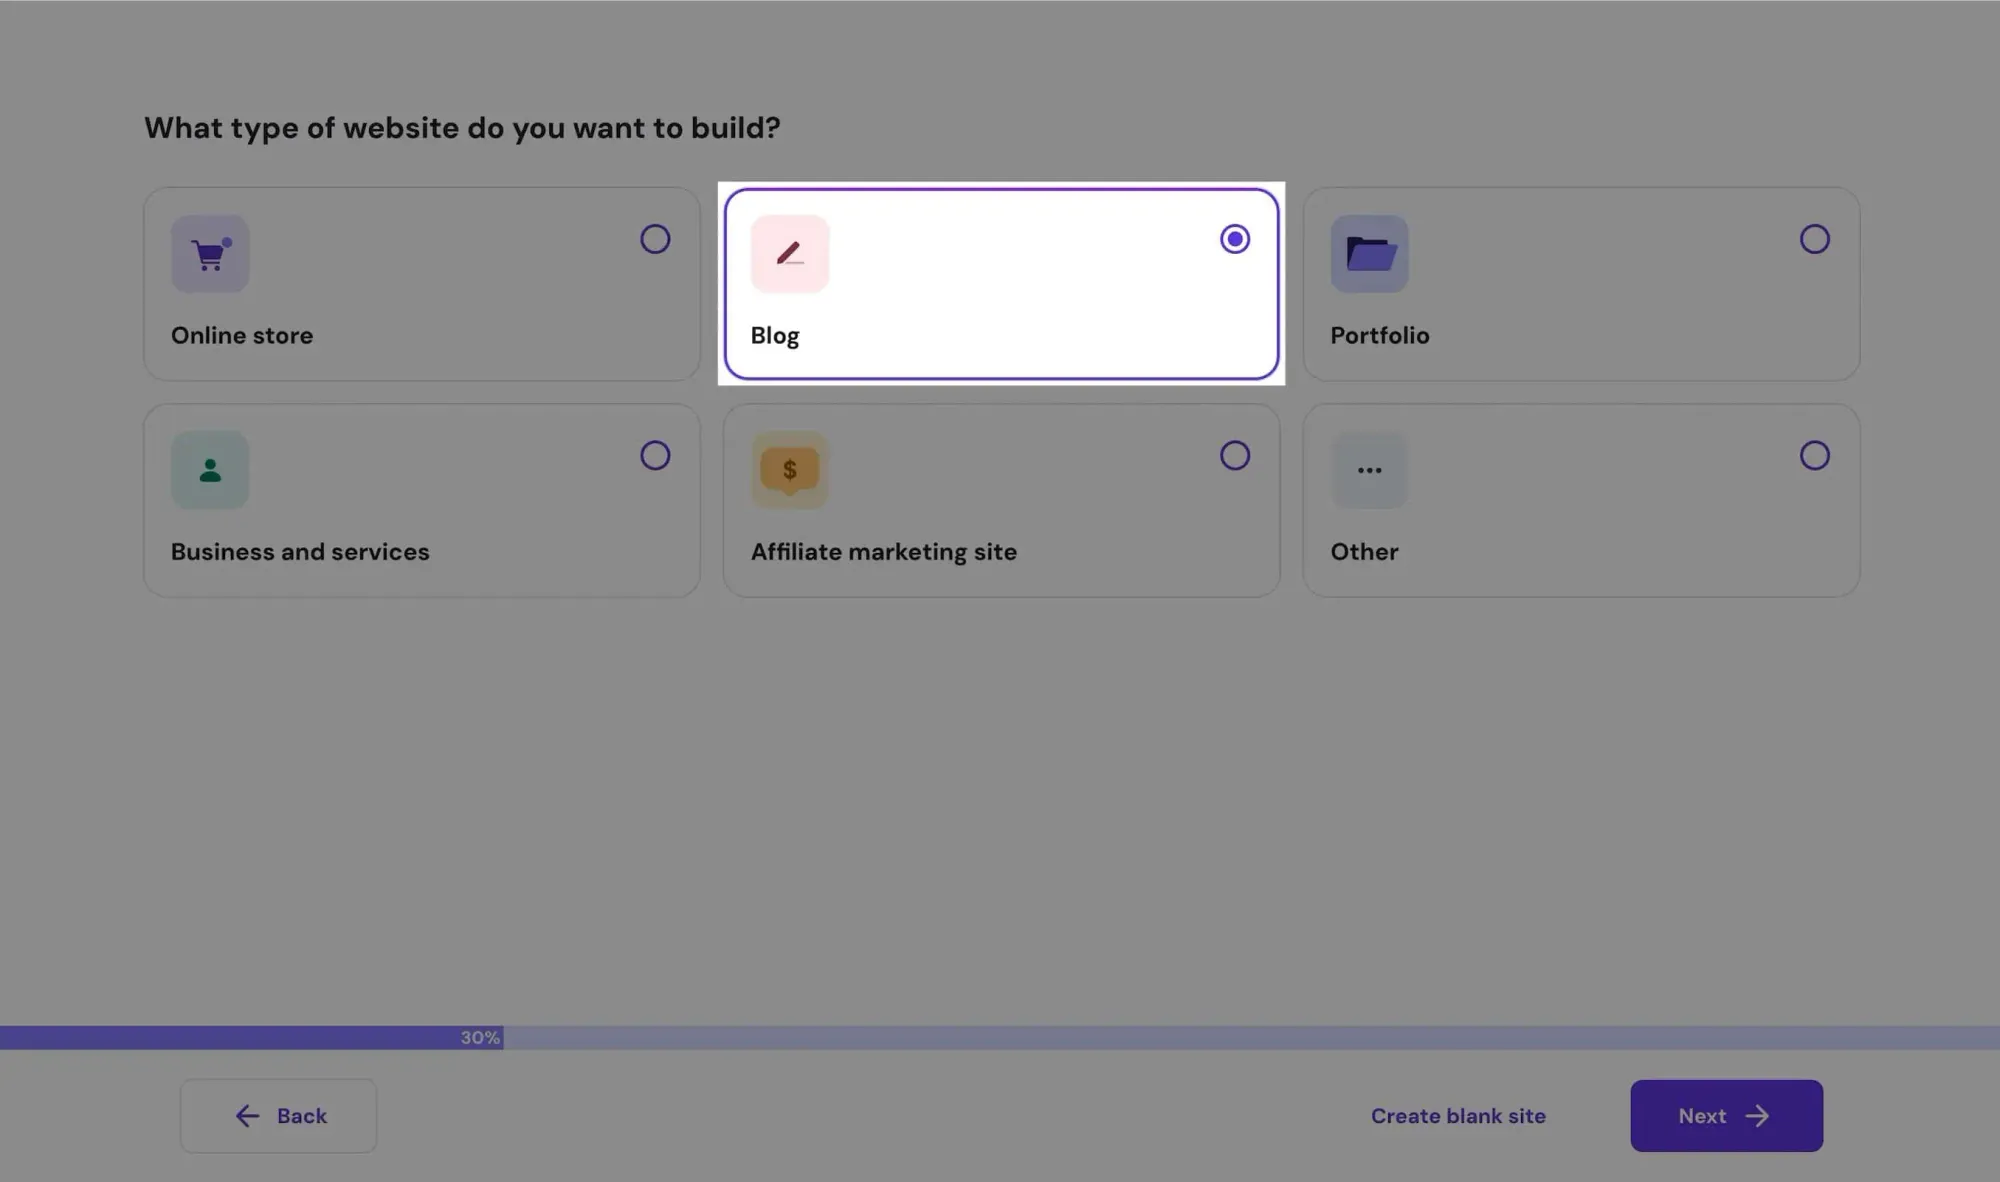
Choose your website type (it can be anything) and click Next:
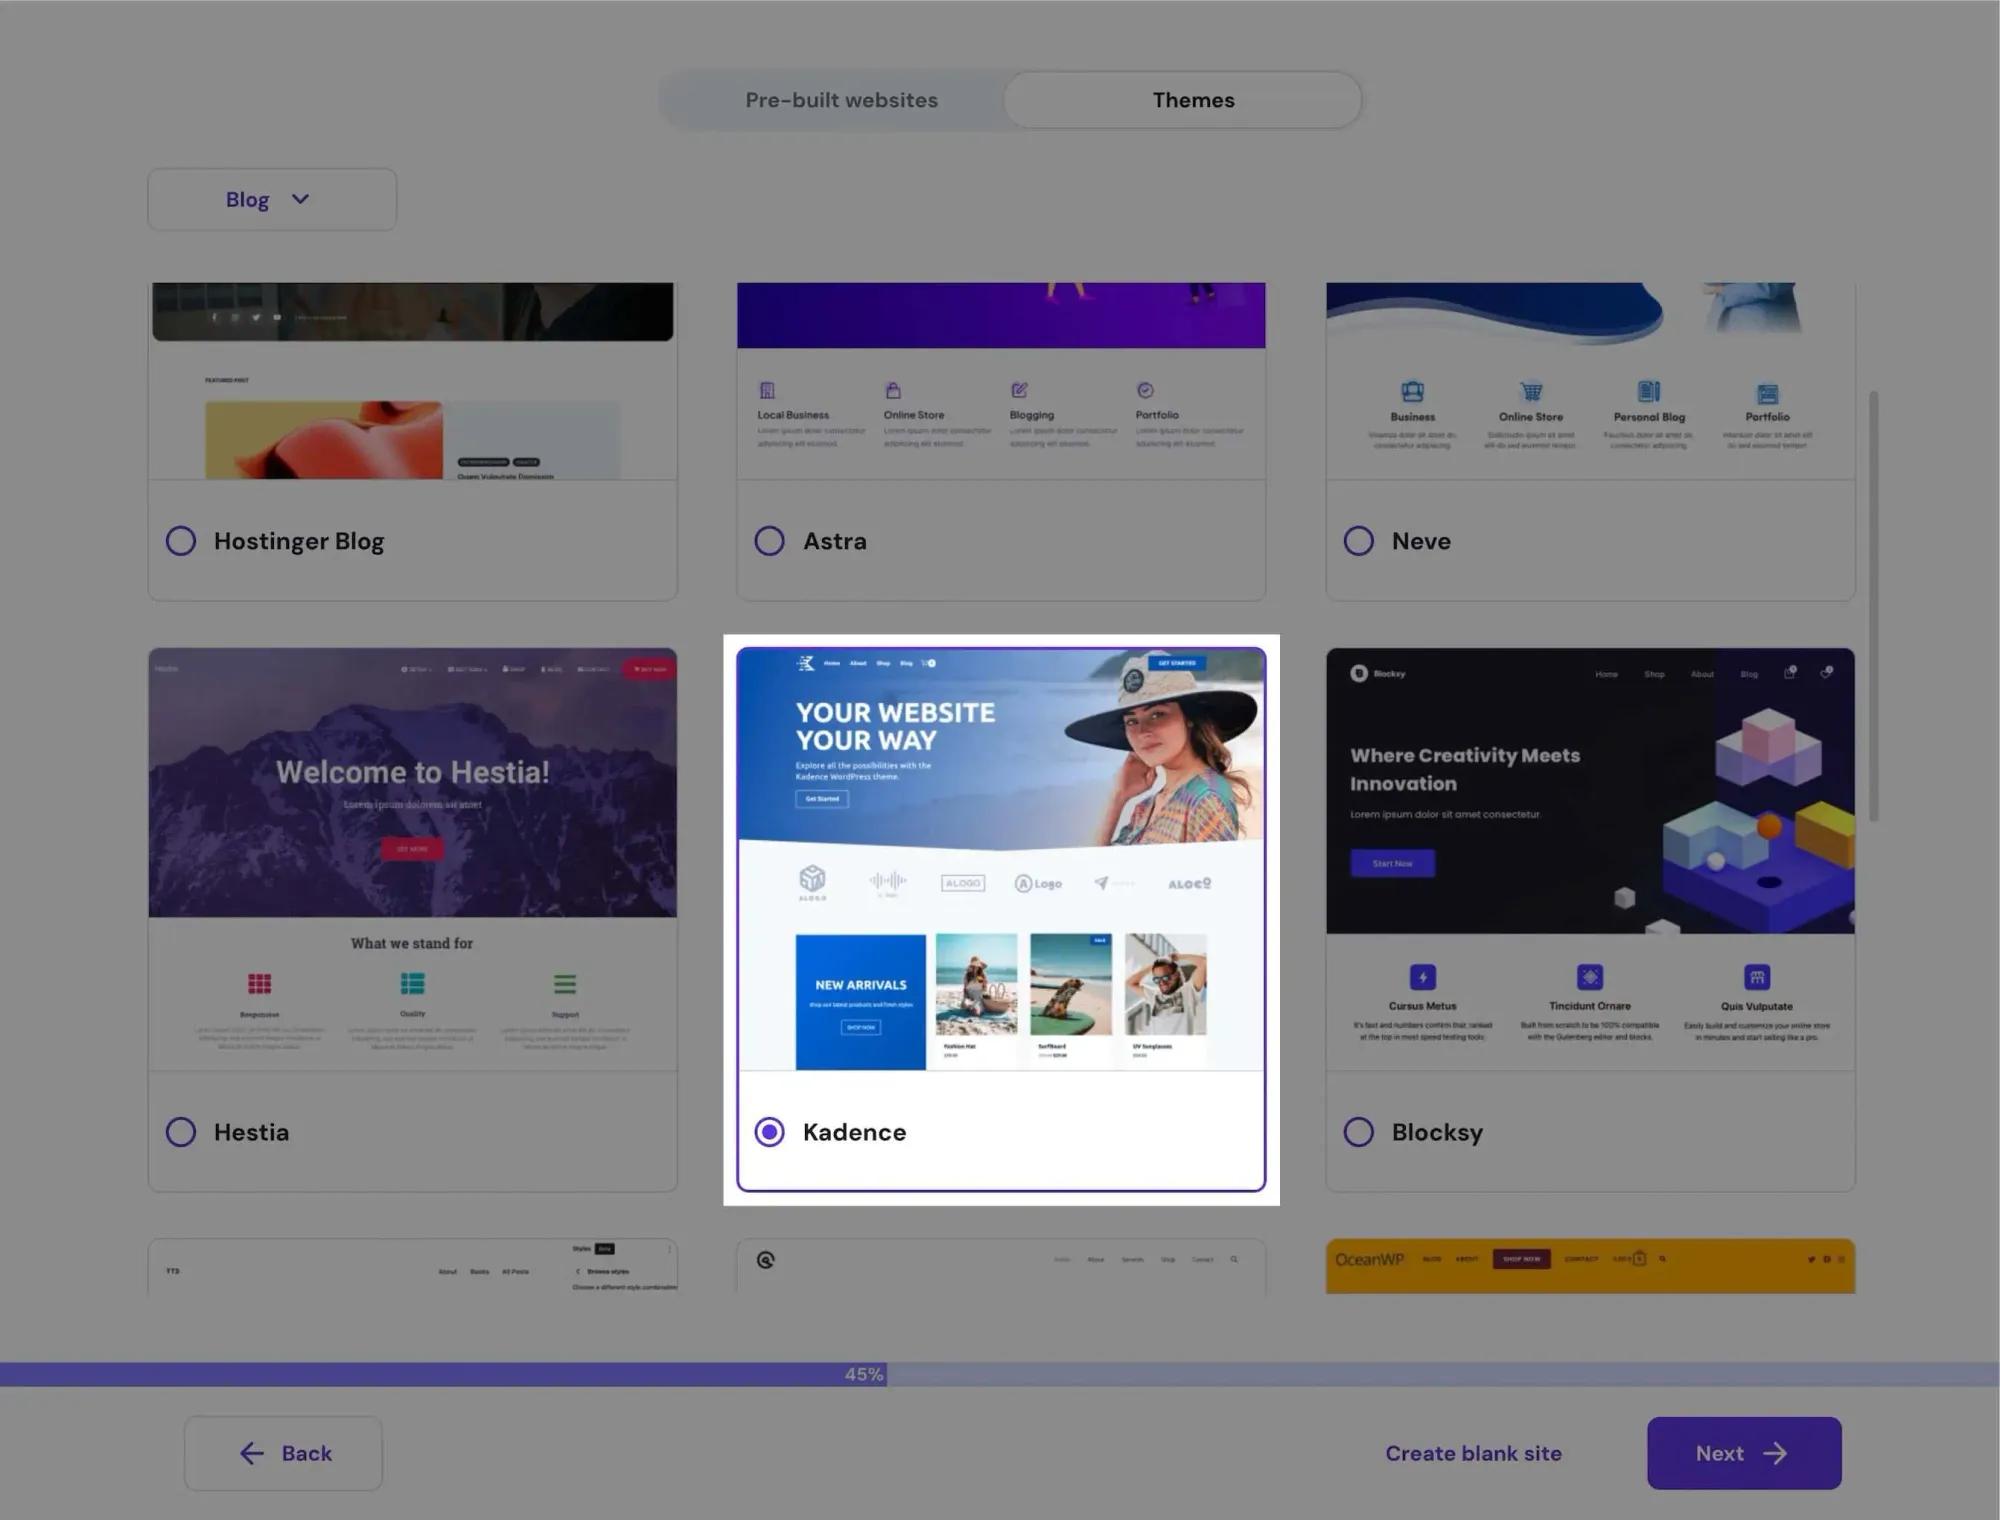
Select a theme for your WordPress installation. I'm familiar with Kadence, so I'll use that in this guide, but feel free to choose any theme you like.
When asked to add plugins, click Skip:
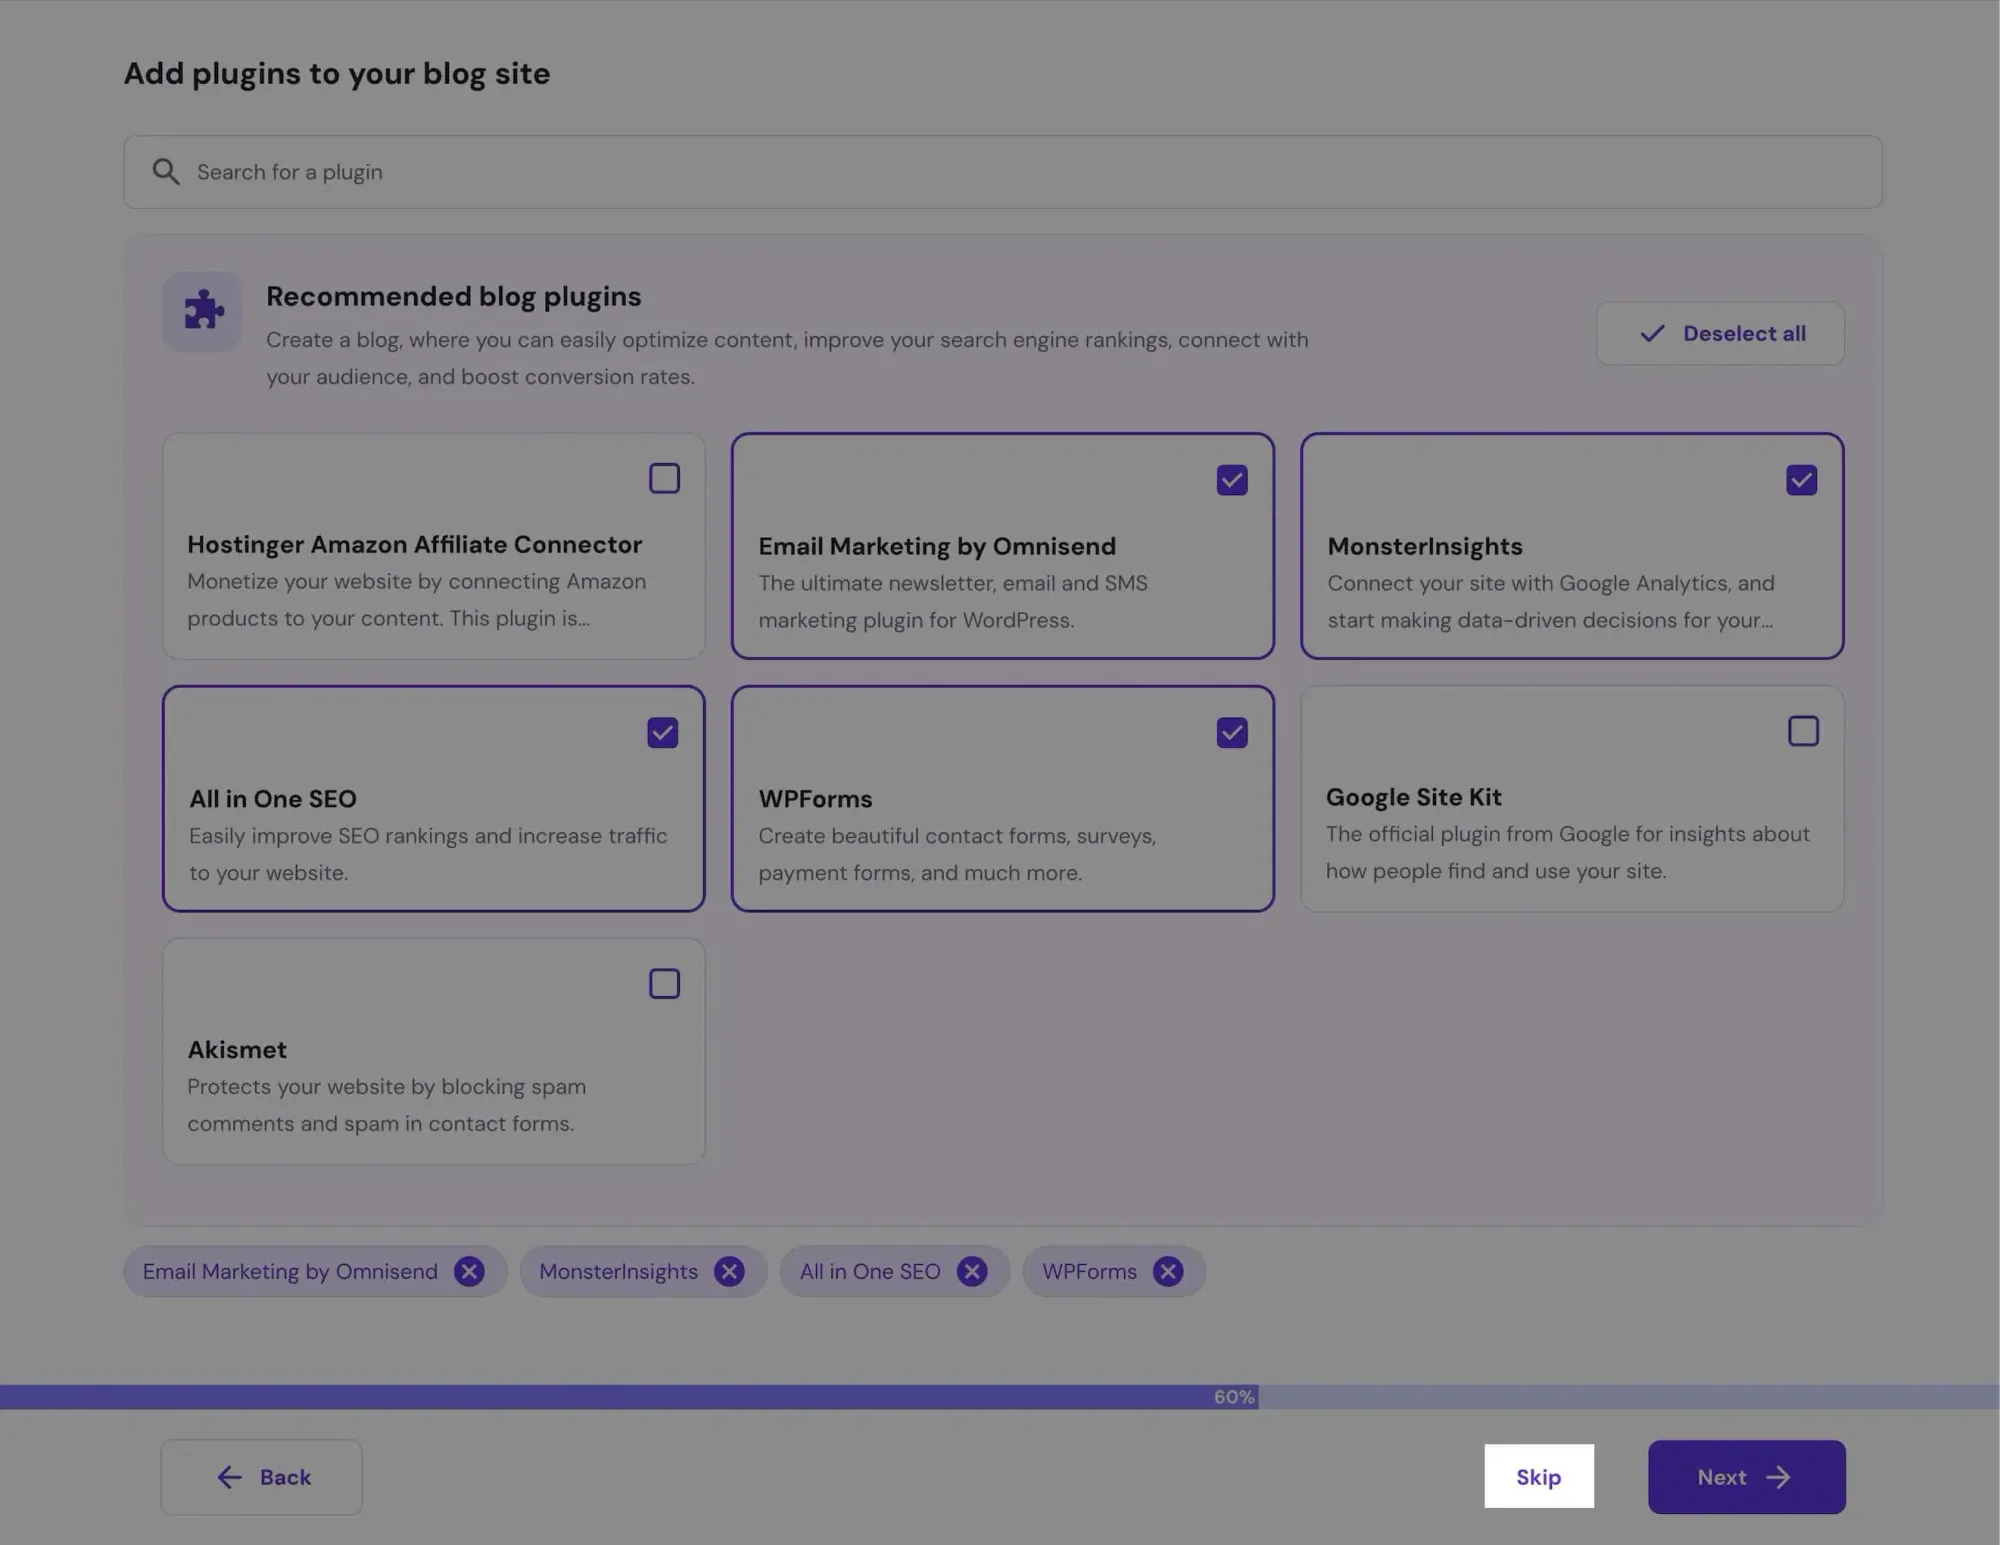
Skip the brand name setup too. We'll handle that later in the dashboard.

Next, enter your domain name:
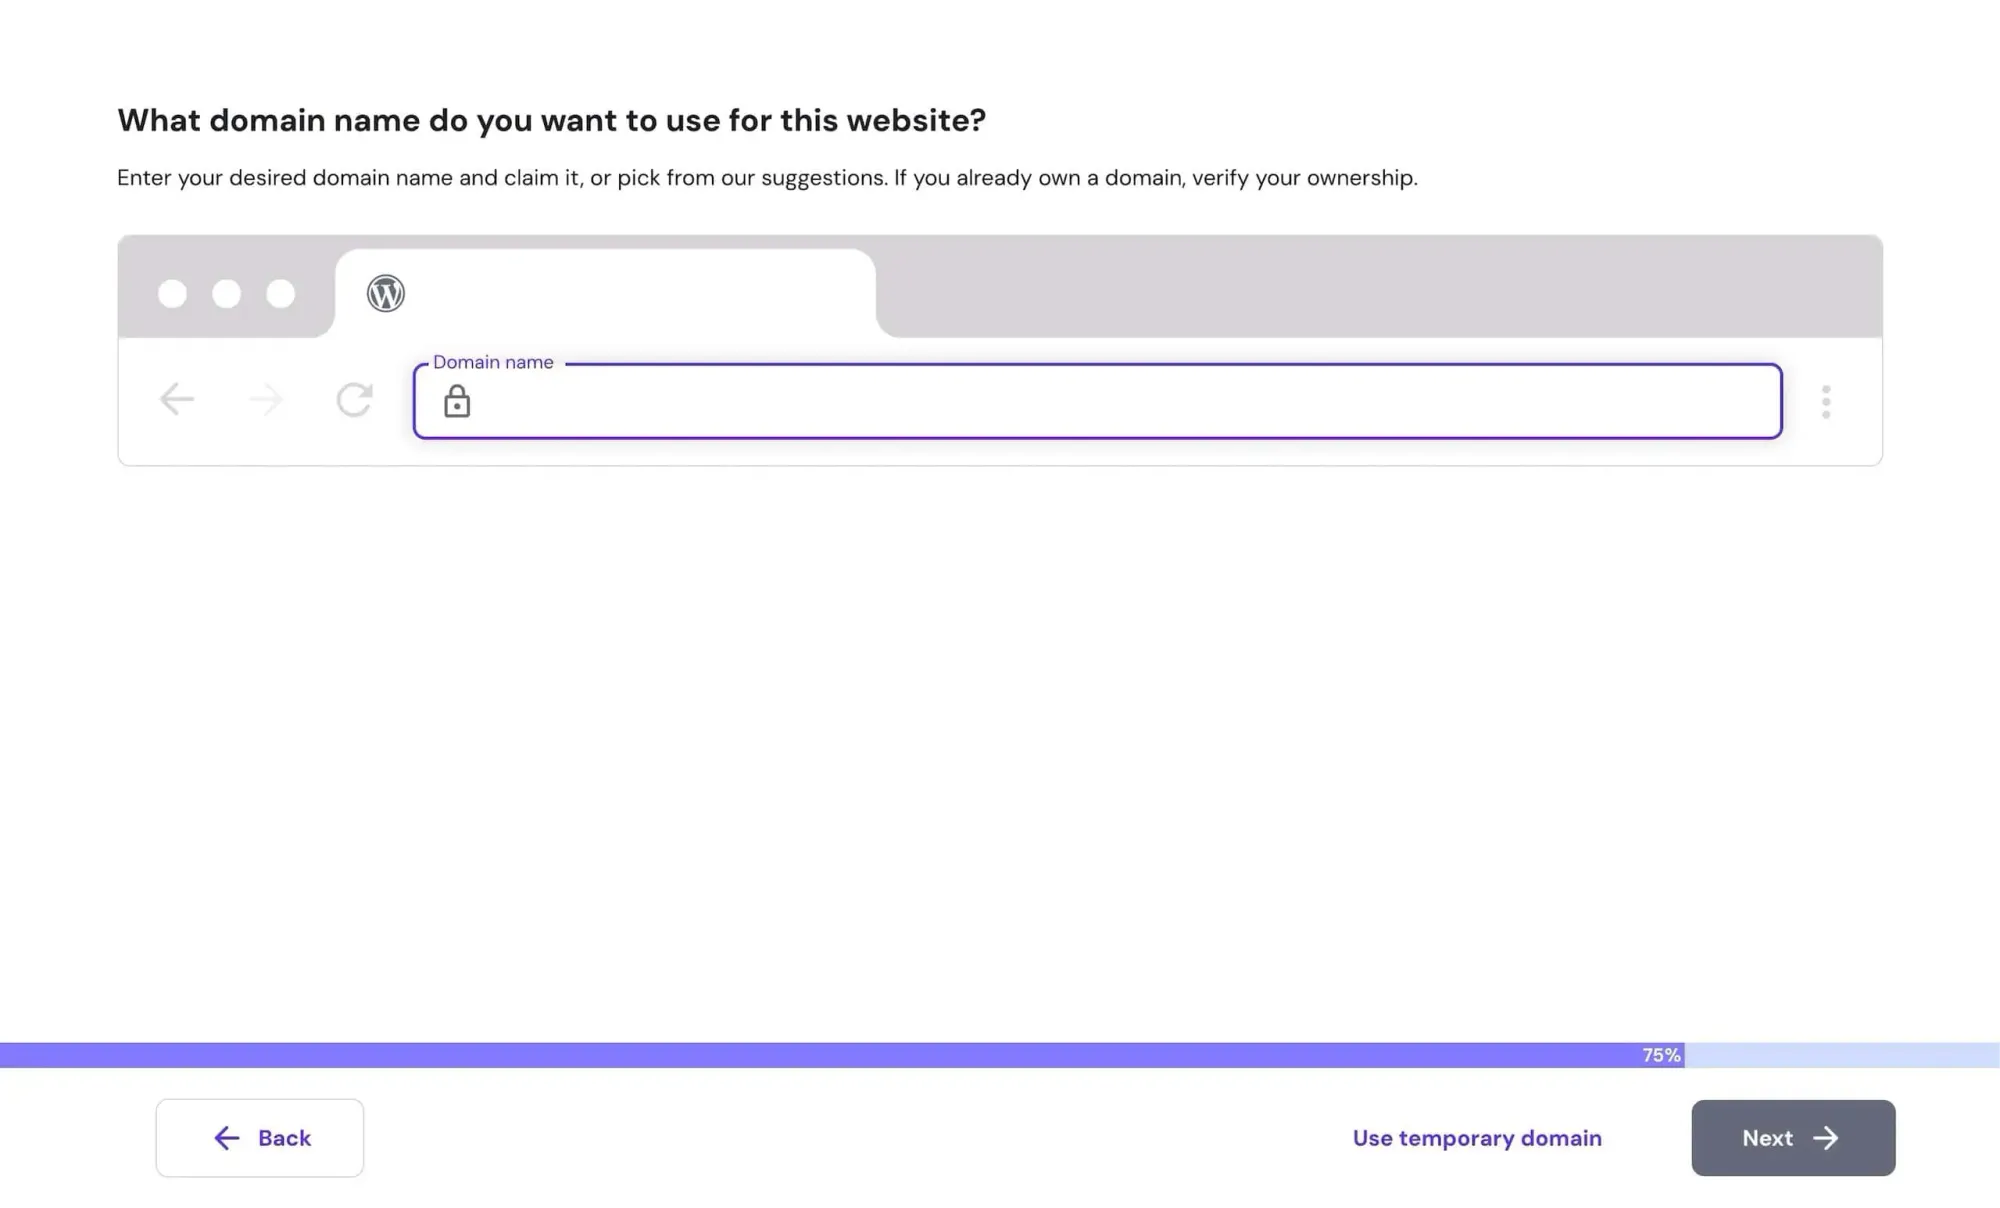
If you get an error like this after the setup in Hpanel:
Go back and choose Use temporary domain. We'll connect the real domain later.

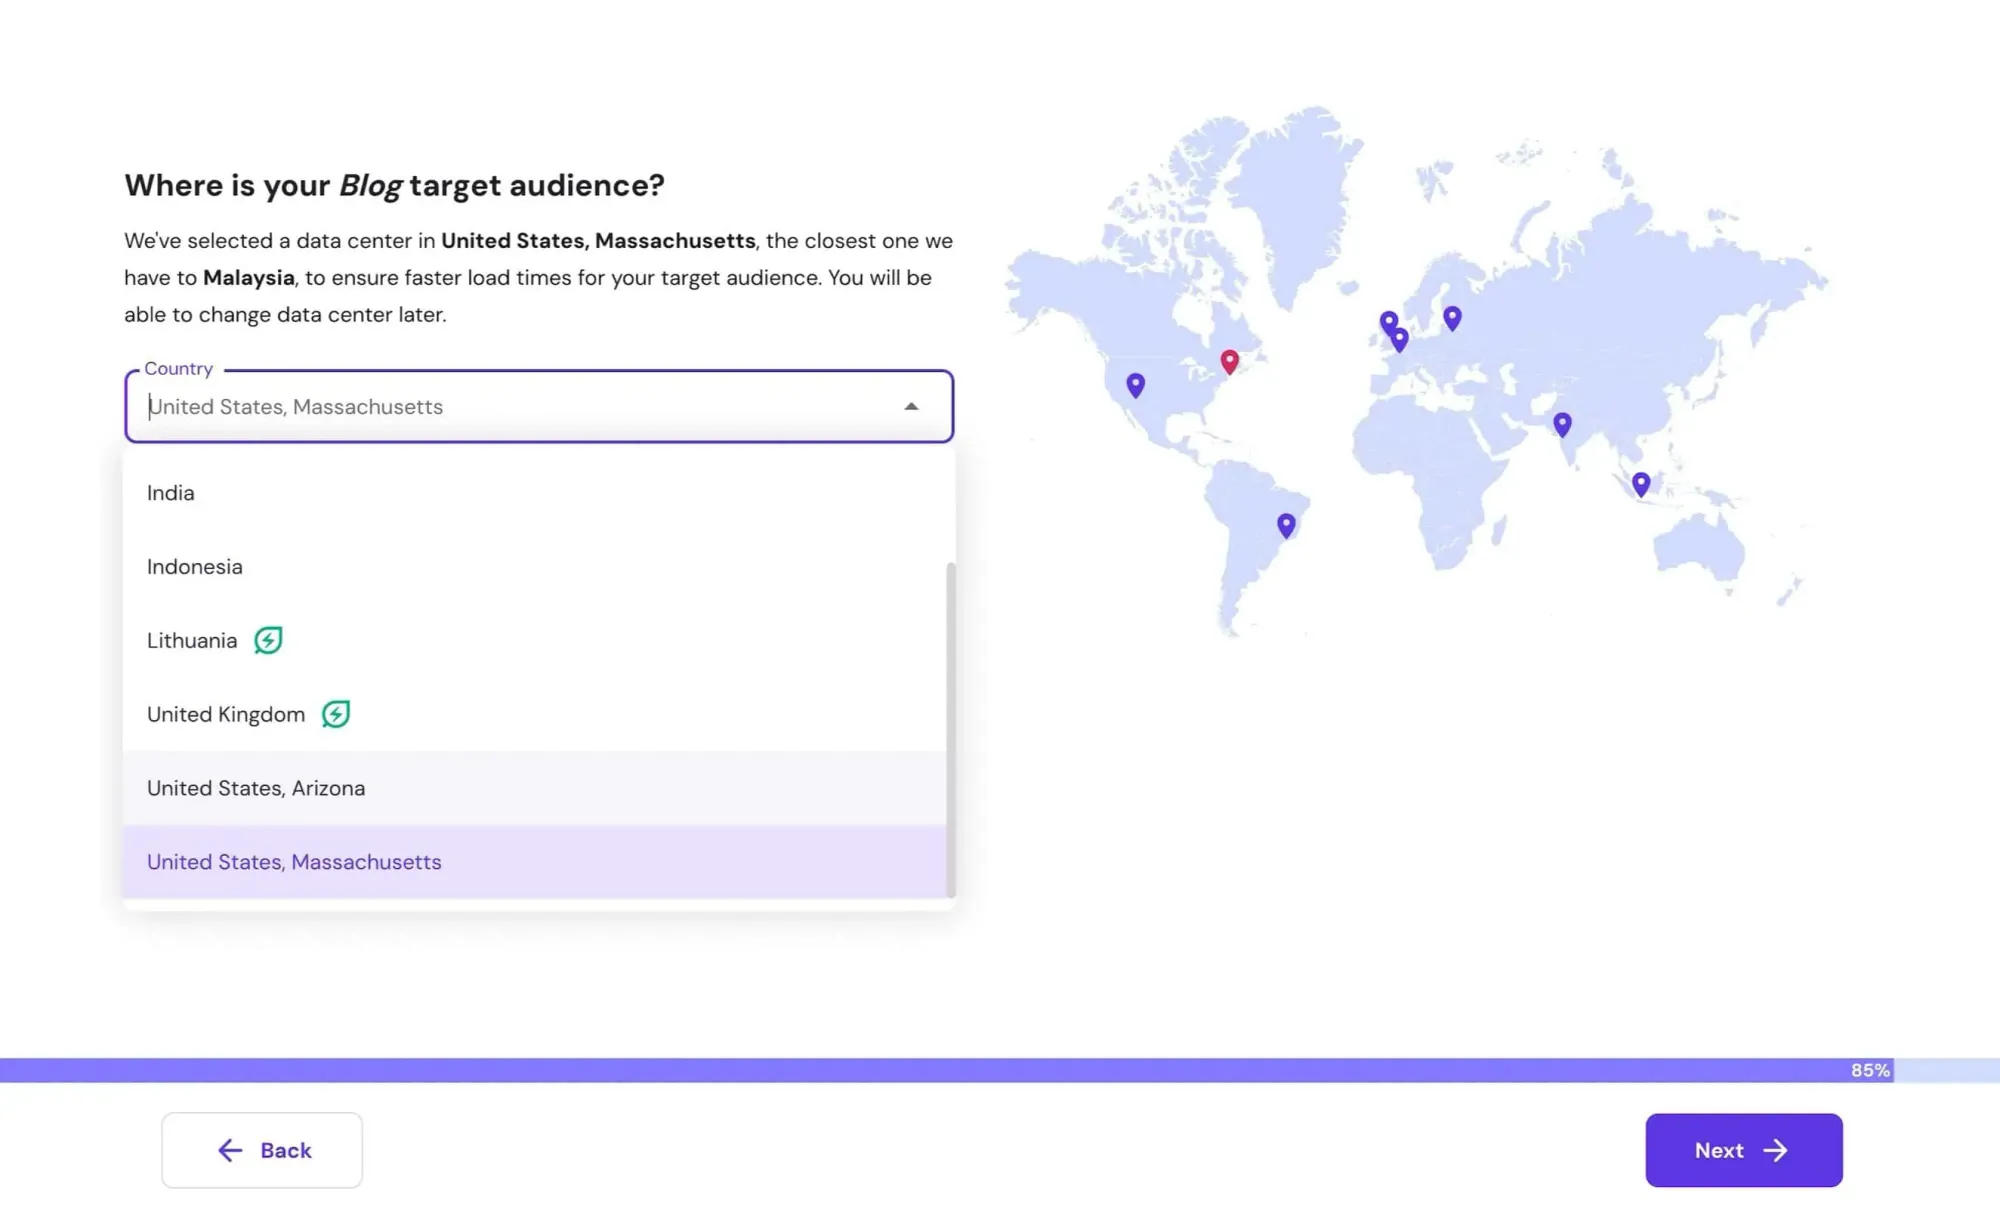
Select a data center closest to your target audience, then click Next.
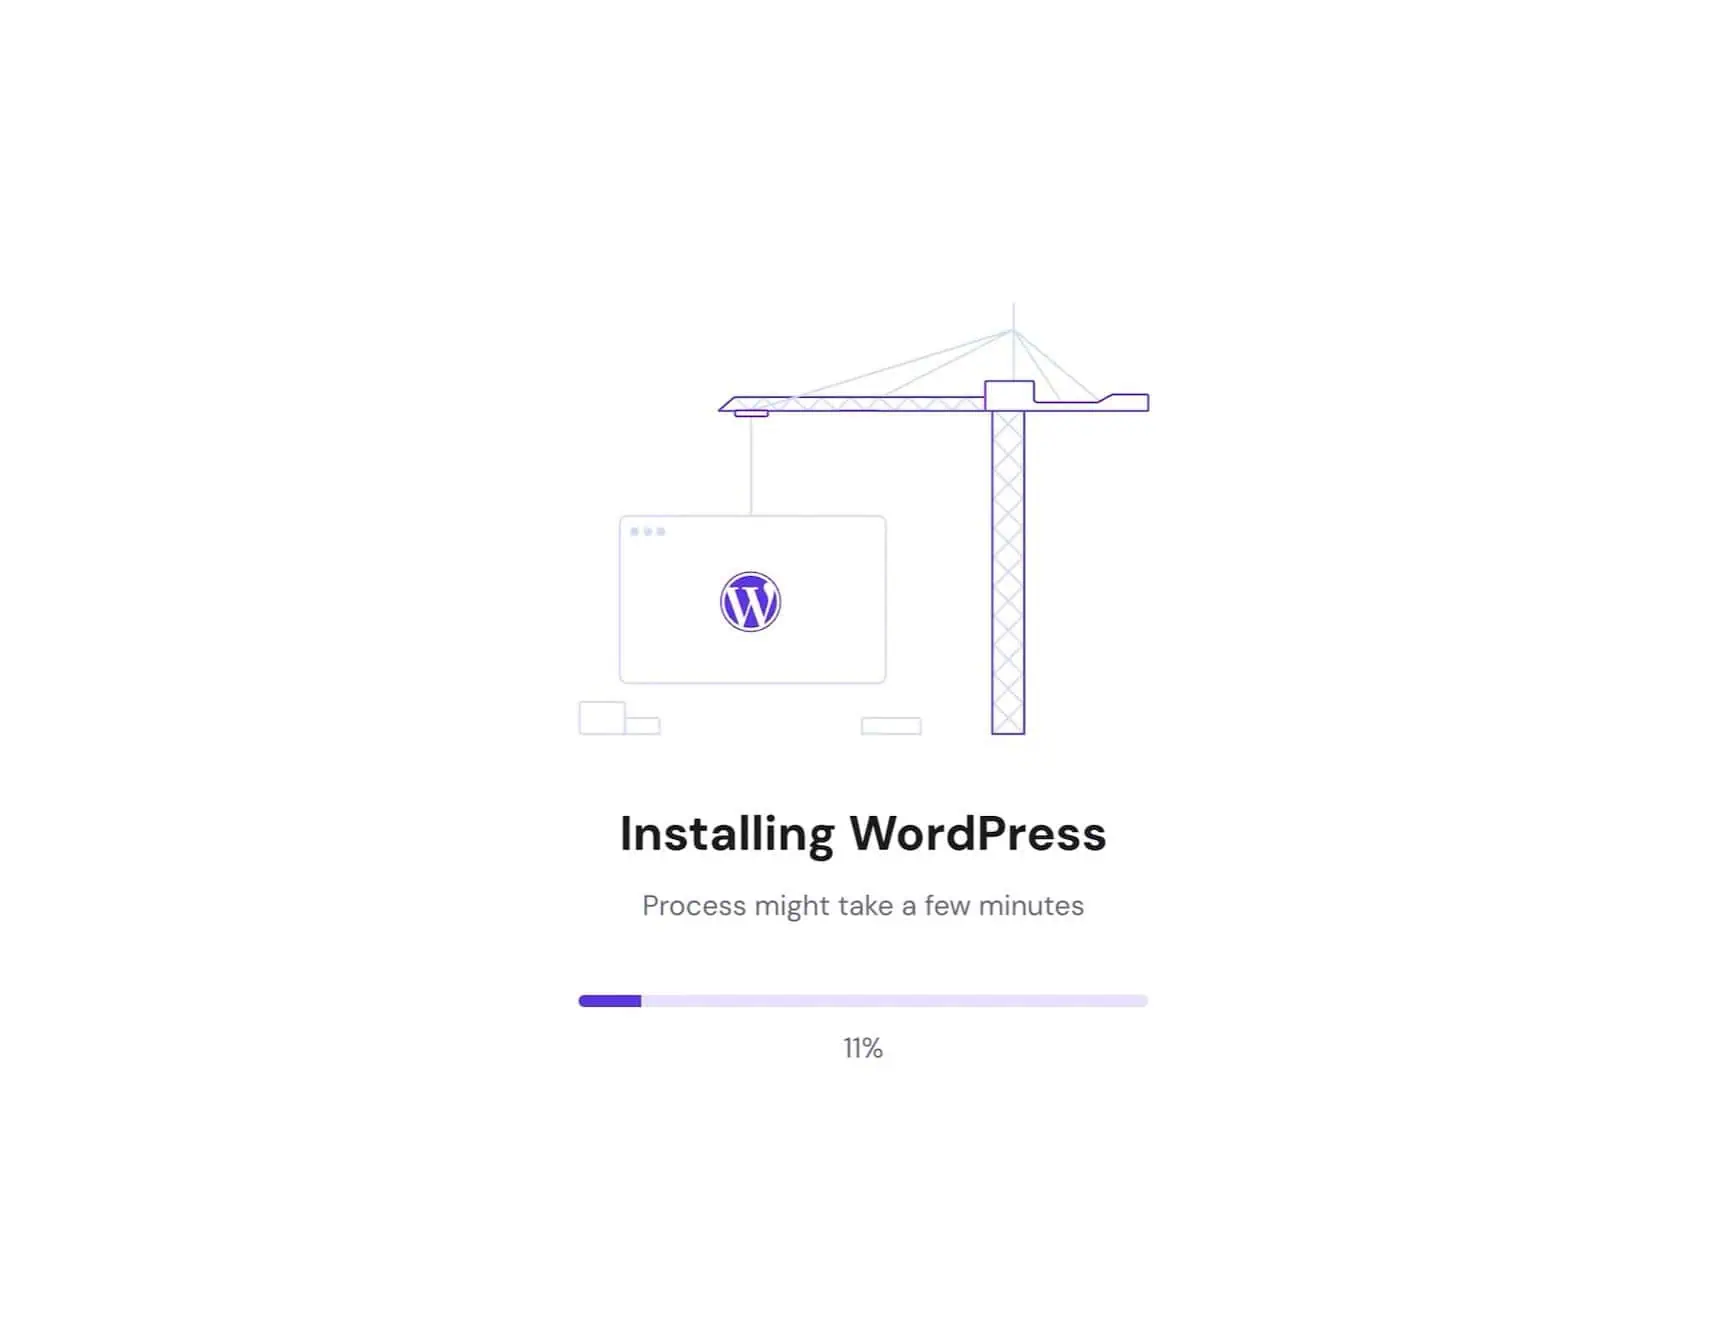
Wait for WordPress to install:
Once done, you'll land on the Hpanel dashboard.
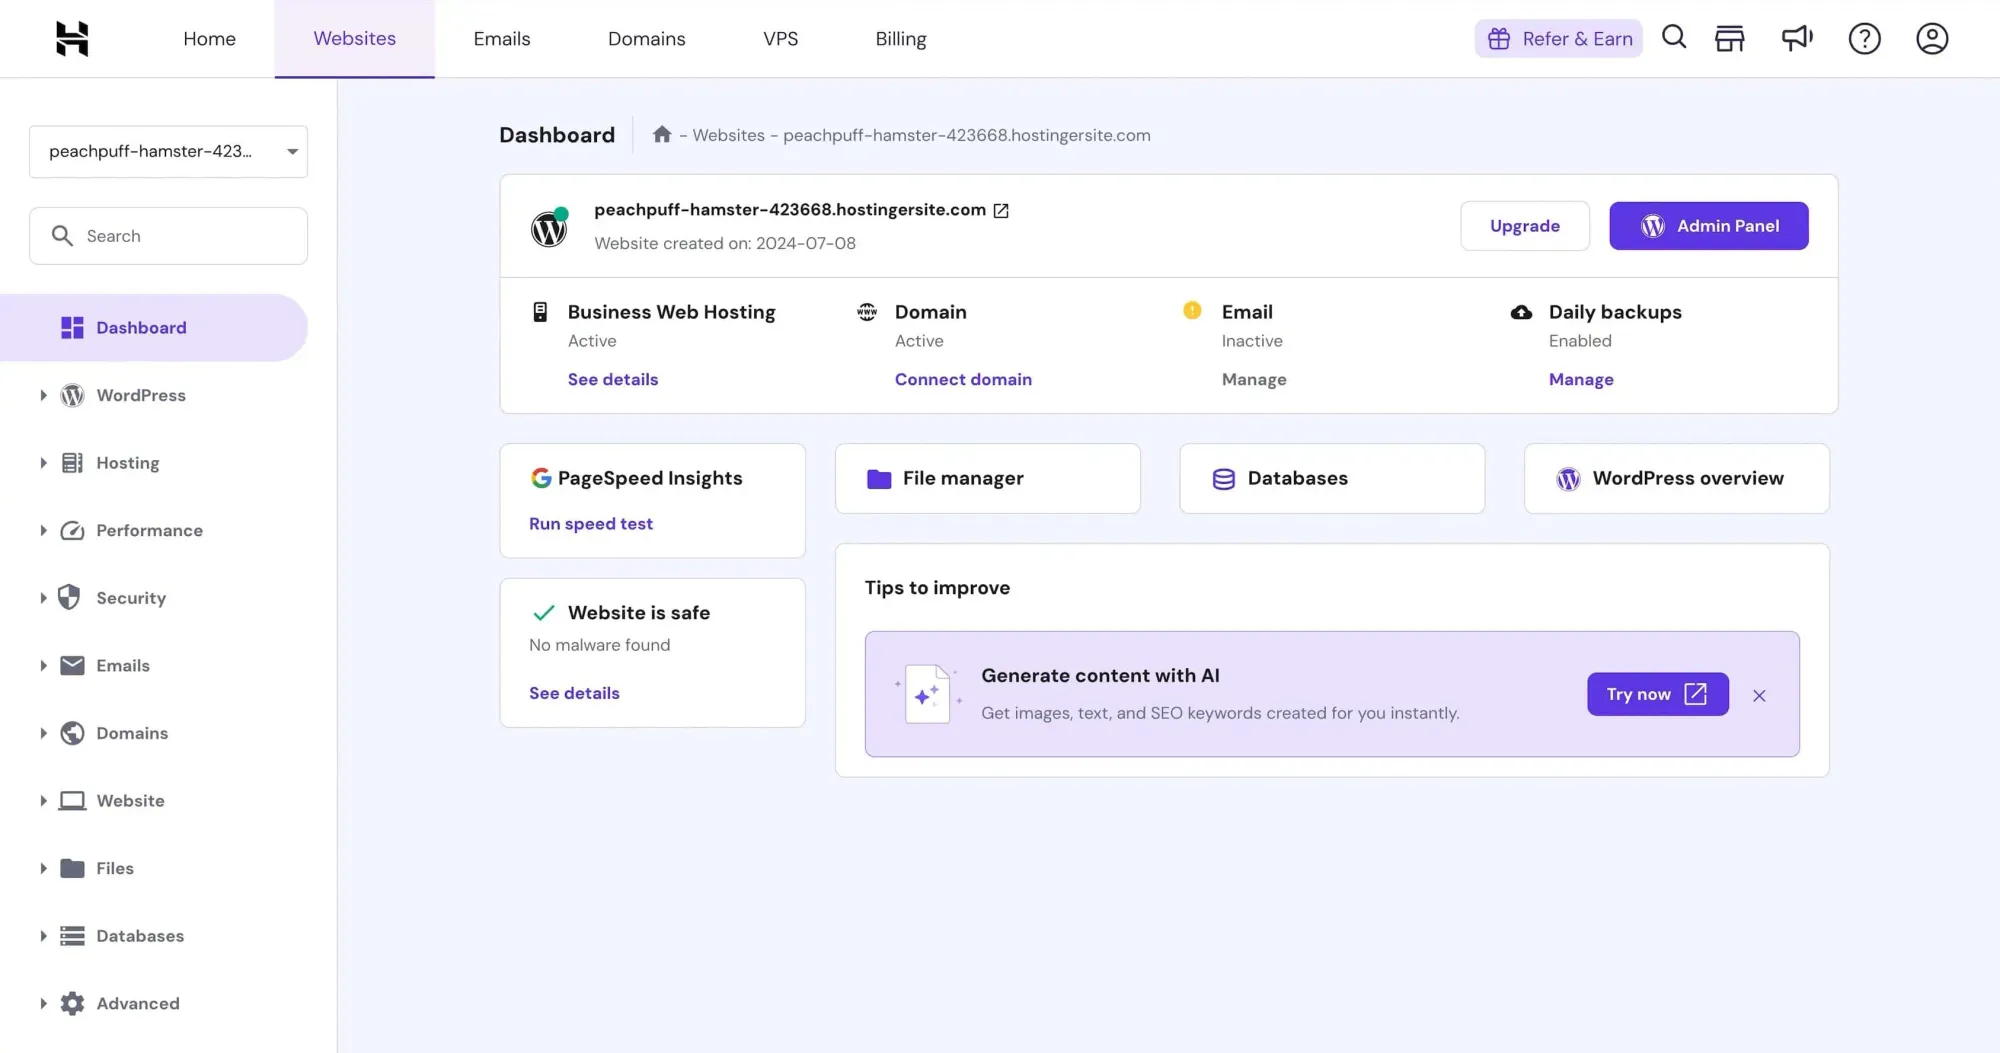
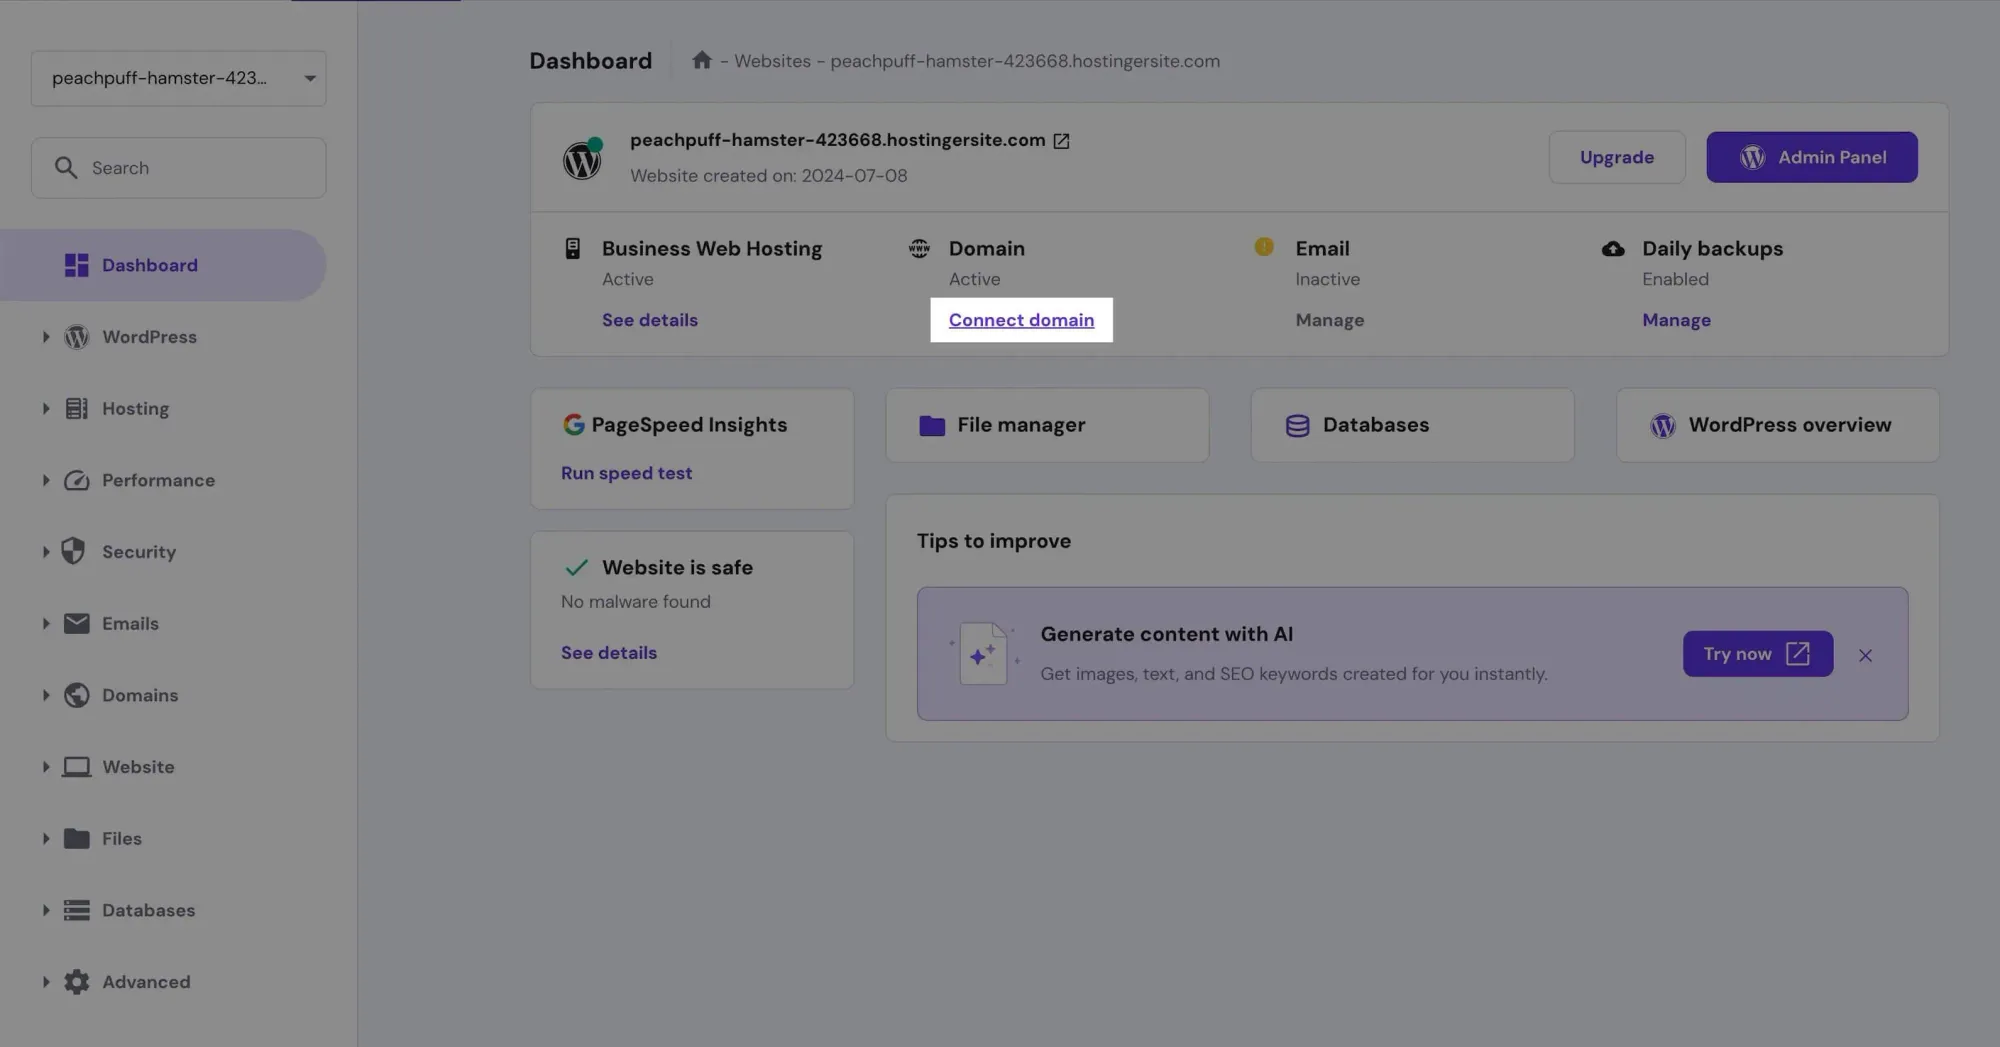
Connecting Your Domain
After landing on the Hpanel dashboard, it's time to connect your domain.
Under Hosting, go to Plan details and copy one of the nameservers:

If you've been following along, you should've purchased a domain from Namecheap. If not, do it here:
Find a domain starting at $0.99
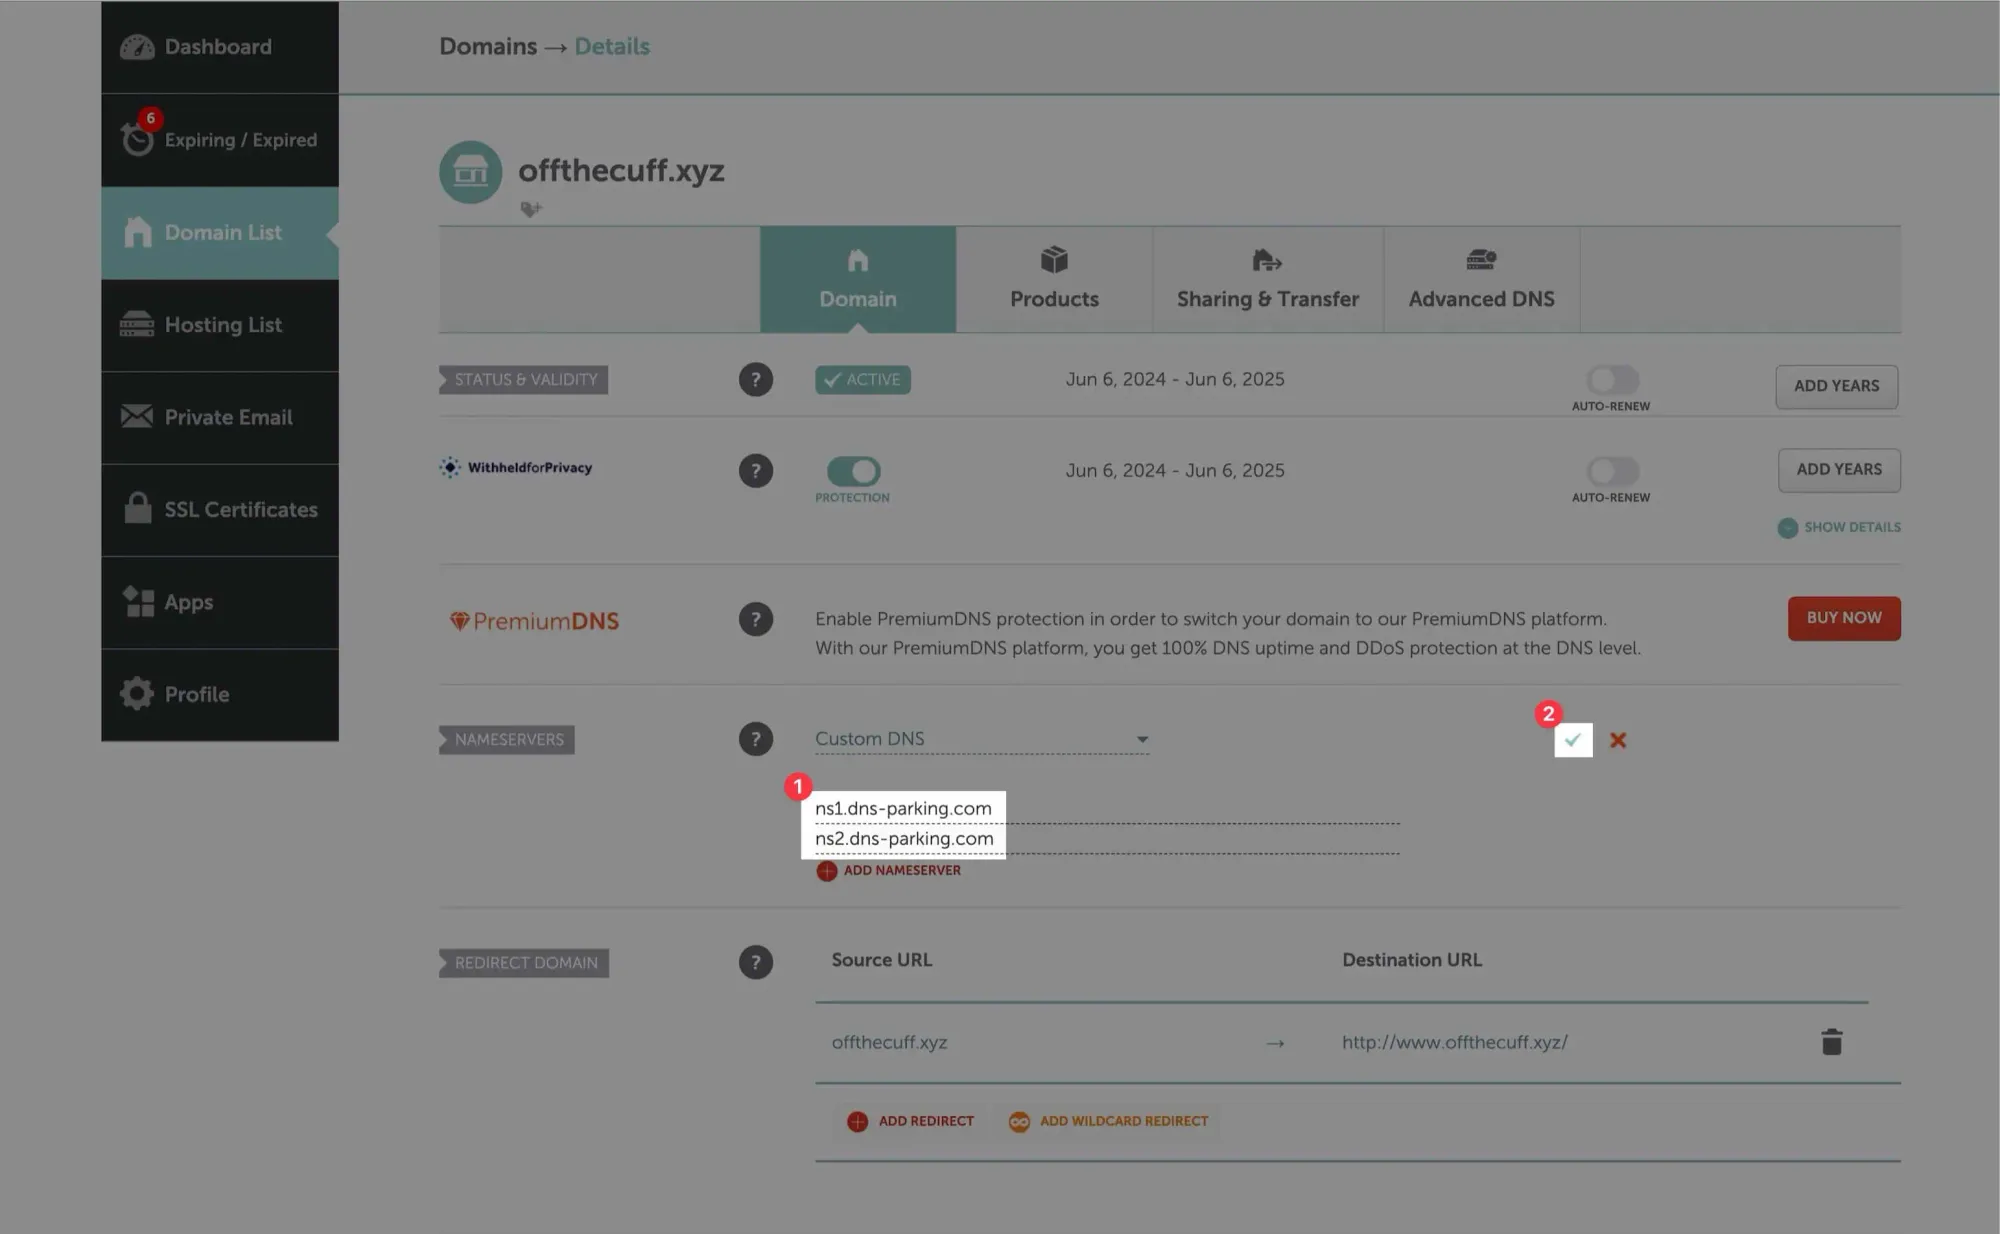
On Namecheap, click Manage next to your domain, then change the nameservers to Custom DNS:
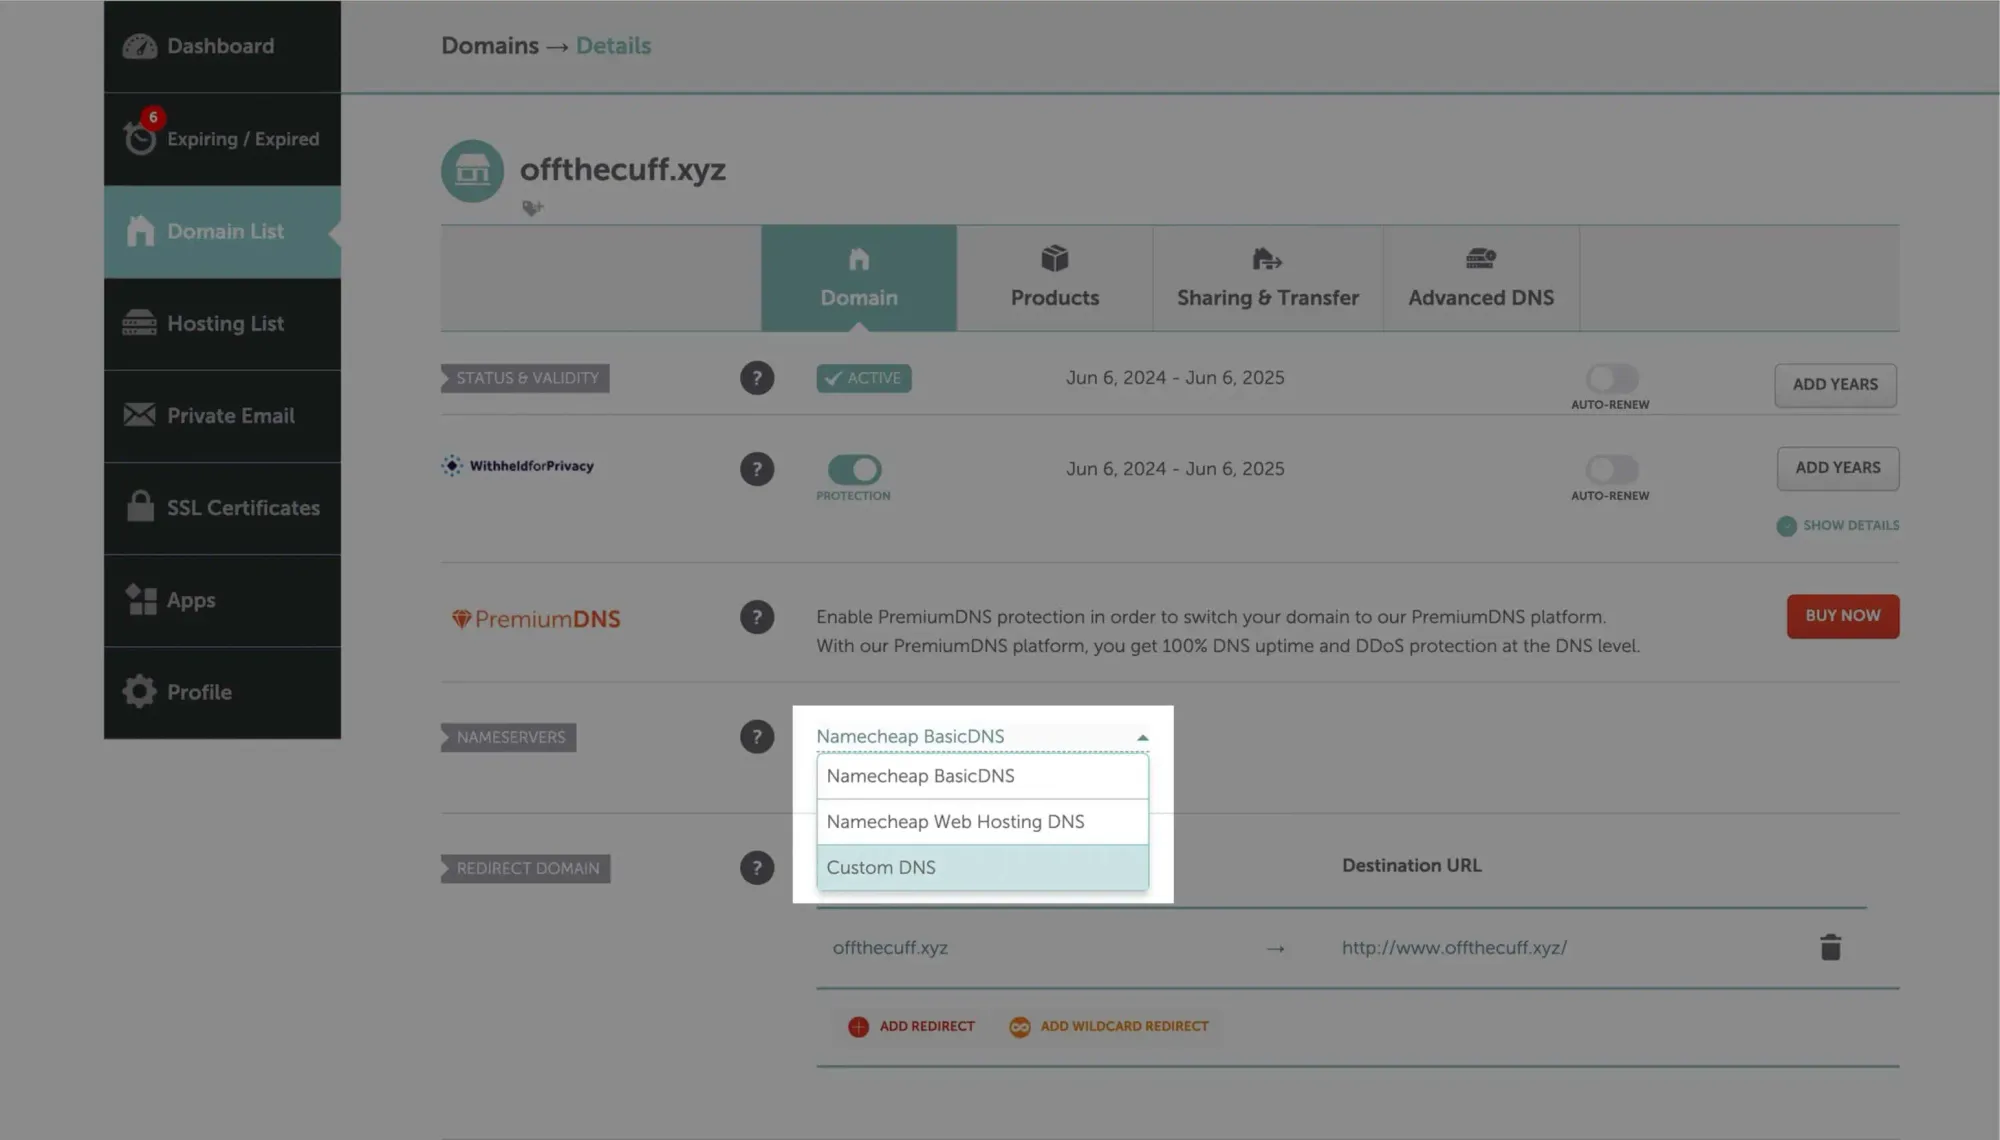
Paste the nameserver you copied earlier into both fields. Make sure the first one is ns1 and the second is ns2. Click the checkmark to save:
Back in Hpanel dashboard, click Connect domain:
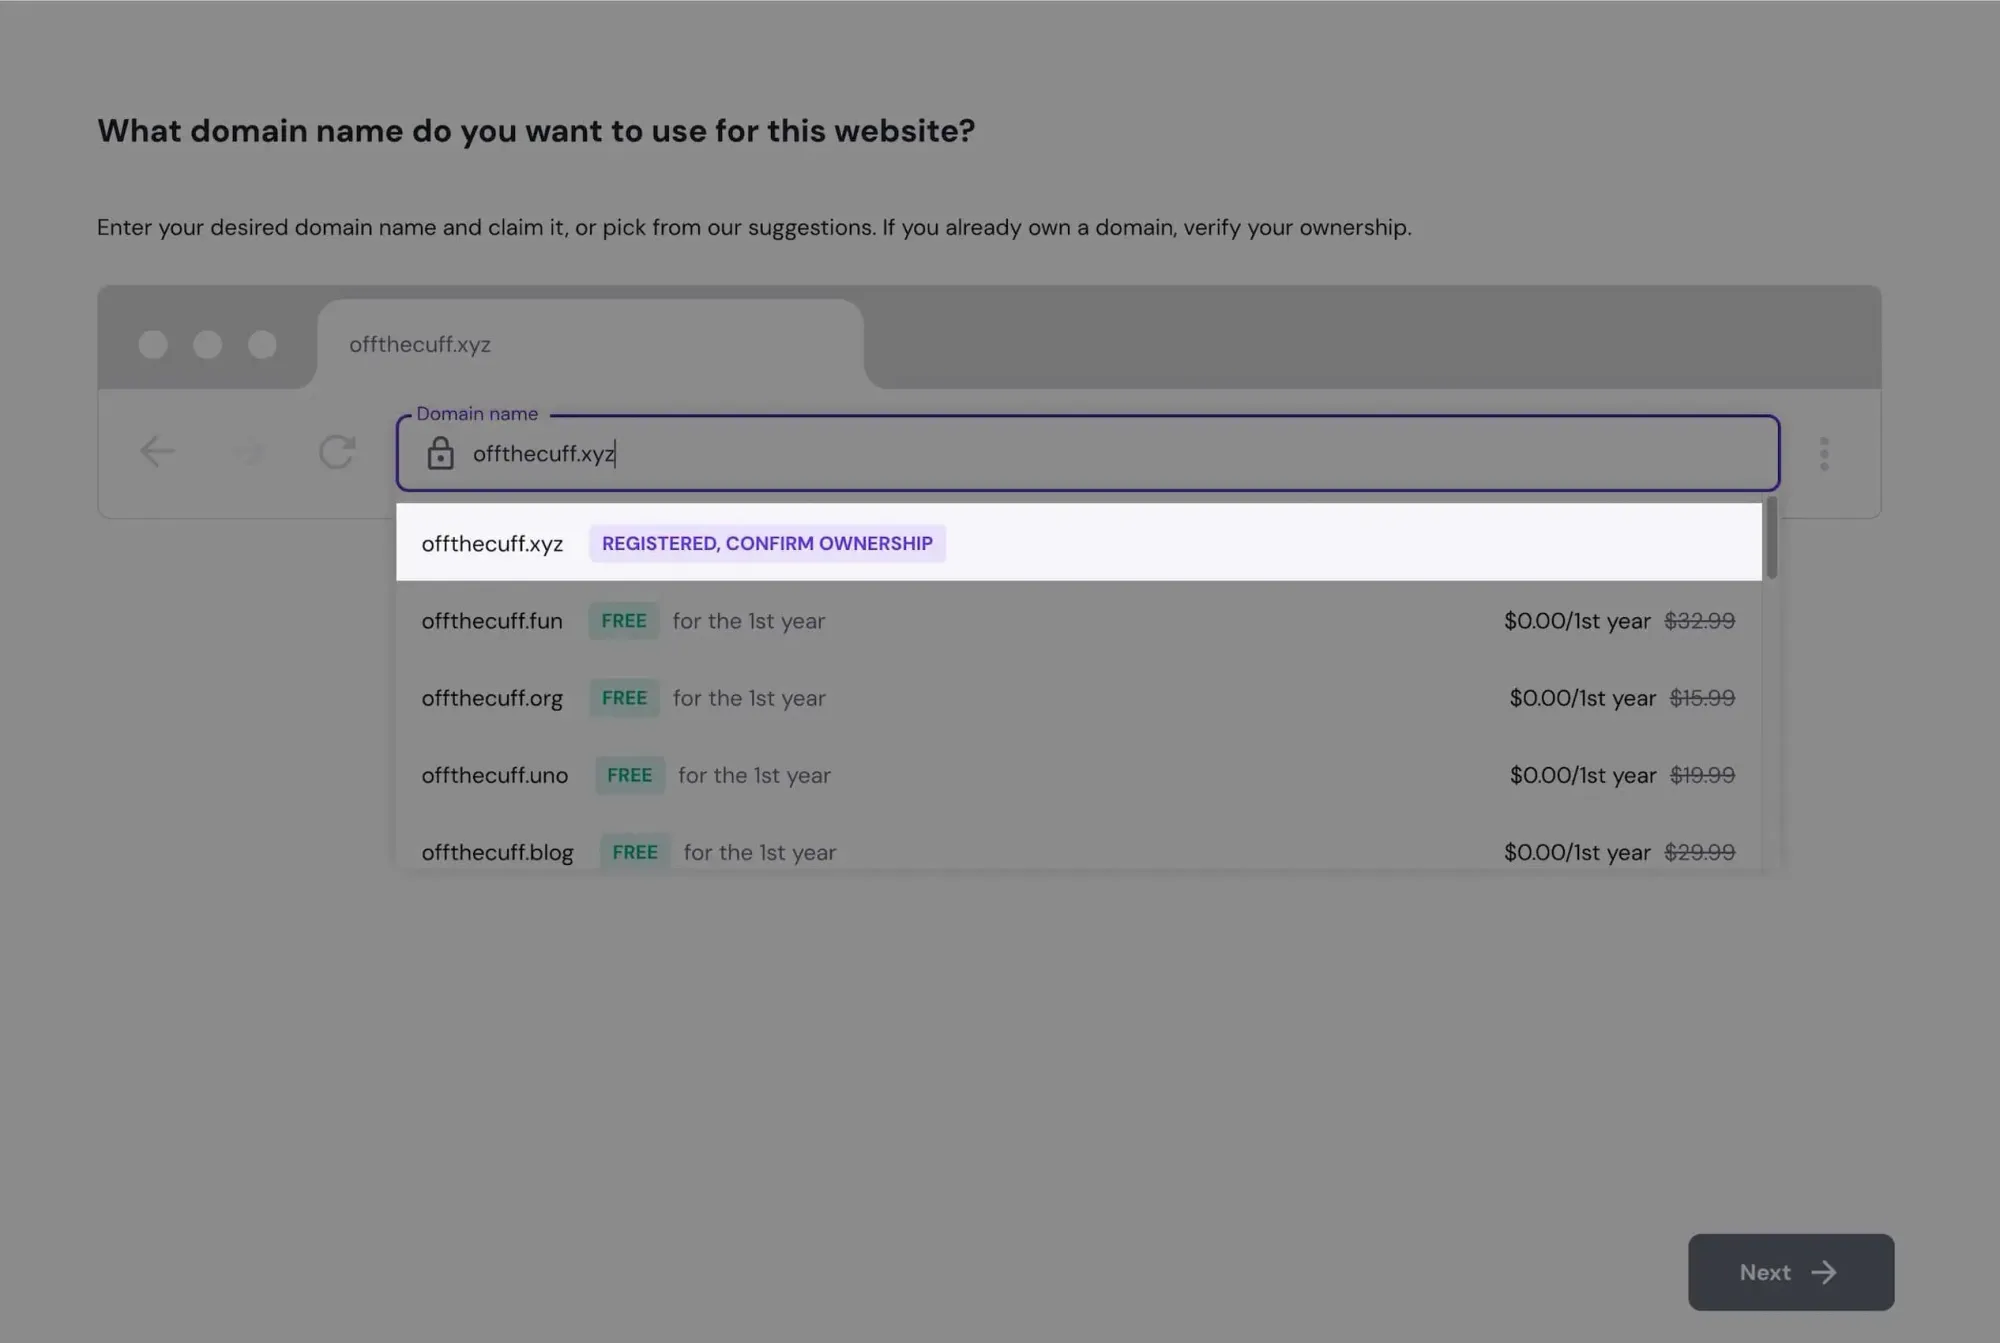
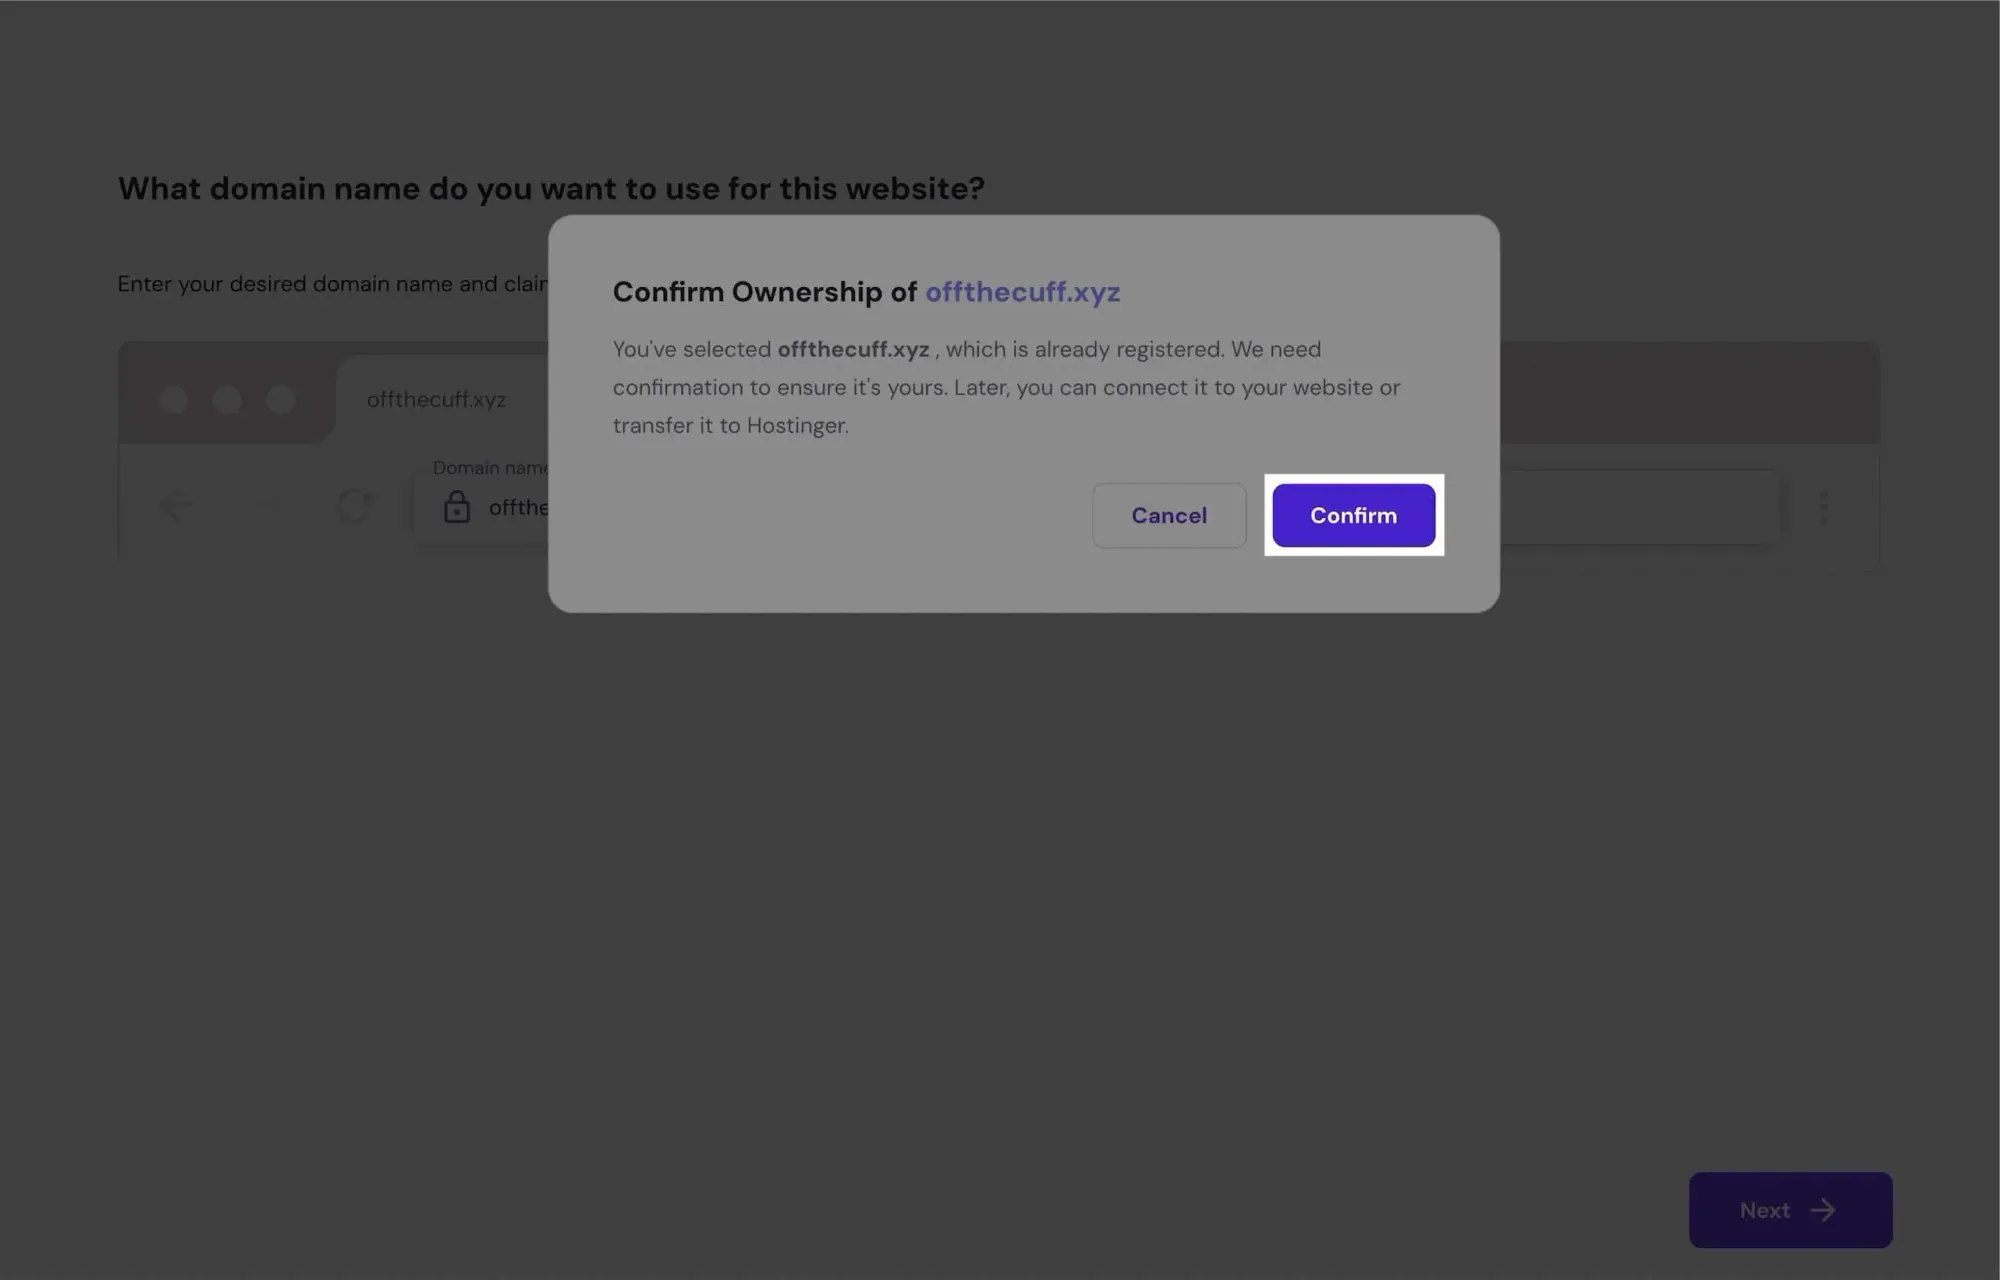
Enter your domain name and select Registered, confirm ownership:
Click Confirm again.
DNS propagation takes a while, so take a short break and come back later.
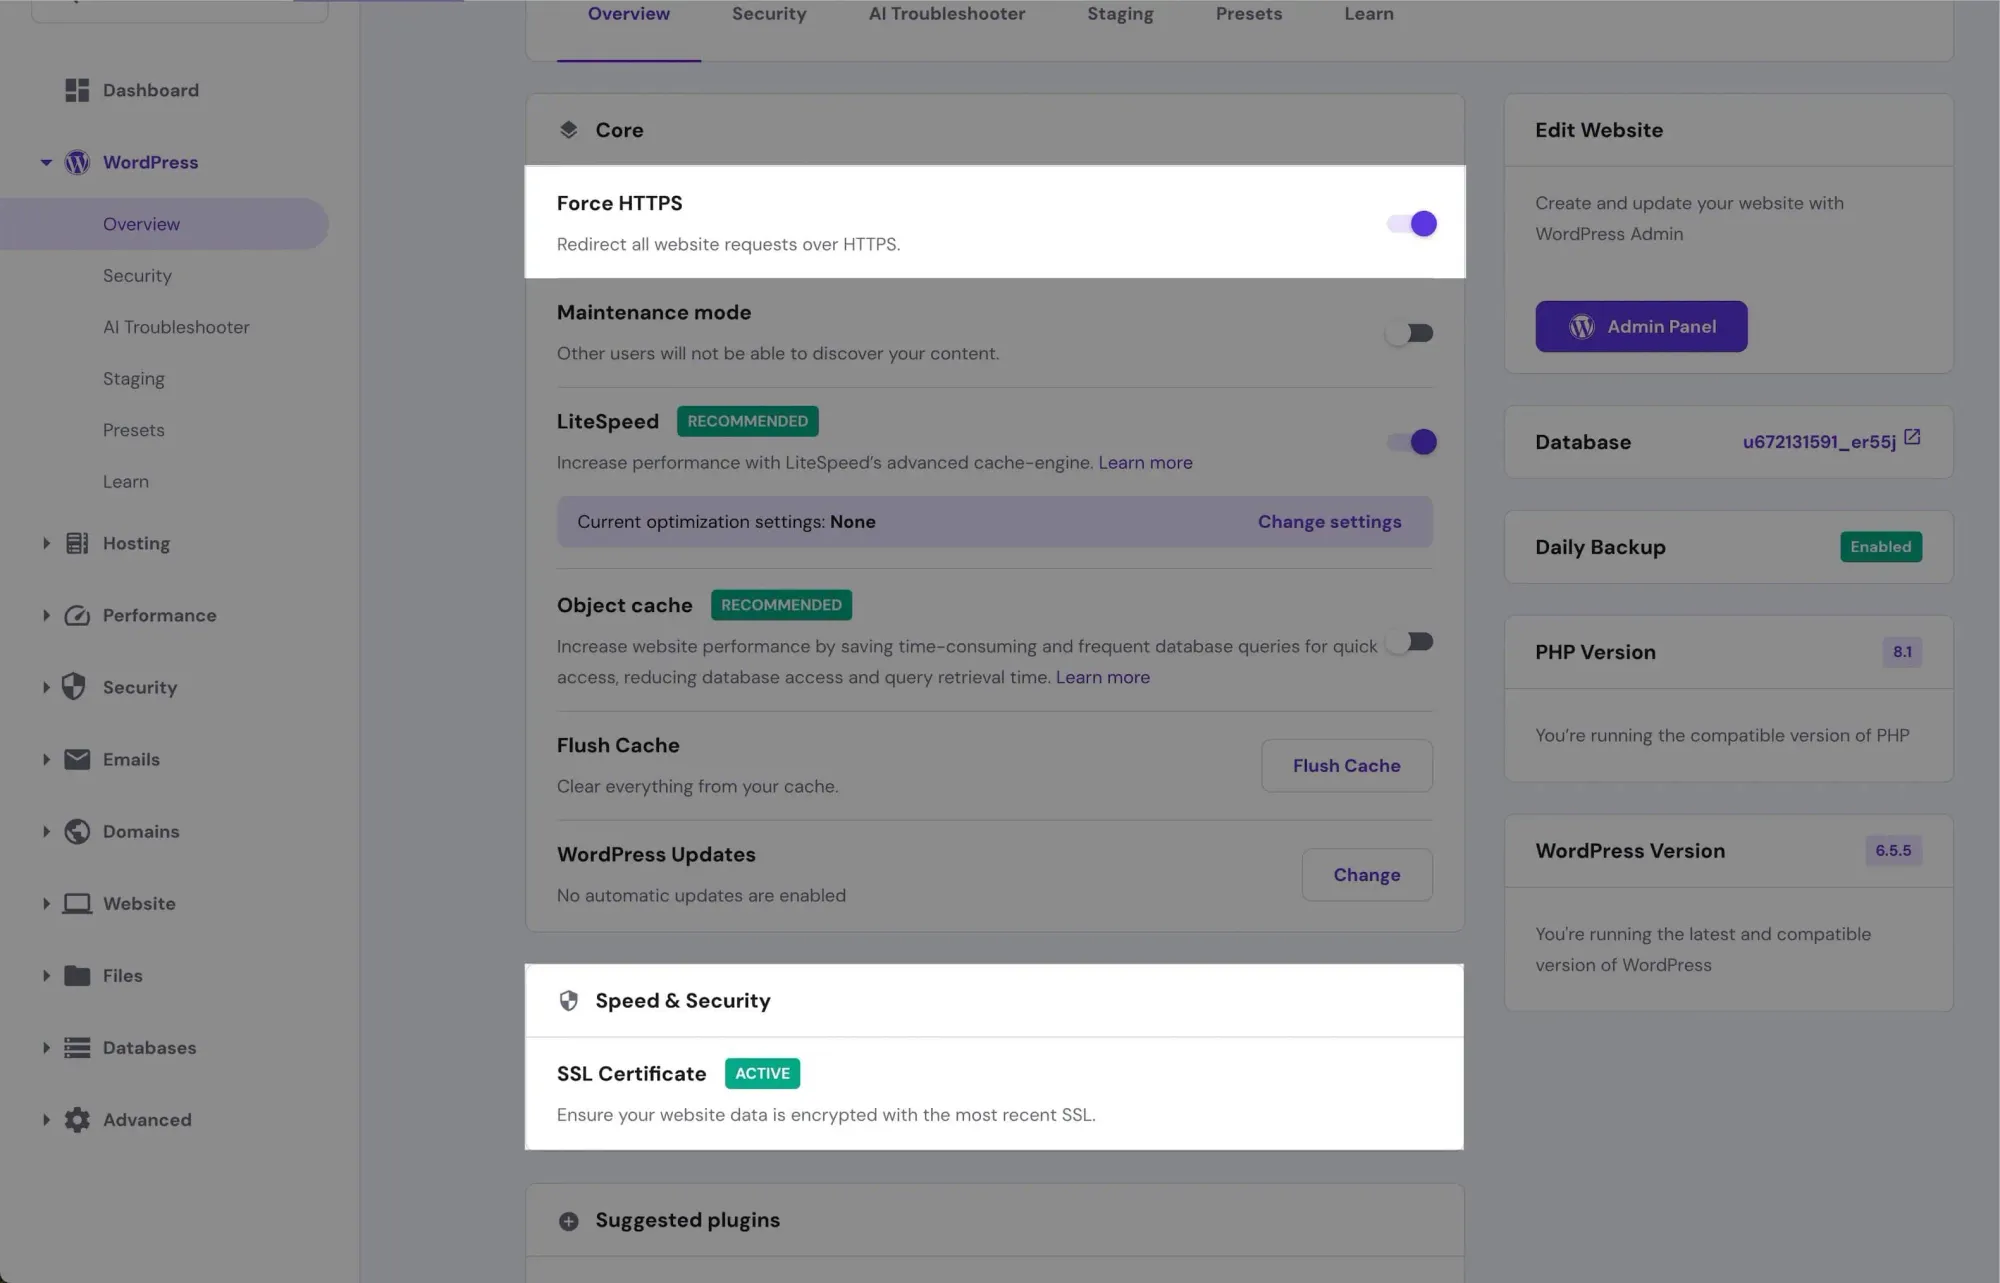
Once the domain is connected, SSL Certificate should be active and Force HTTPS should be toggled on:
If it shows SSL Certificate Installing, wait for it to complete.
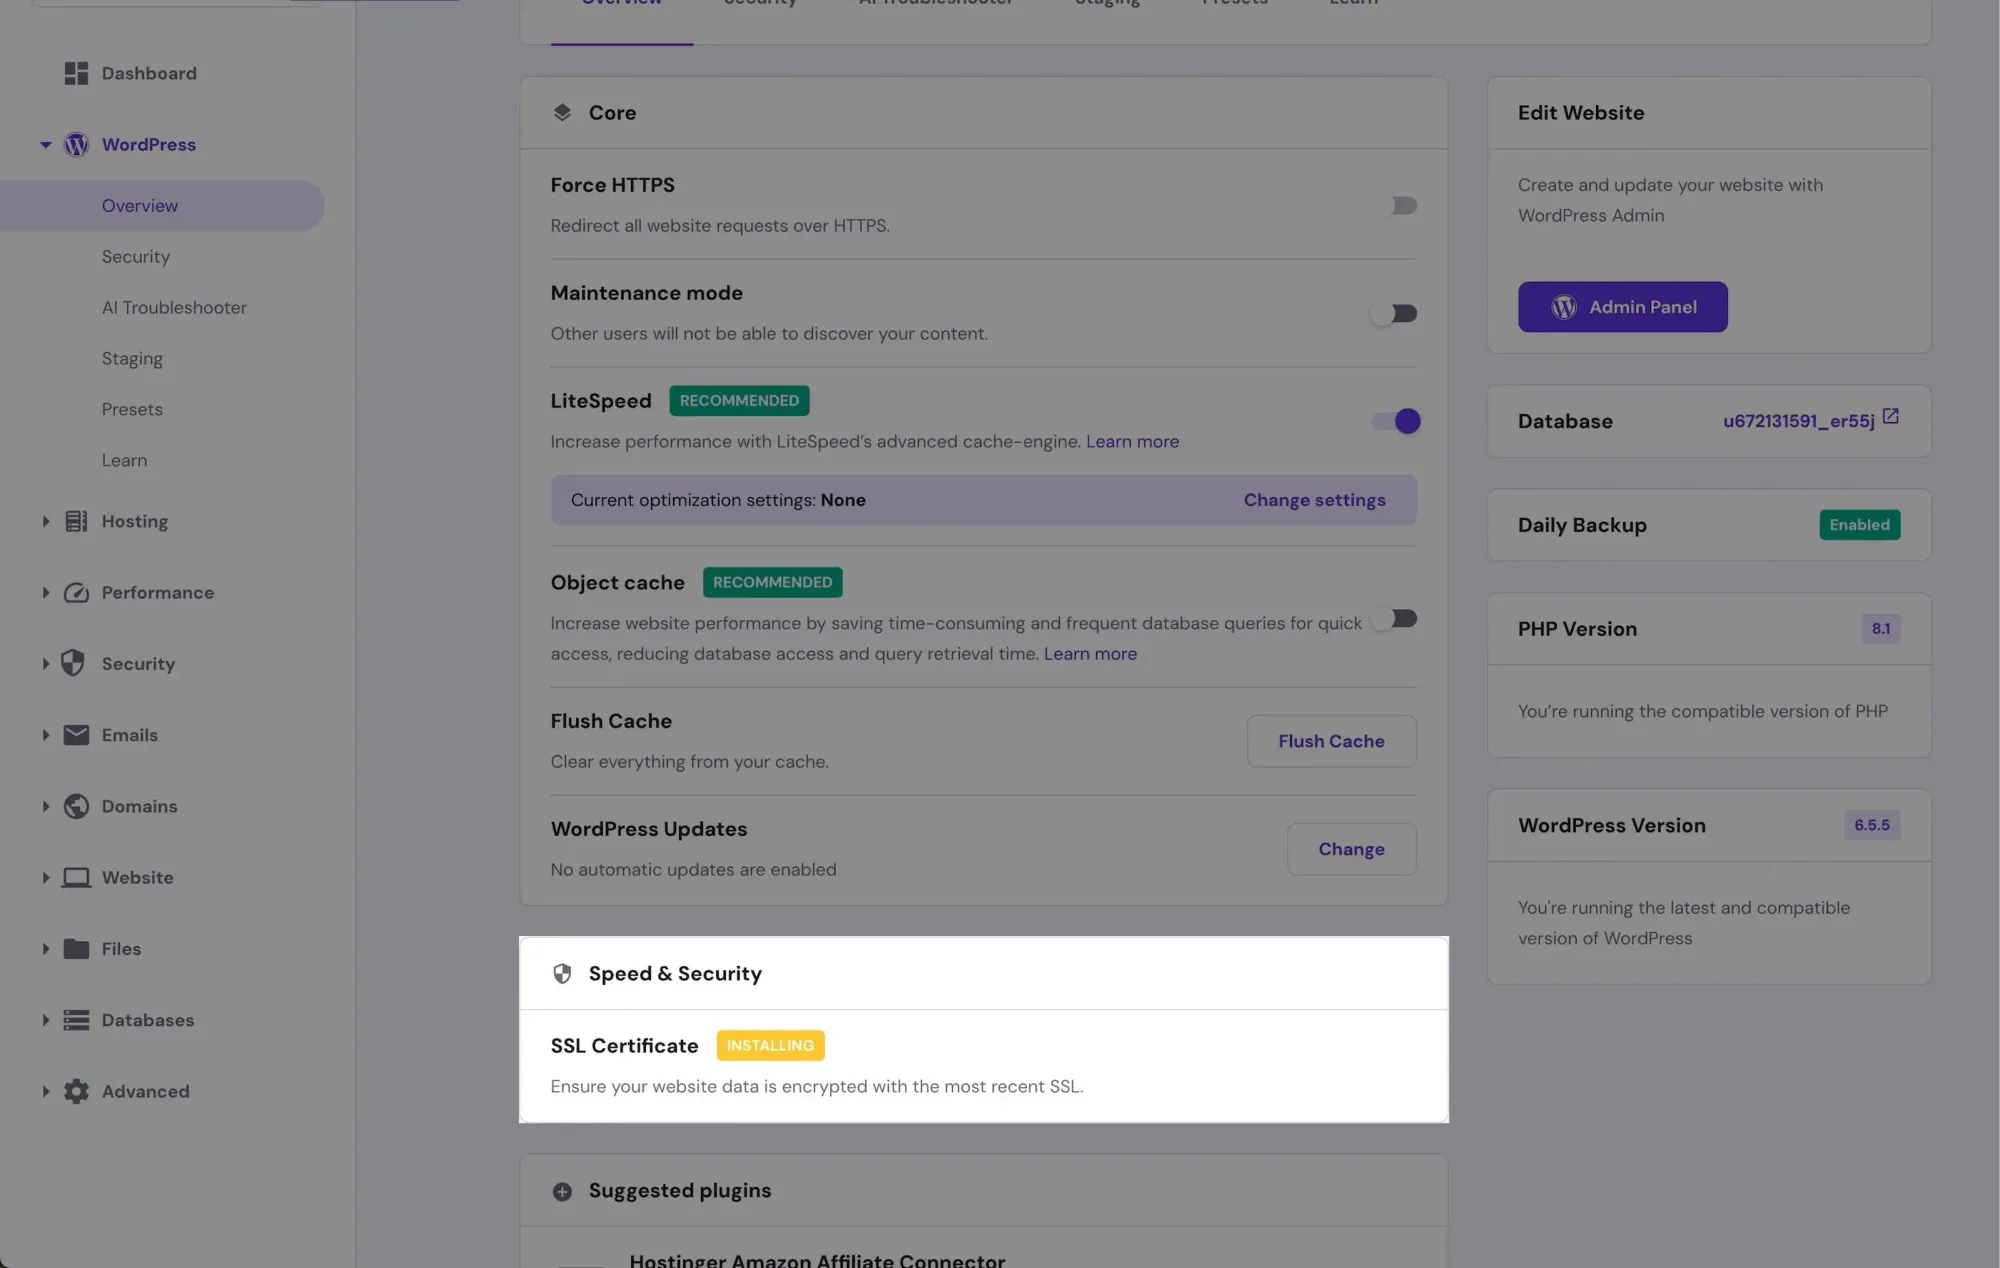
If the SSL isn't installed for some reason, click Install:

Ensure SSL Certificate is active and Force HTTPS is toggled on, then click Admin Panel:
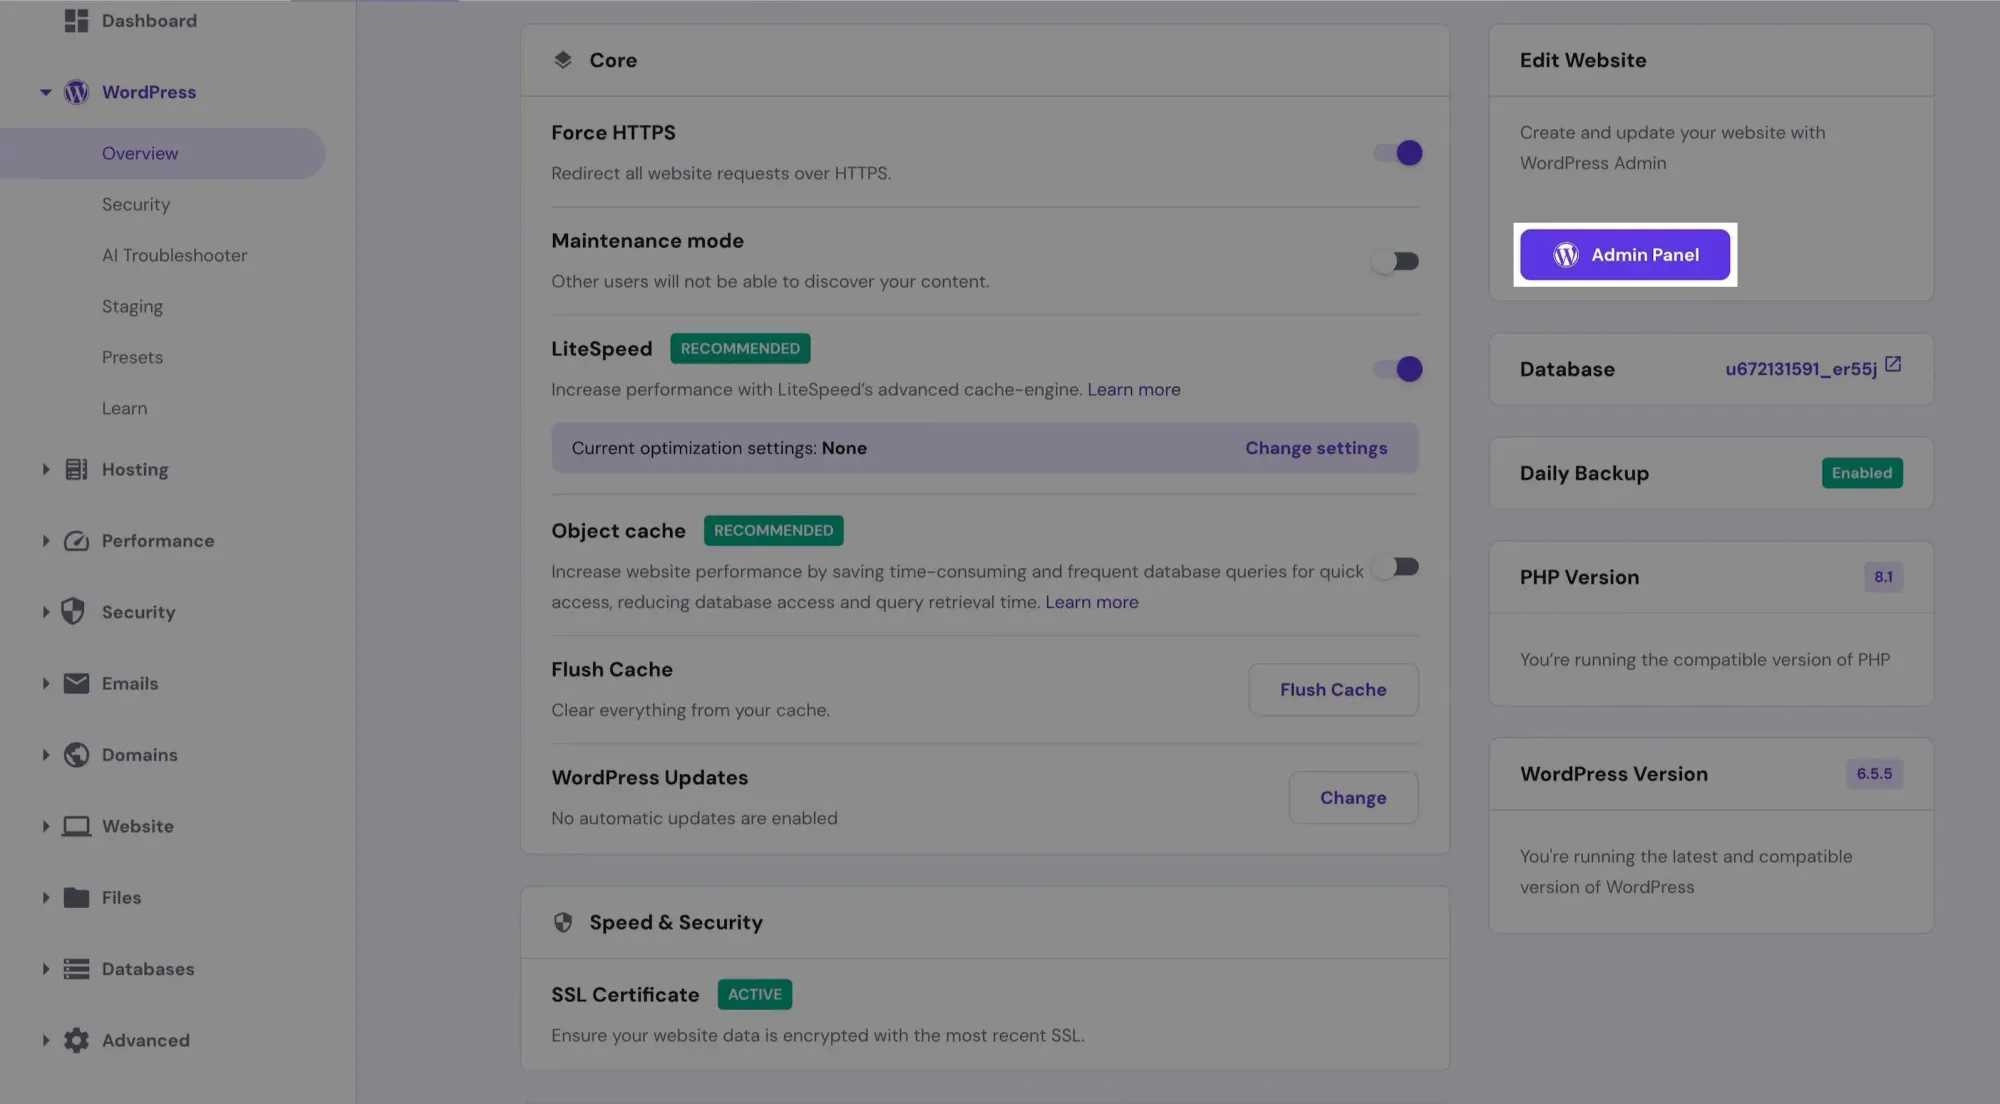
Congratulations! You've successfully installed WordPress:
In the next section, we'll configure some basic settings.
Configuring Basic WordPress Settings
Now that we've got WordPress installed, let's configure some essential settings.
This isn't a strict rulebook — take what makes sense for your site and adjust as needed.
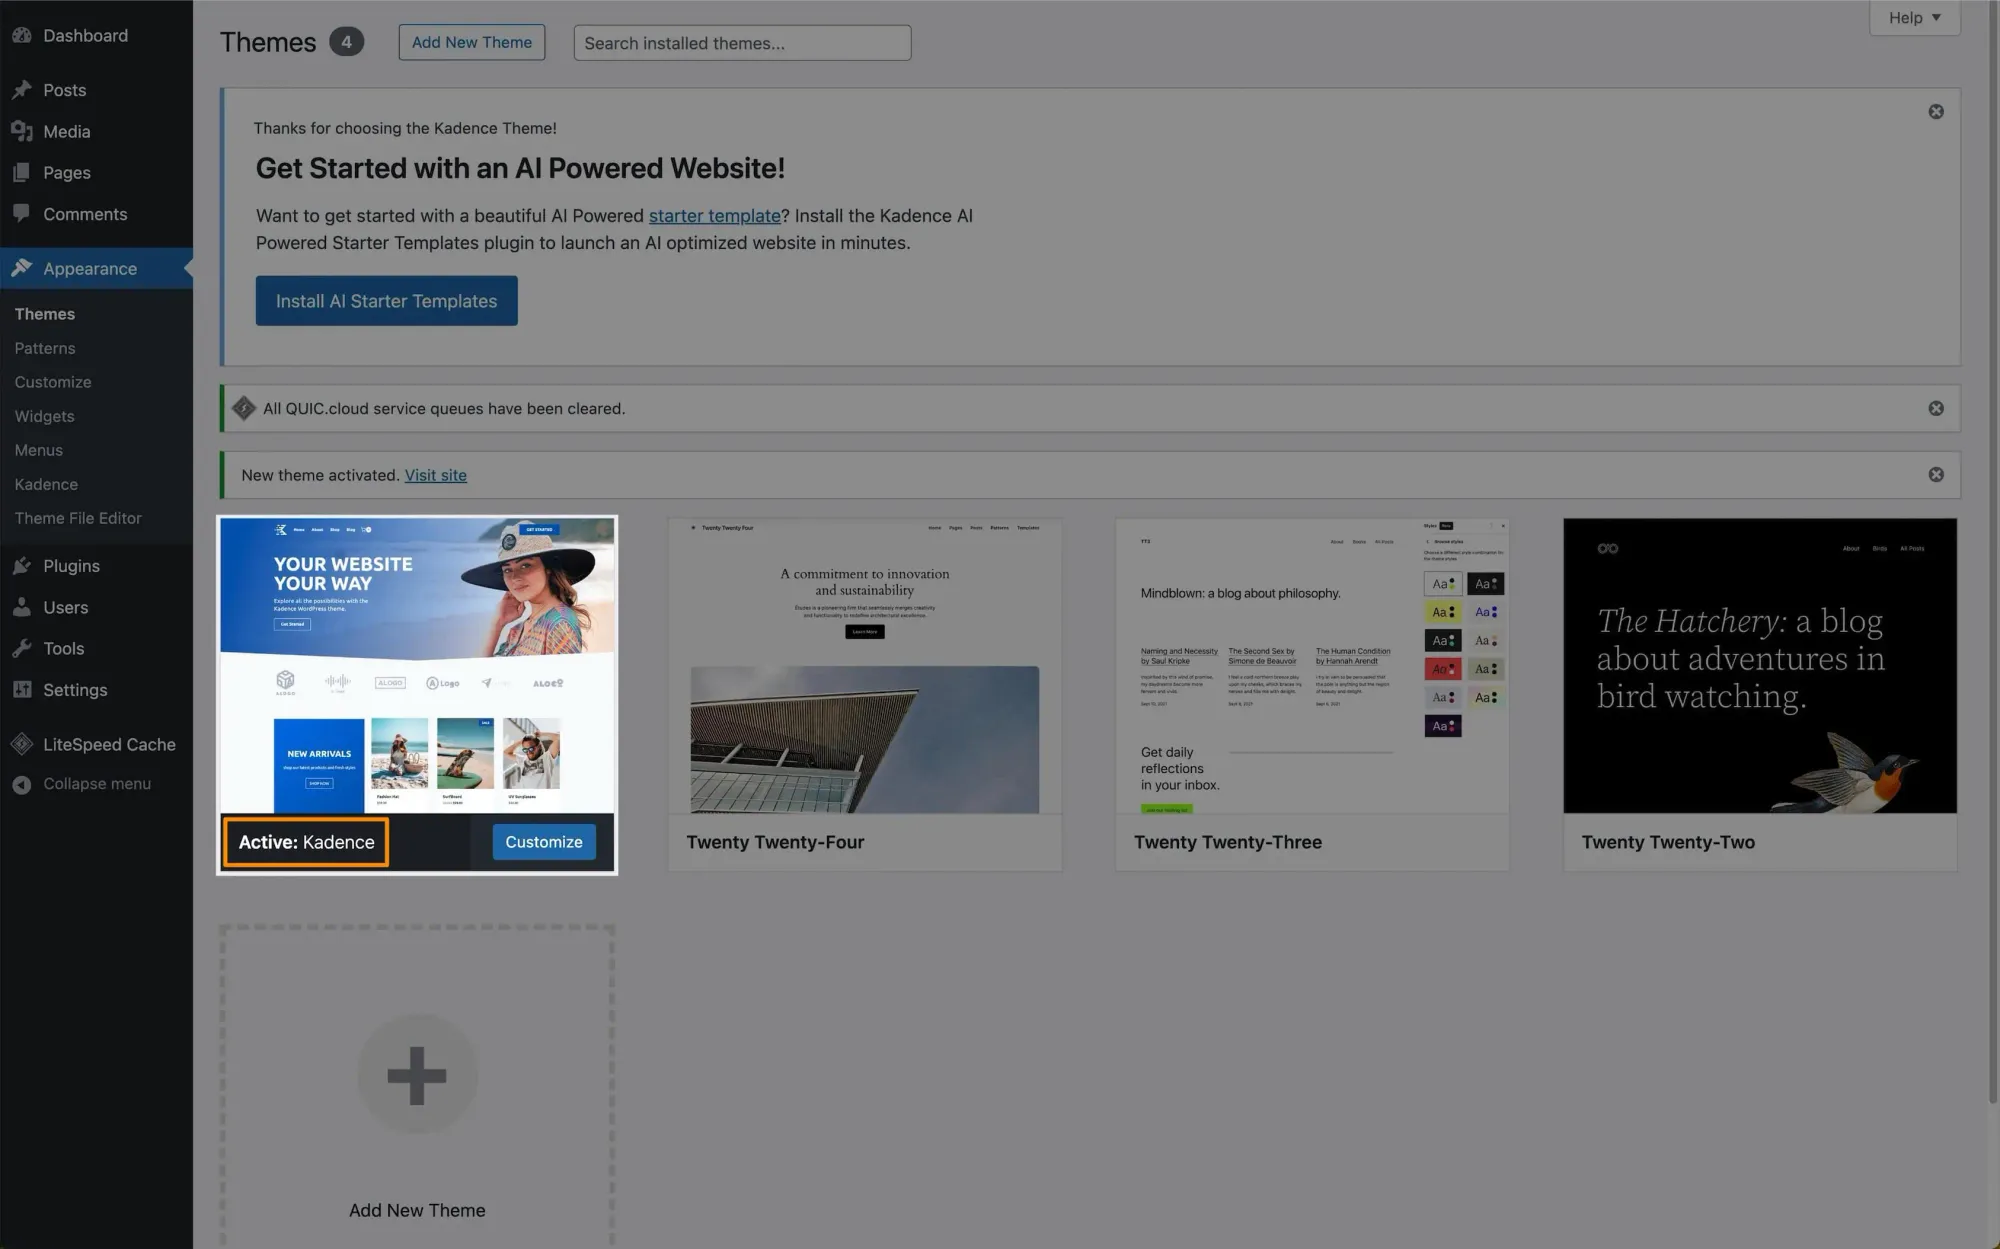
First, let's set up the theme. Head to Appearance → Themes and make sure Kadence is installed and activated:
Now, let's tackle some basic WordPress settings:
General Settings
Navigate to Settings → General and:
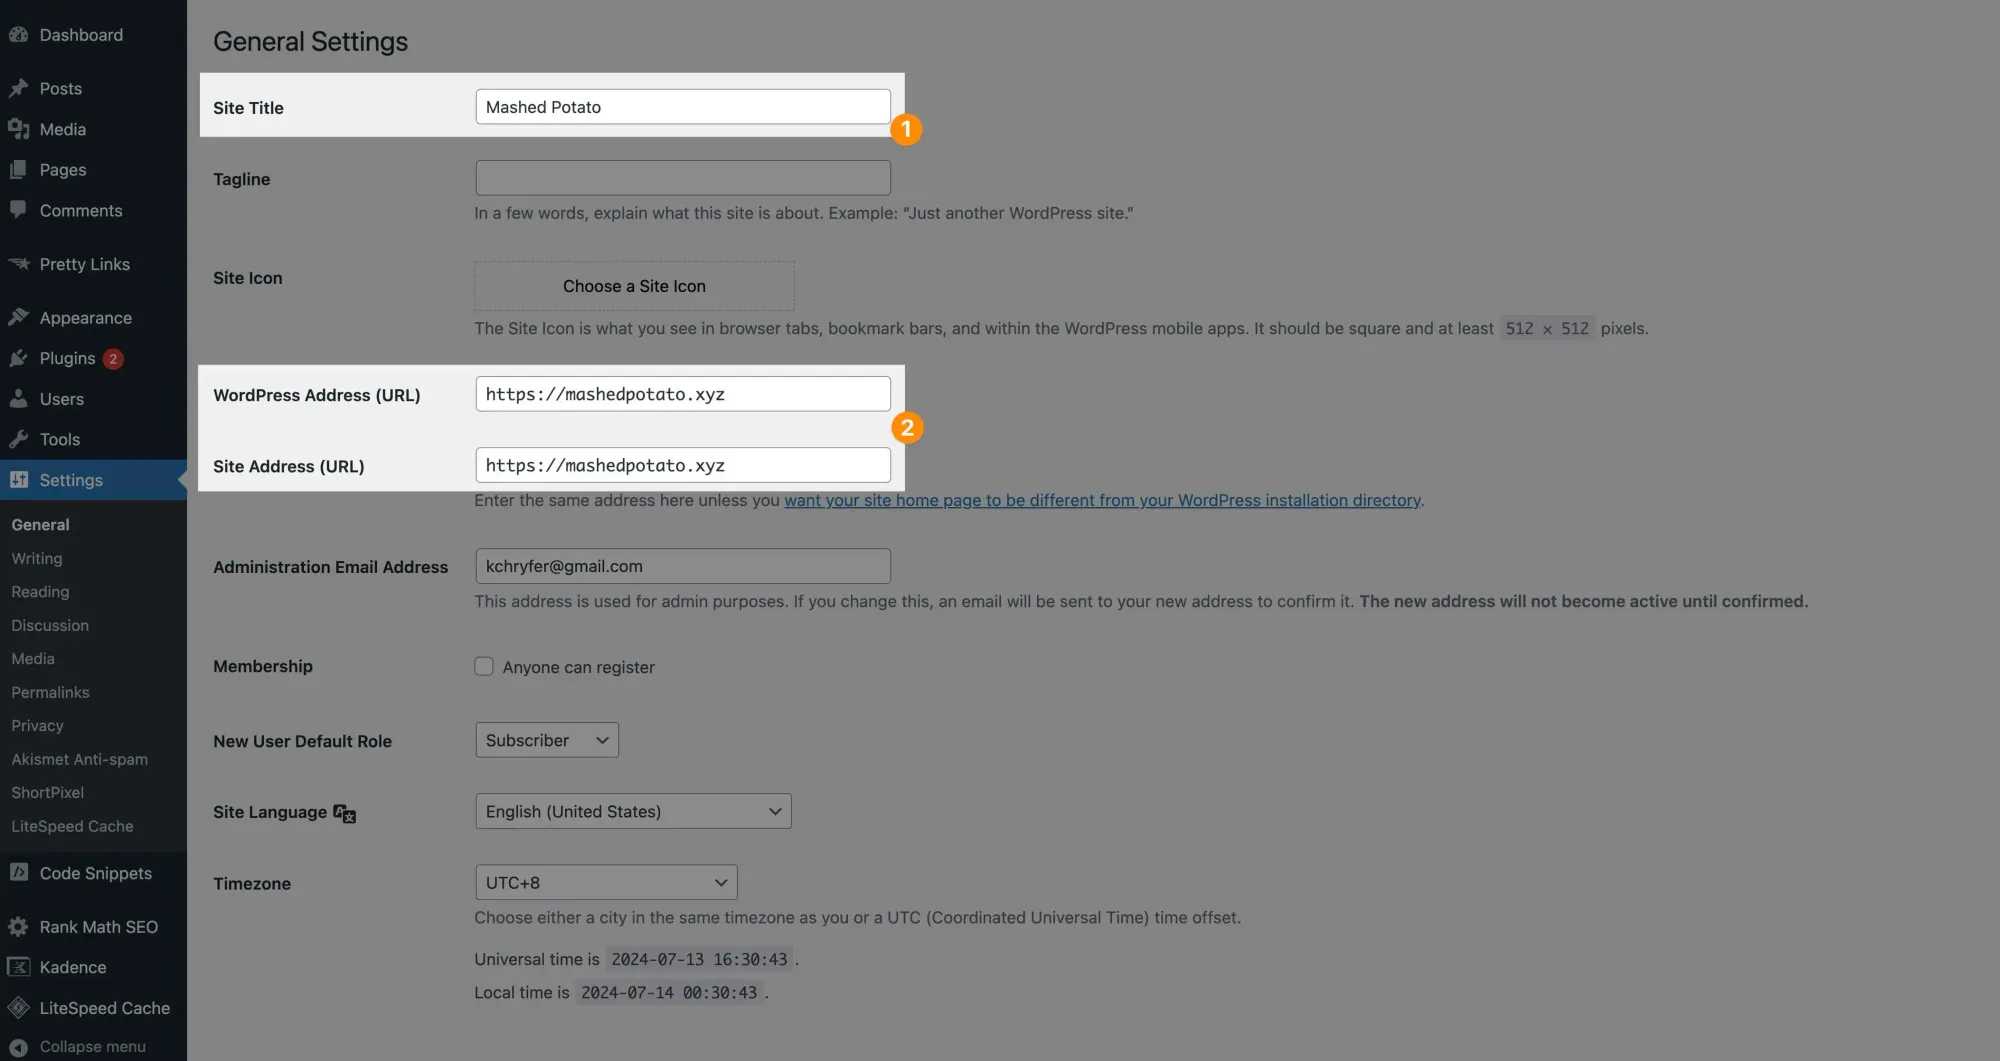
- Update your
Site Title. For a personal site, use your first name and last name. - Ensure both
WordPress AddressandSite Addressstart with https.
Don't forget to save your changes.
Discussion Settings
Under Settings → Discussion:
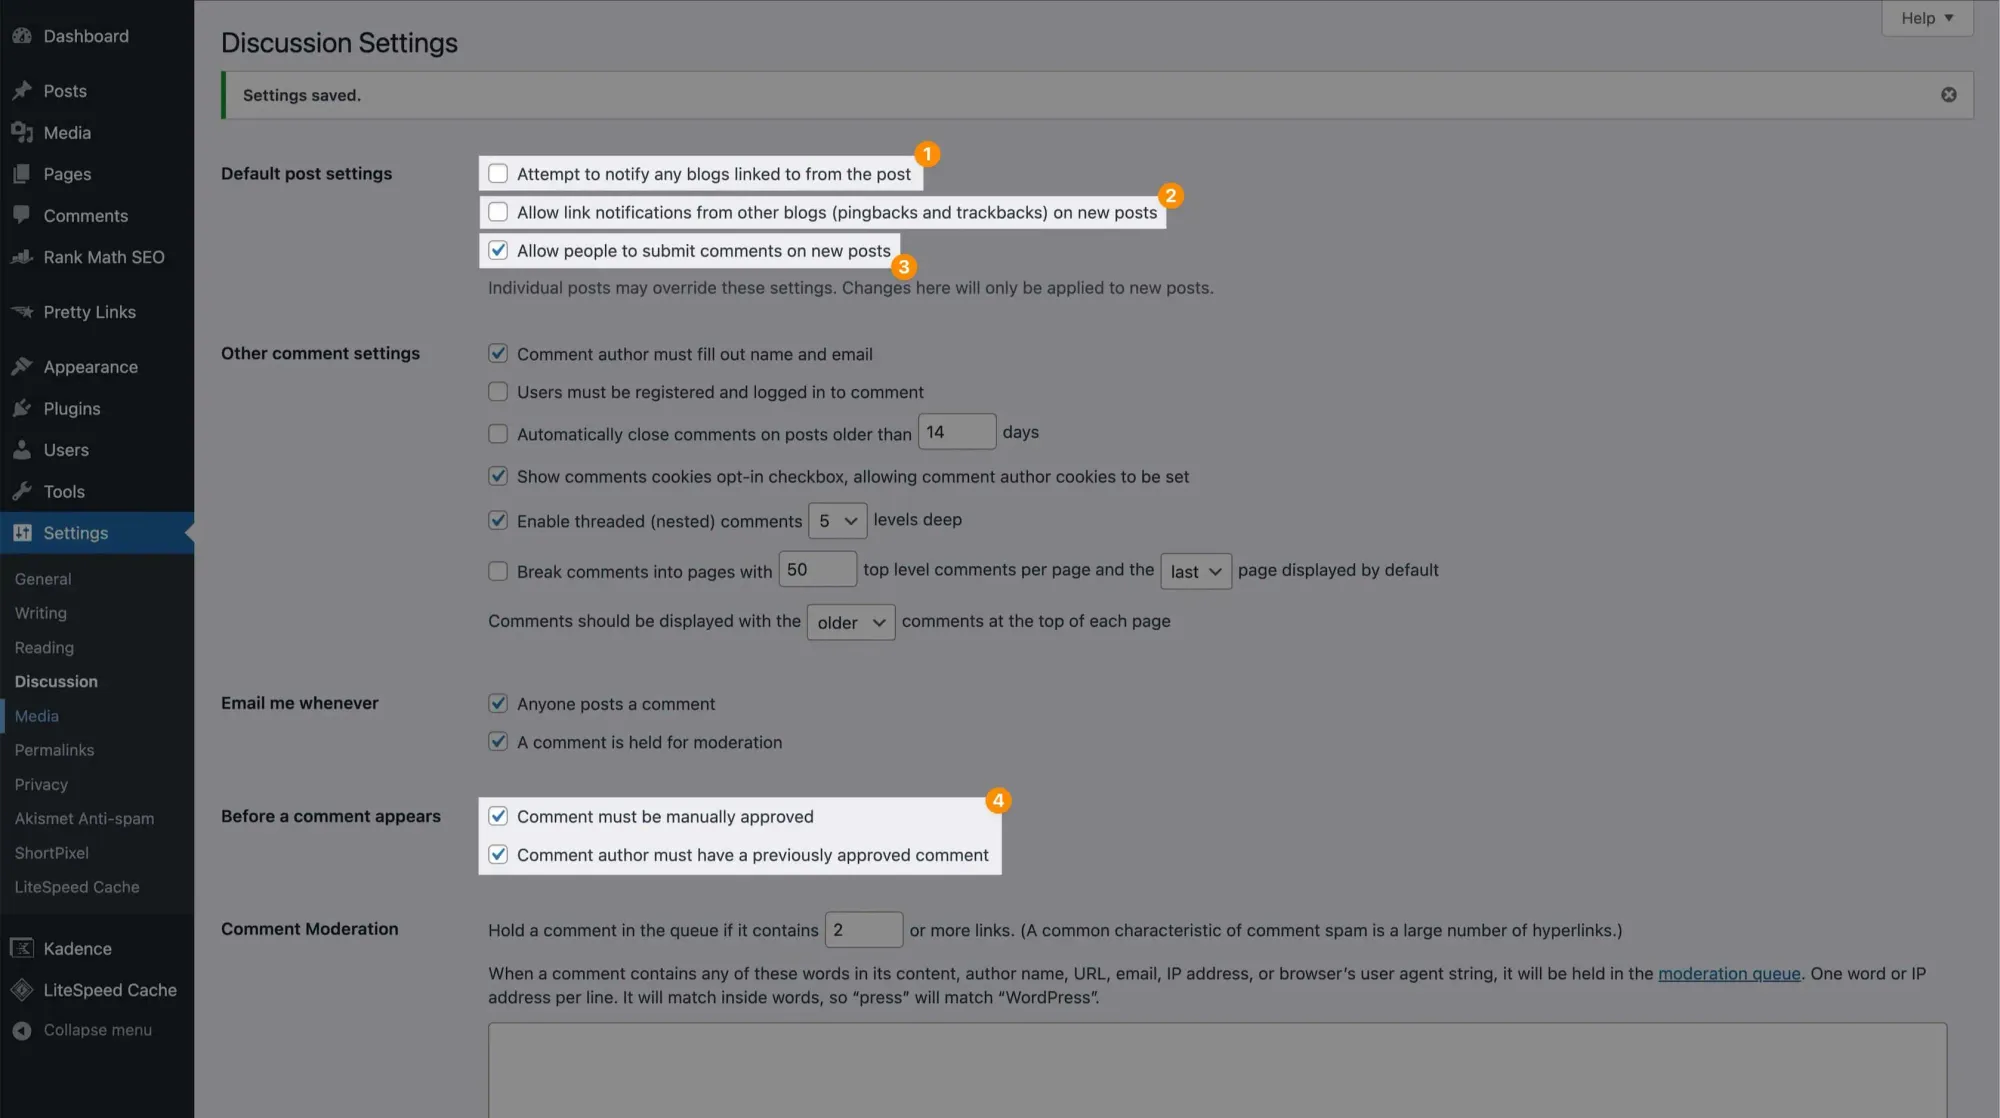
- Uncheck
Attempt to notify any blogs linked to from the articleto avoid pinging other blogs. - Uncheck
Allow link notifications from other blogsto prevent spam. - Keep
Allow people to submit comments on new postschecked if you want to enable comments. - Keep
Comment must be manually approvedandComment author must have a previously approved commentchecked to manage spam.
Permalink Settings
Go to Settings → Permalinks:
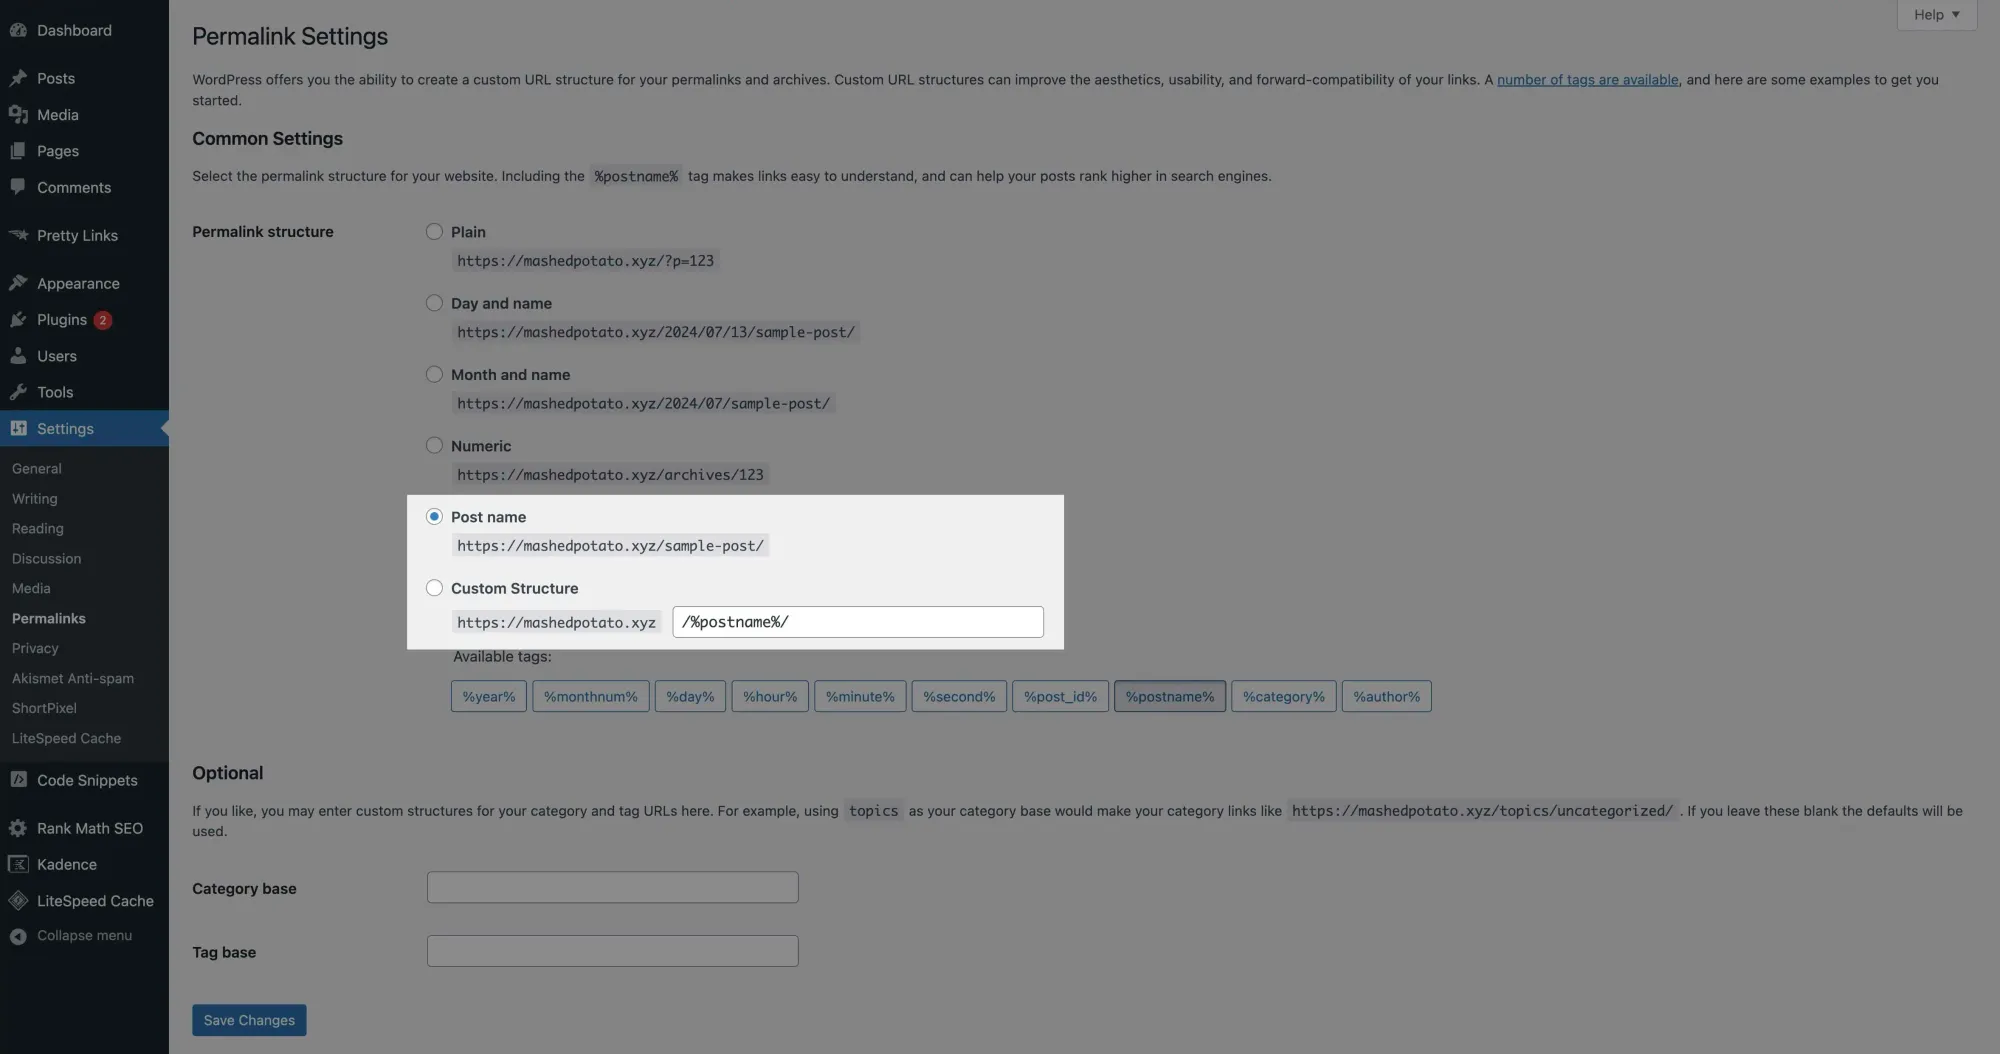
The Post name structure should be pre-selected. This is ideal for most blogs. You can use Custom structure if needed, but the default is usually fine.
That covers the basic settings. Next up, we'll talk about installing essential plugins for your WordPress site.
Installing Essential Plugins
Plugins are great for adding functionality to your site without needing coding skills.
But too many plugins can slow down your site.
Not good.
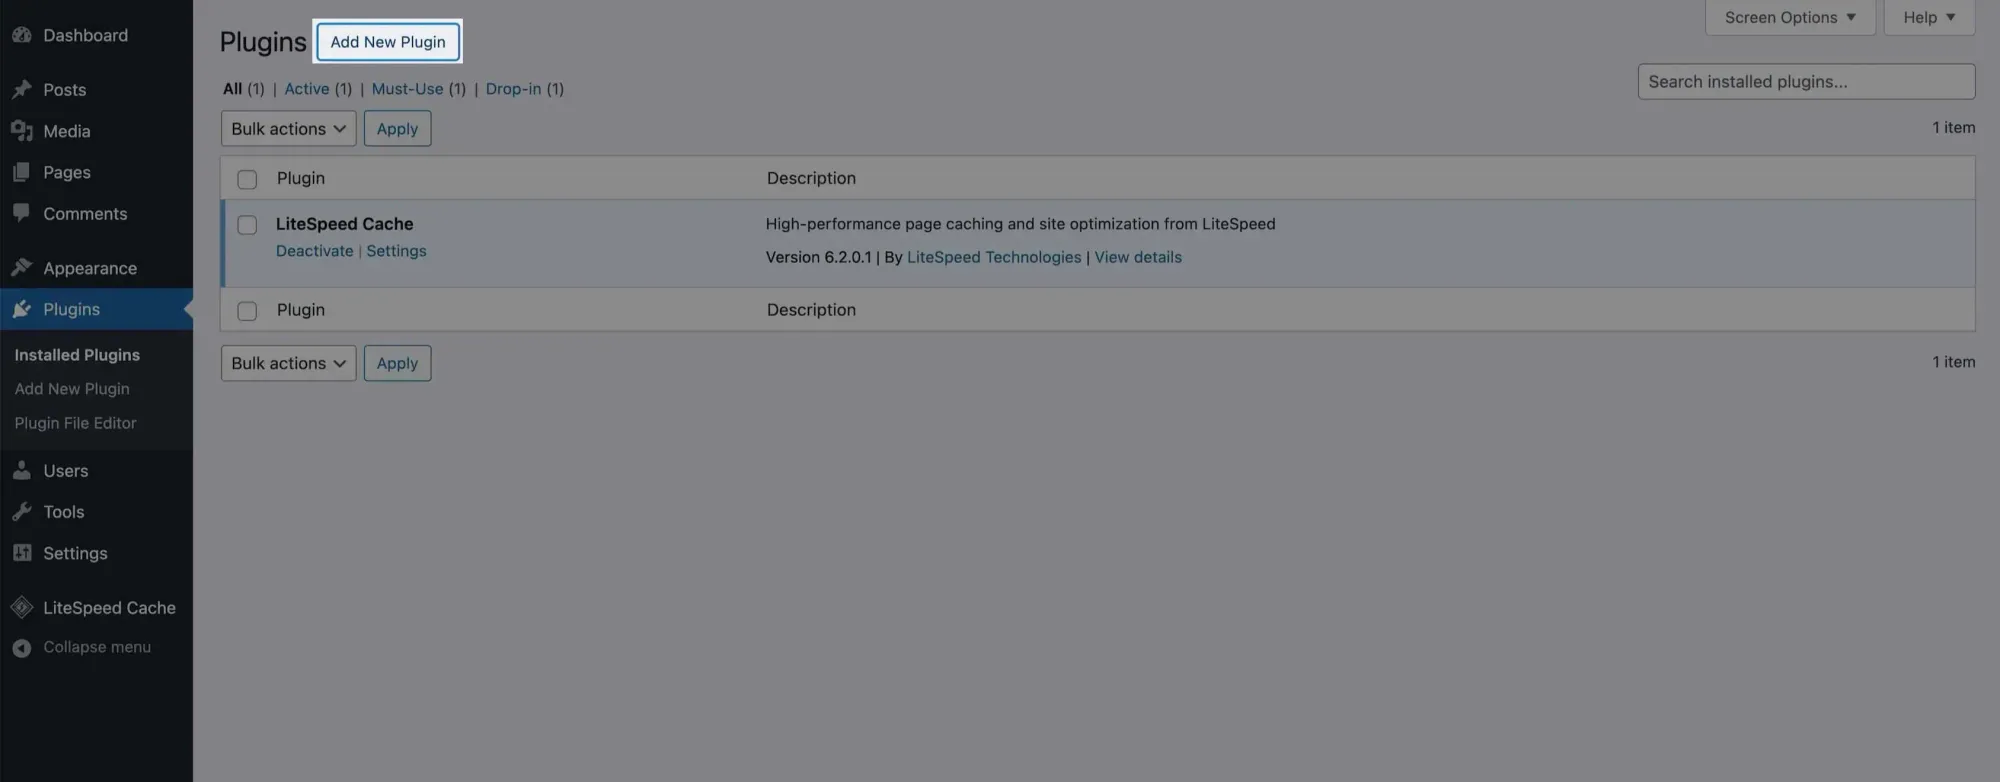
So let's start by cleaning house — head to Plugins and deactivate all the useless plugins except Litespeed Cache:
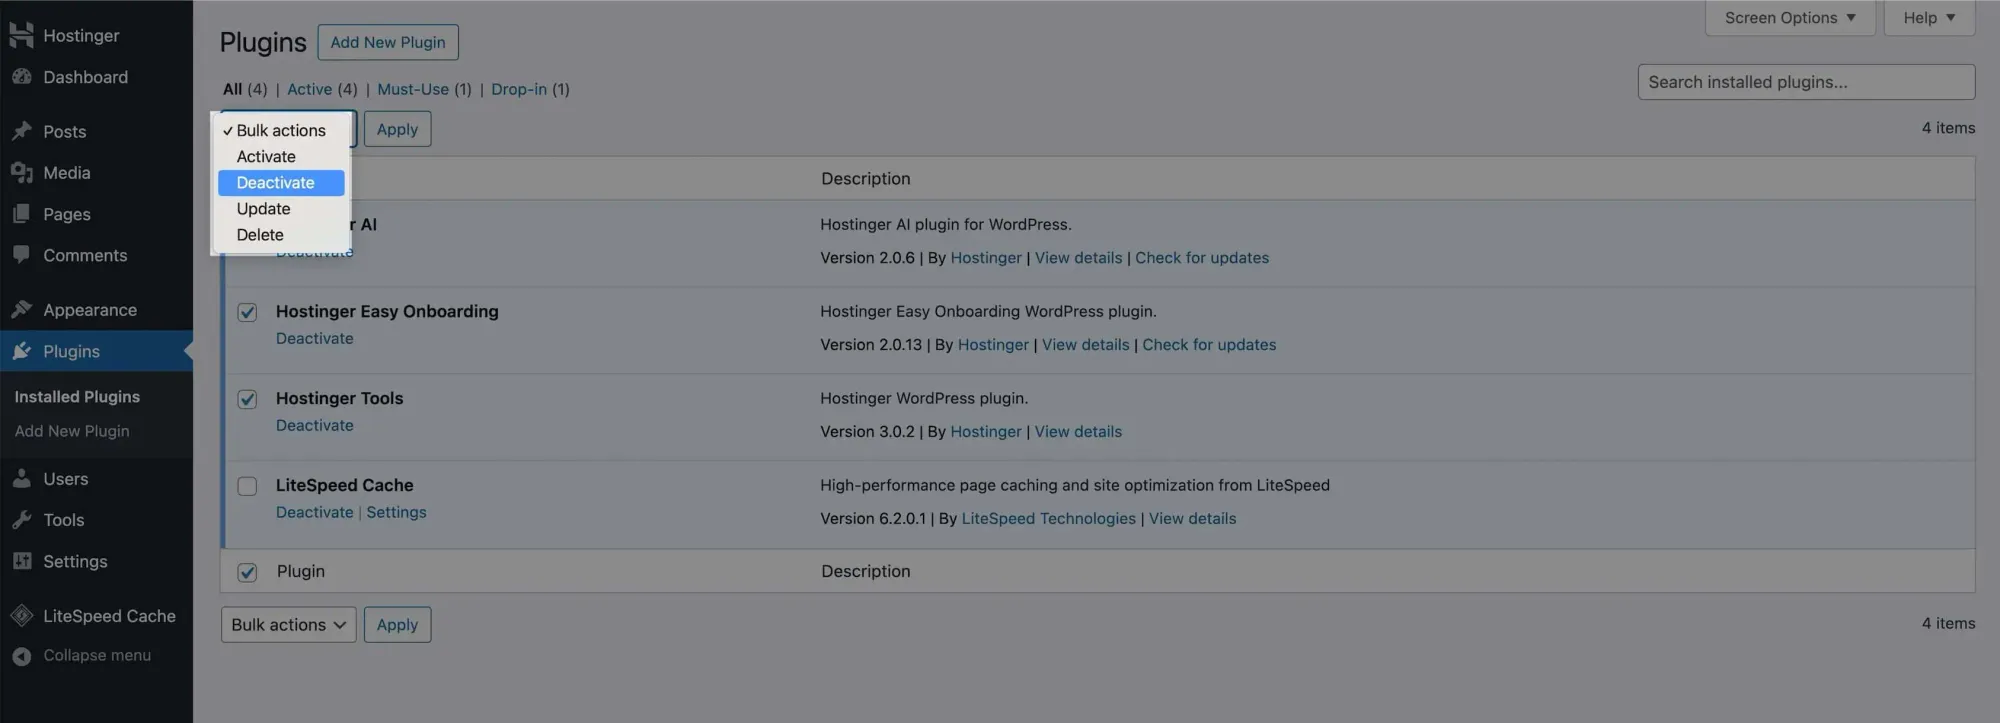
Then delete them:

Now, let's add some essential plugins. Click Add New Plugin:
You'll see this interface:
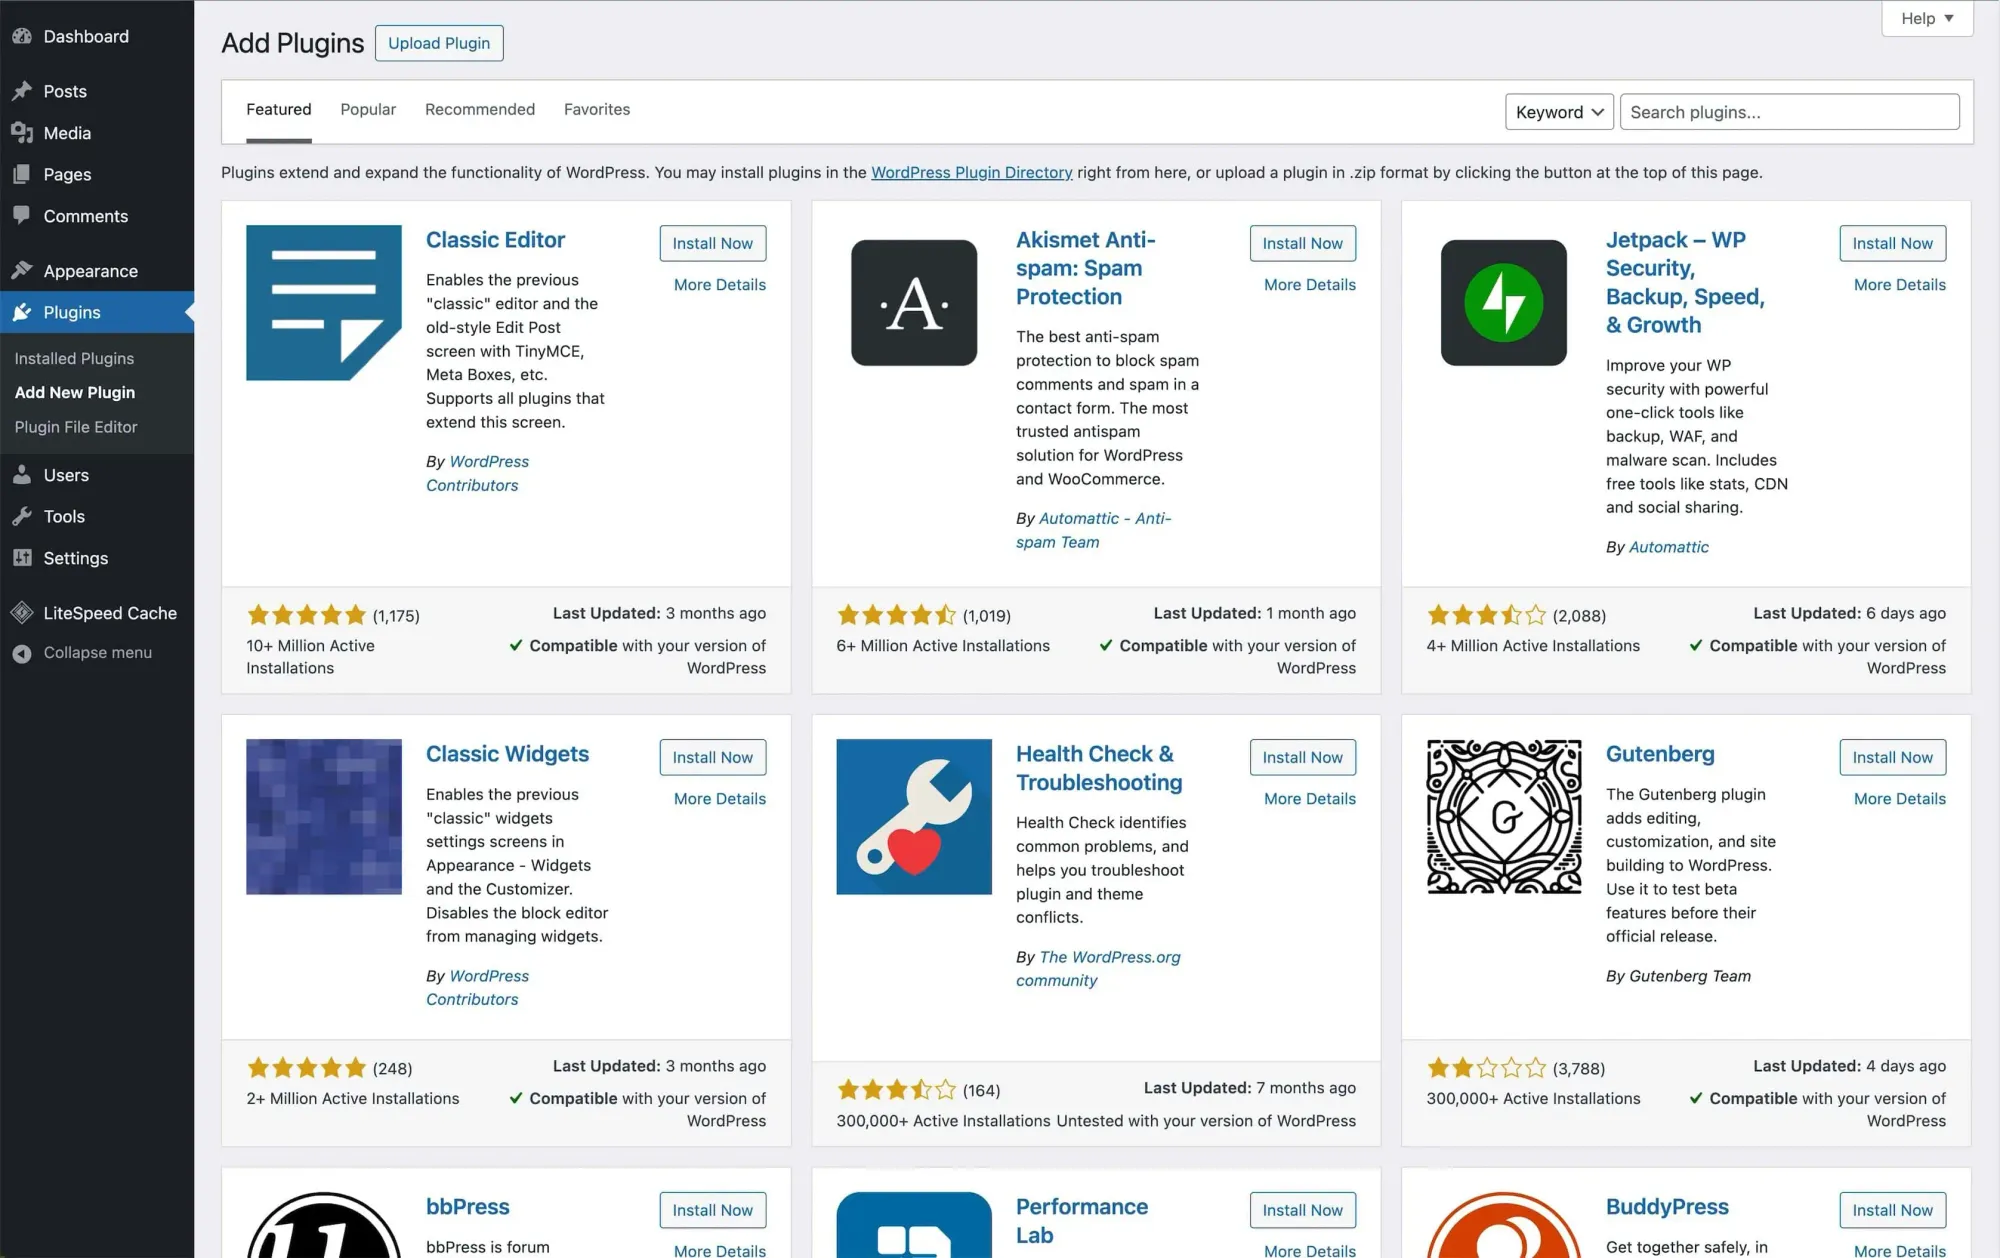
Here are the plugins I recommend:
1. Kadence Blocks
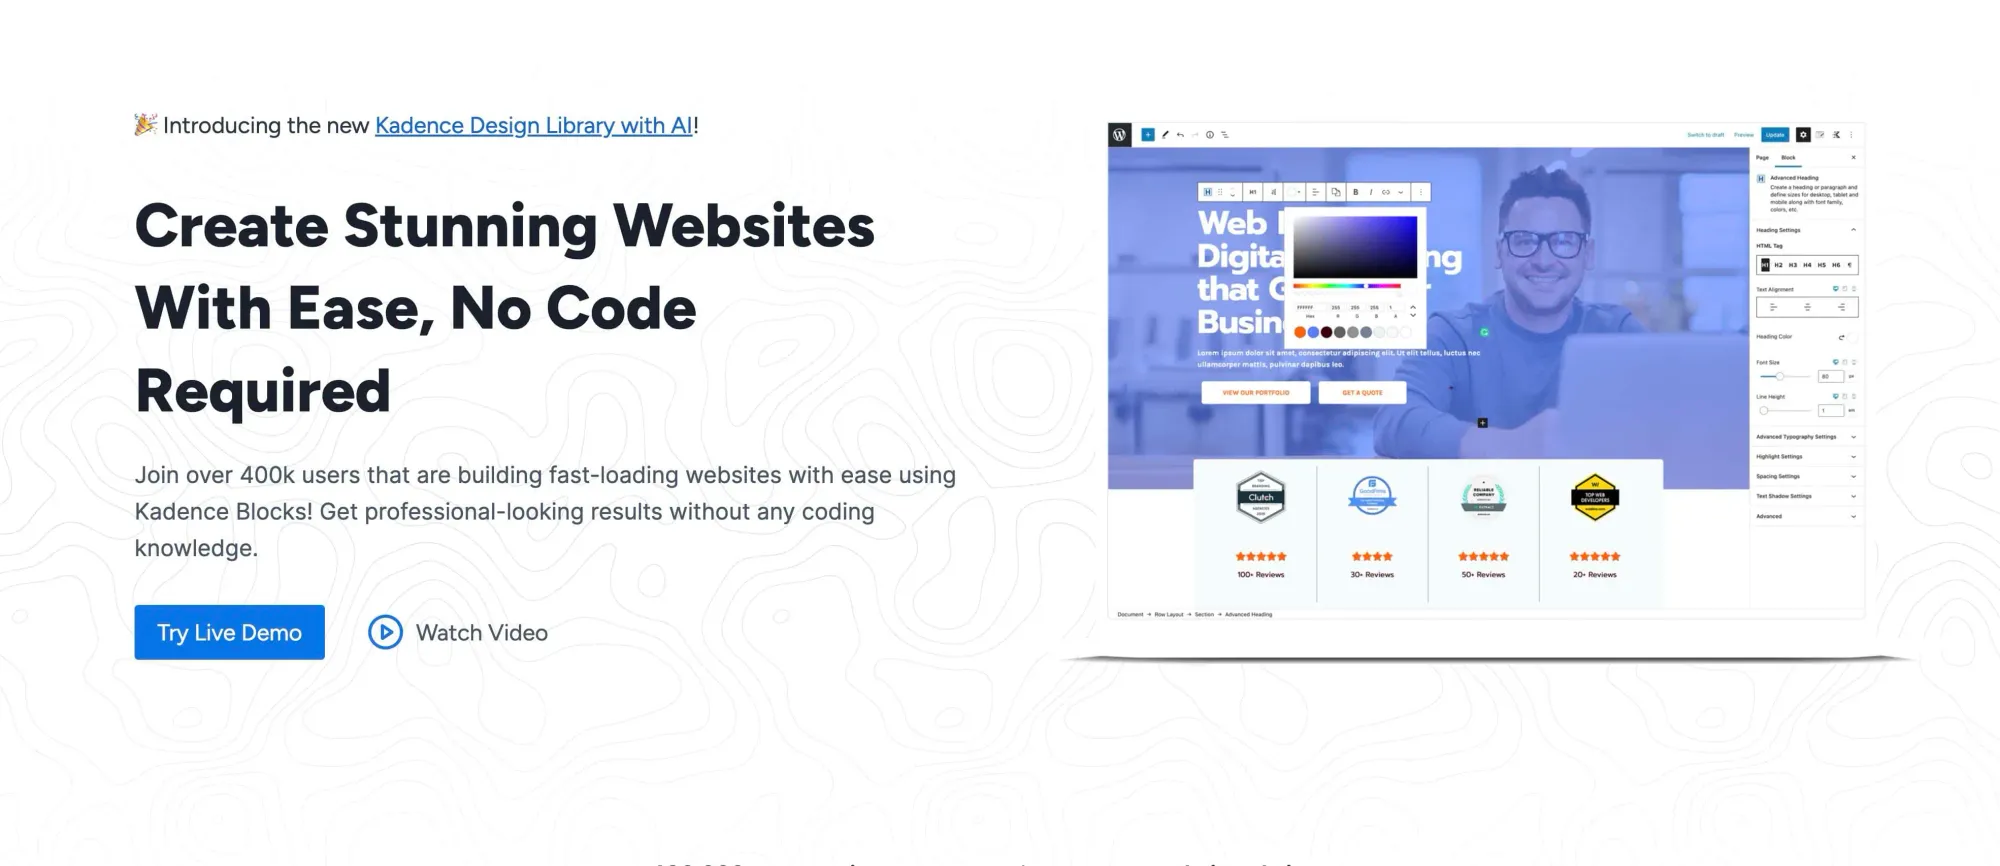
The default Gutenberg editor is a bit basic. Kadence Blocks adds more flexibility and functionality. It's optimized to work well with the Kadence theme for better performance.
If you prefer a drag-and-drop builder, Elementor is a great option. Personally, though, I'm not a fan.
Kadence Blocks has a free version that covers the basics. The pro version offers more advanced features if you need them.
2. Pretty Links

Pretty Links cleans up your affiliate links. For example, it turns this:
https://www.hostg.xyz/aff\_c?offer\_id=6&aff\_id=54857&url\_id=1003Into this:
https://kimkoh.xyz/hostingerMuch cleaner, right?
The free version works well for managing affiliate links. But the pro version offers some extra features if you need them.
3. Rank Math SEO
Rank Math SEO makes on-page optimization easy. The free version has everything you need to get started.
It integrates with Google services, letting you check posts' performance right in WordPress.
Here's a tutorial on setting it up:
4. ShortPixel Image Optimizer
Images can slow down your site if not optimized. ShortPixel automatically compresses your images without noticeable quality loss.
I've used ShortPixel for years. Even now that I'm not on WordPress, I still use it to optimize images before uploading to my Ghost site.
5. Akismet Anti-Spam

Akismet filters spam comments effectively. The Personal plan is free, but with some conditions:
- No ads on your site
- No selling products/services
- No business promotion
You can also choose your own price:
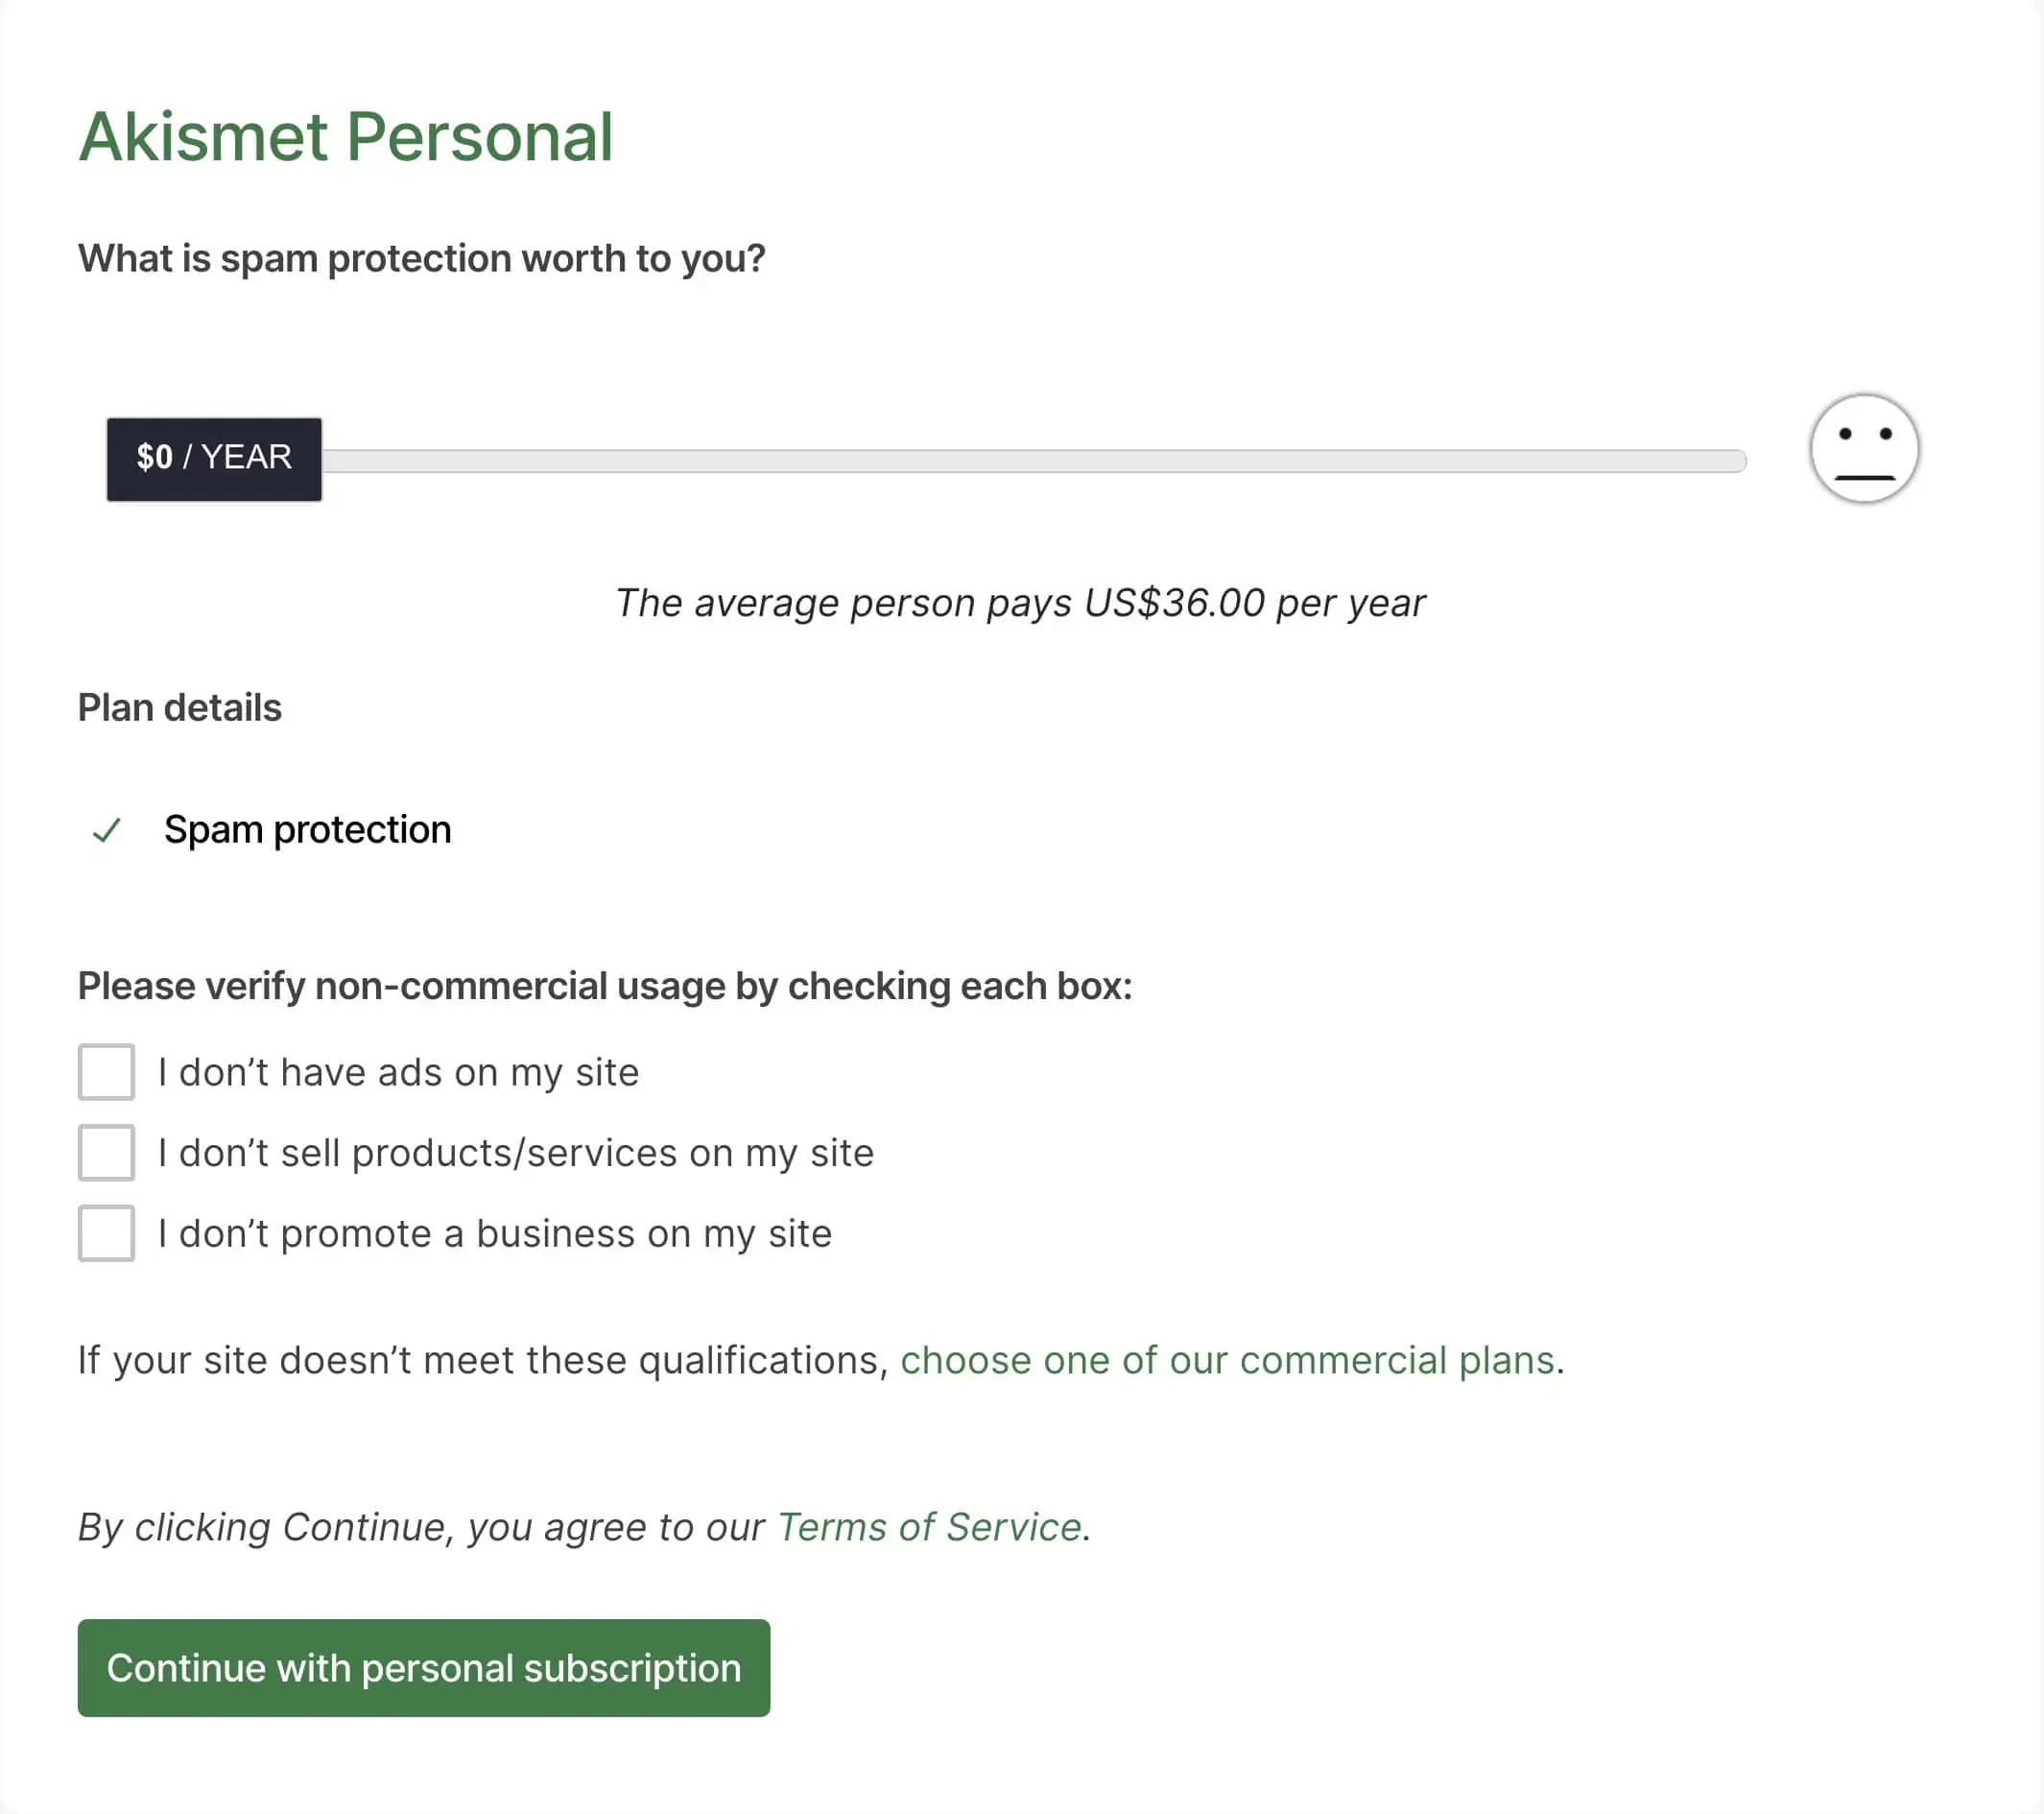
My advice? Use it for free until you start making money, then decide what it's worth to you.
There you have it. These are the plugins that I think are essential for an affiliate marketing blog.
If you need to add more, choose plugins that fit your specific needs without overloading your site.
Basic Tracking Setup with Google Analytics 4 (GA4)
Google Analytics 4 (GA4) is the go-to tool for most bloggers to track website traffic. It's free and works well with Google Tag Manager (GTM).
I love GTM for two reasons:
-
It lets you manage all tracking tags in one place. Within the same GTM tracking tag, you can have GA4, Facebook pixel, Twitter pixel, Pinterest tag, and many more.
Using multiple tracking tags will still impact page load times. GTM just simplifies the management.
-
It allows for custom tracking without deep technical knowledge. It's still somewhat technical — but much easier than coding from scratch.
Later, I'll show you how to use GTM for tracking affiliate link clicks, giving you a taste of custom tracking setup.
For now, let's set up basic GA4 tracking using GTM.
Creating Your GA4 Account
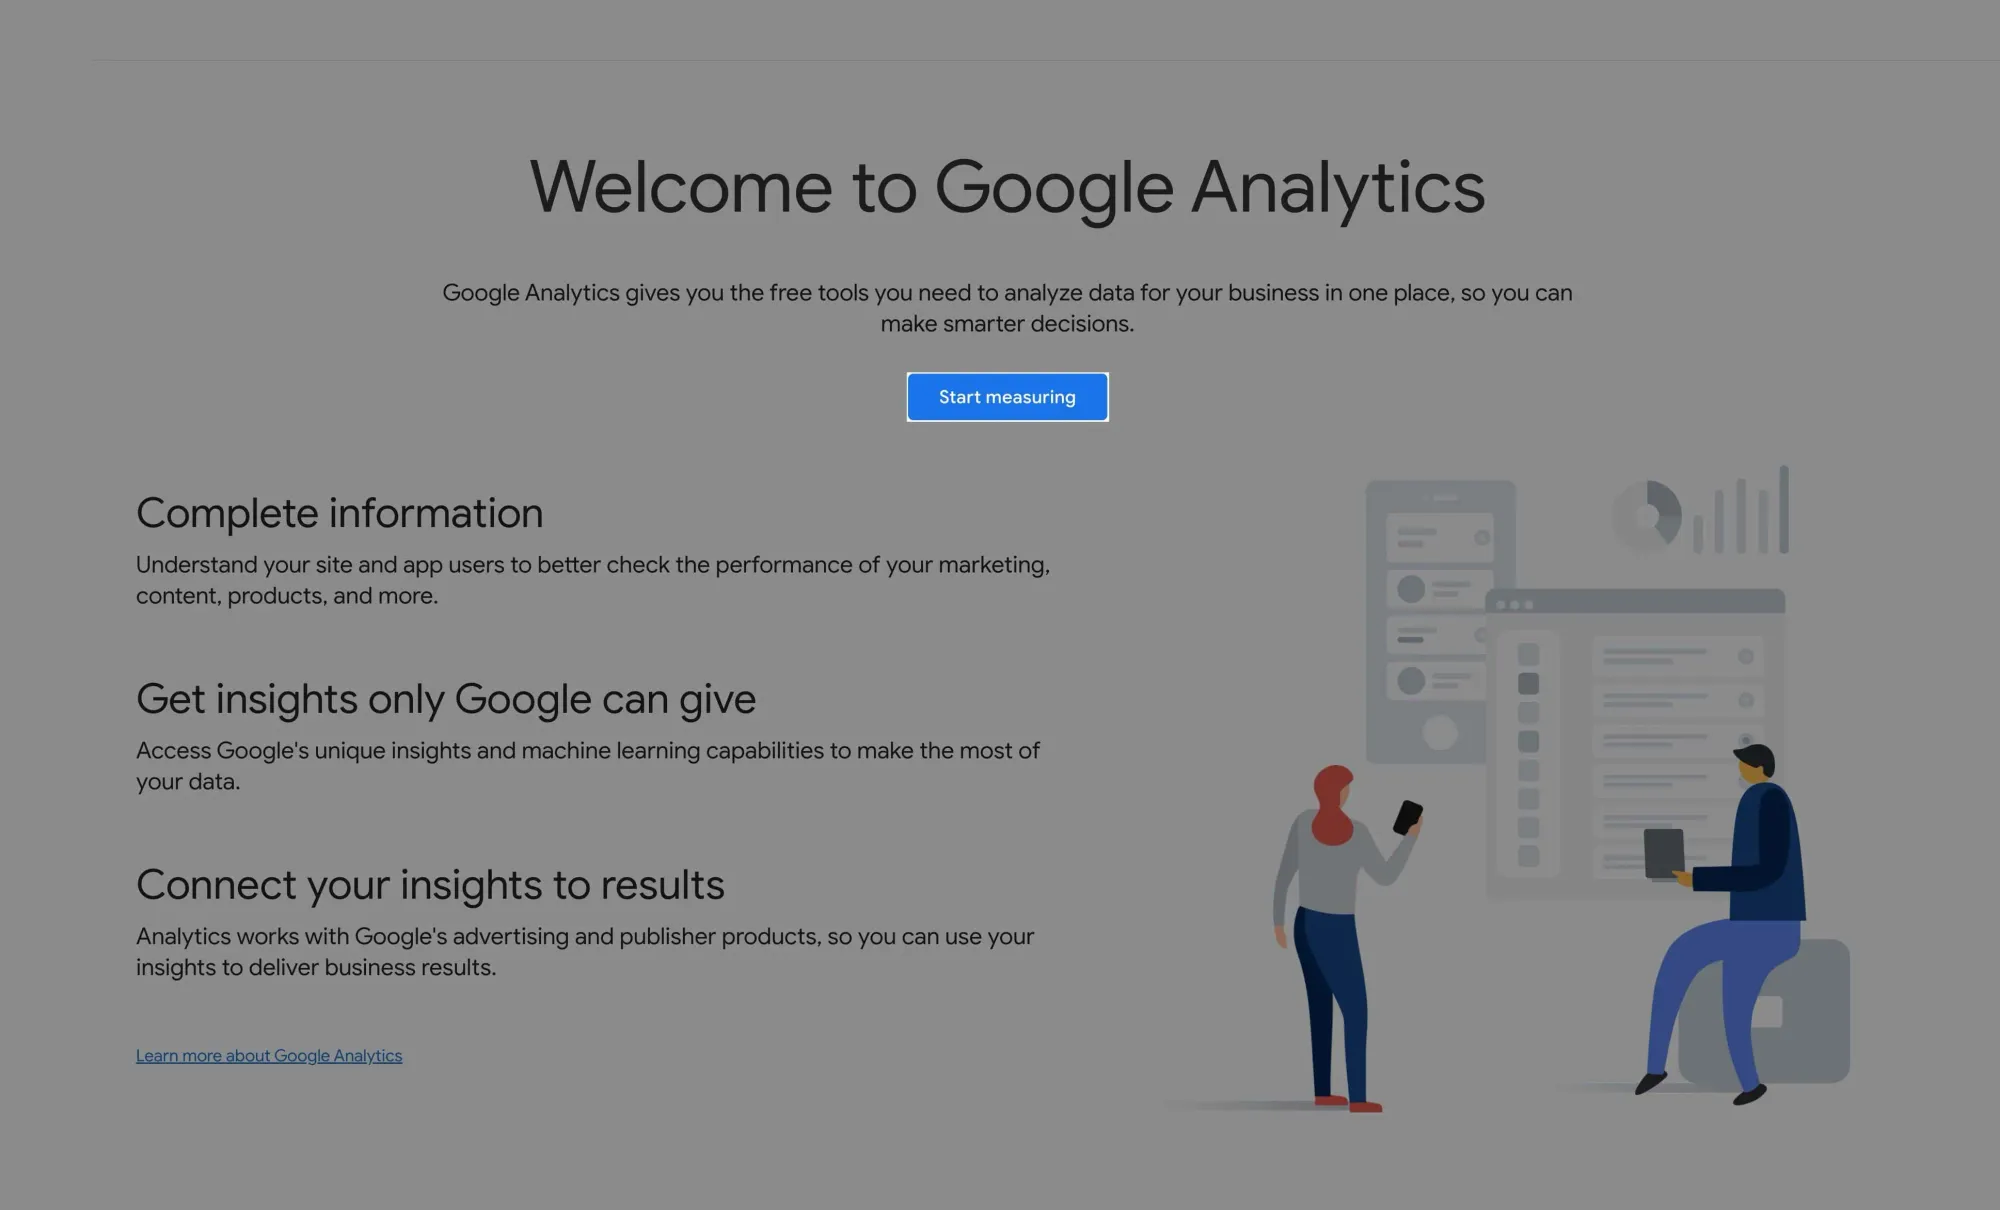
Start by logging into your main Google account. Head to Google Analytics and click Start measuring:
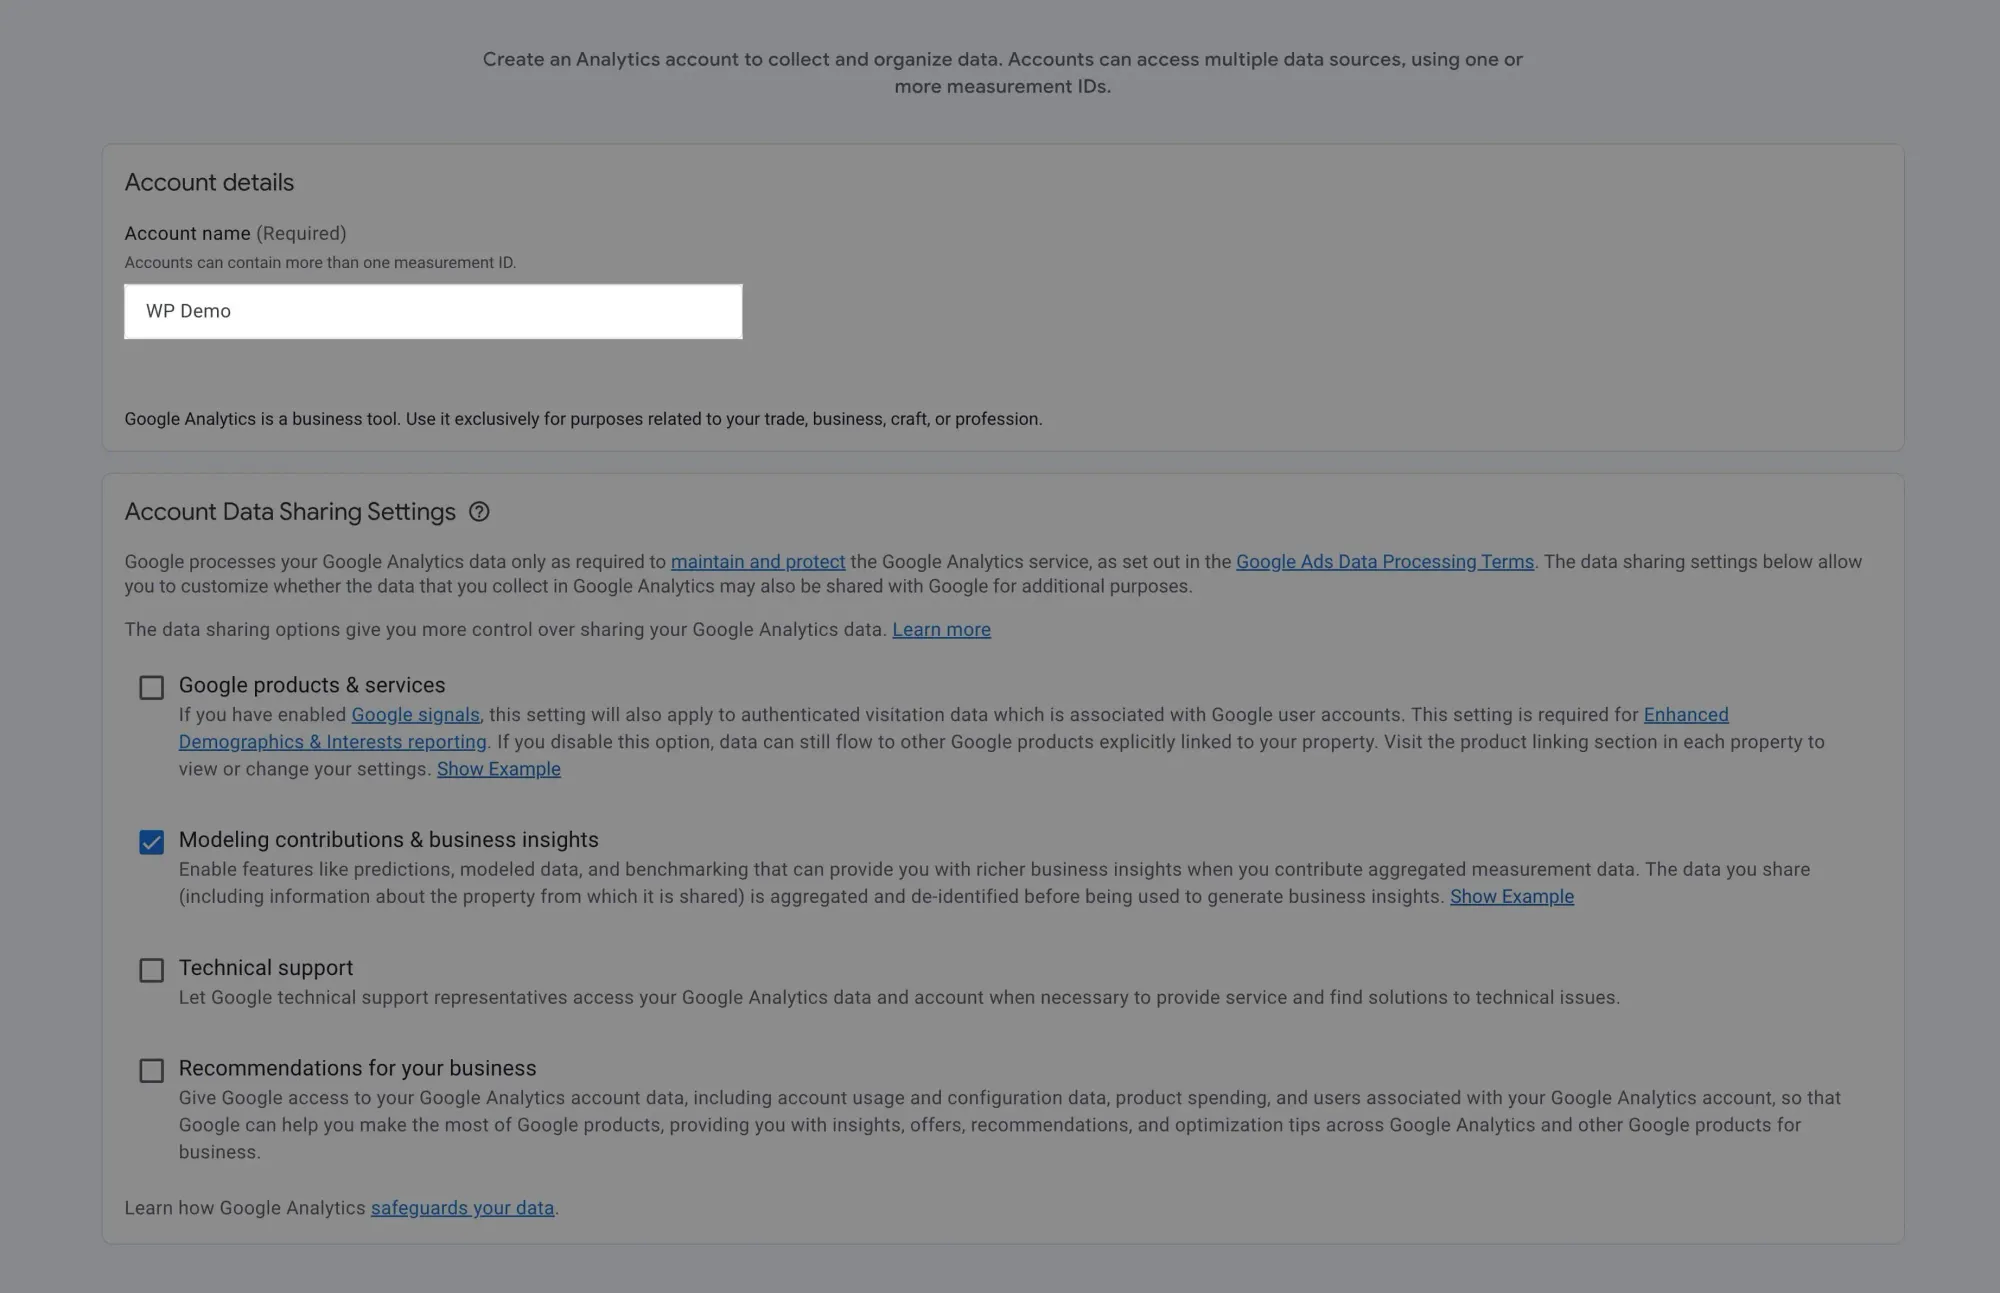
On the Account creation page, enter an account name (your company or personal name). Select your data-sharing preferences, then click Next:
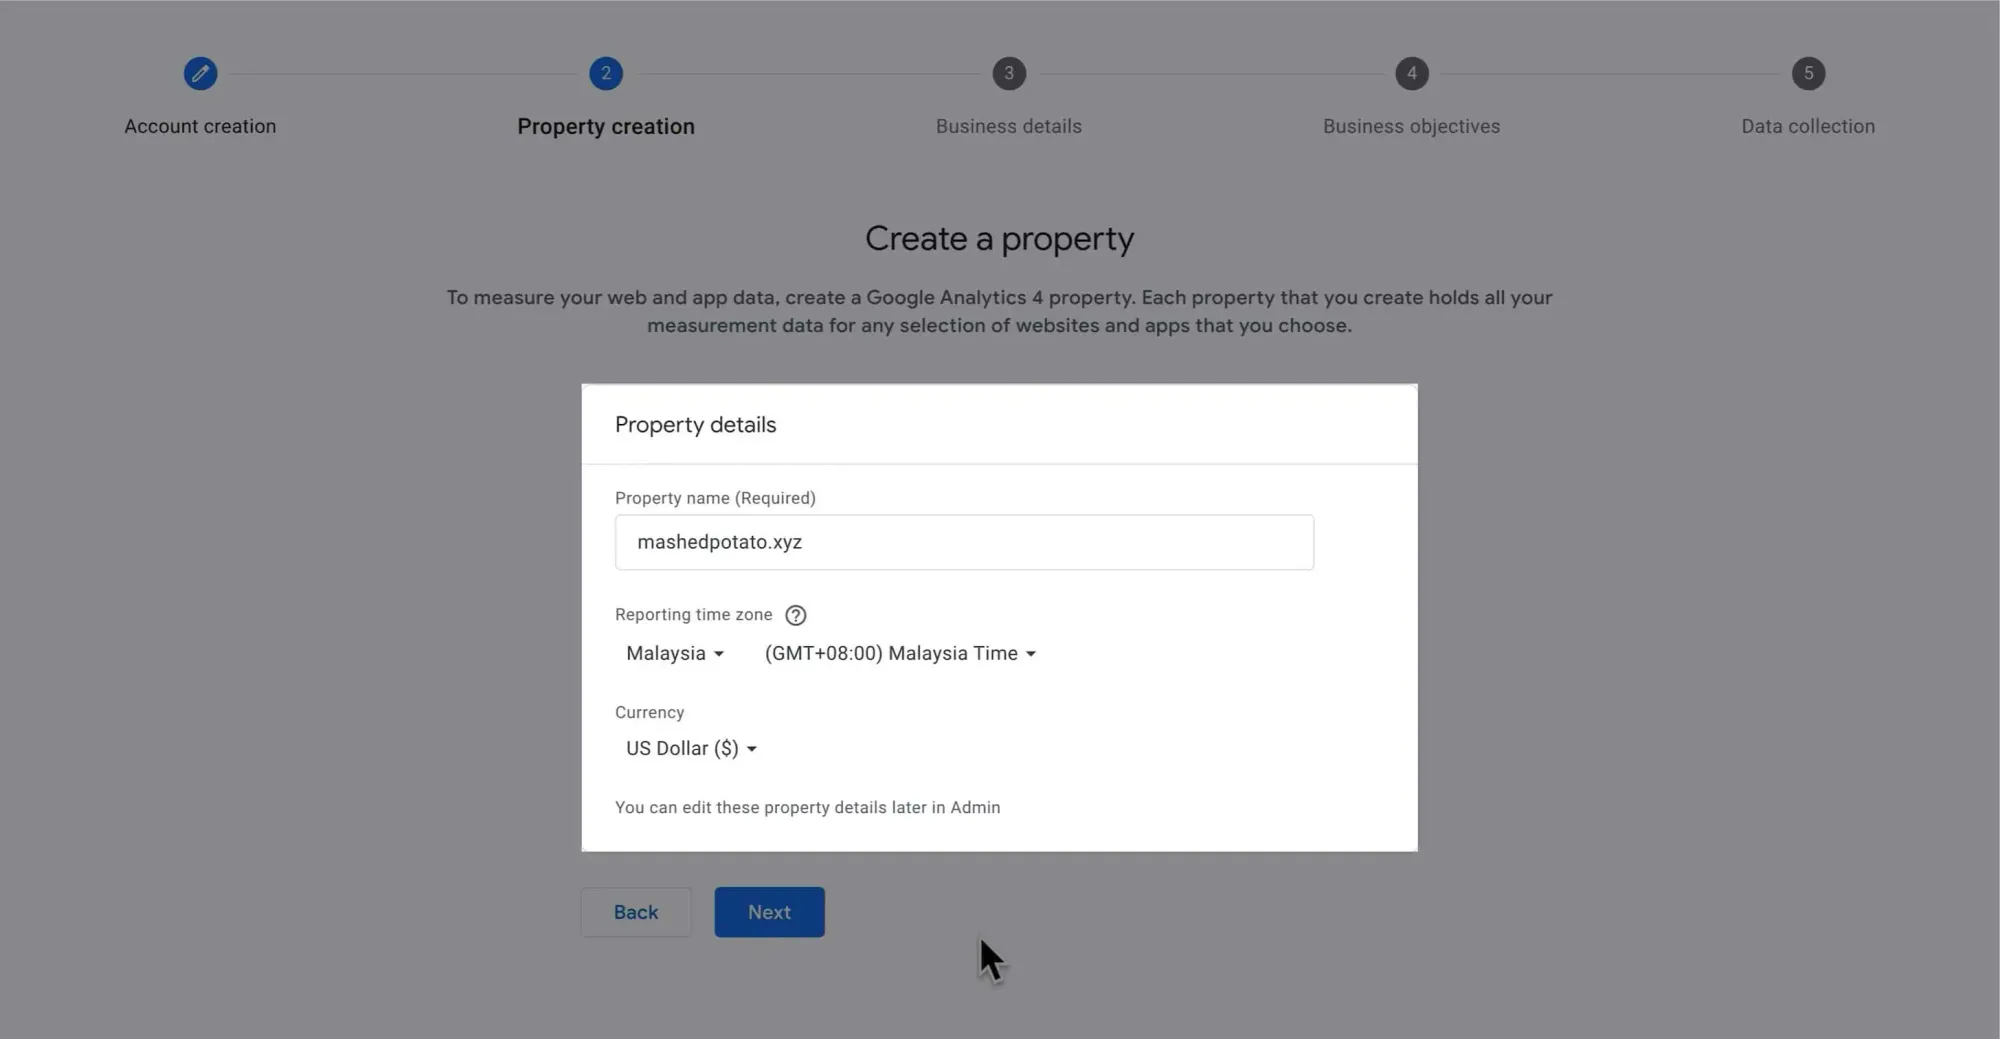
Now, create a property. Enter your property details (typically your domain name) and click Next:
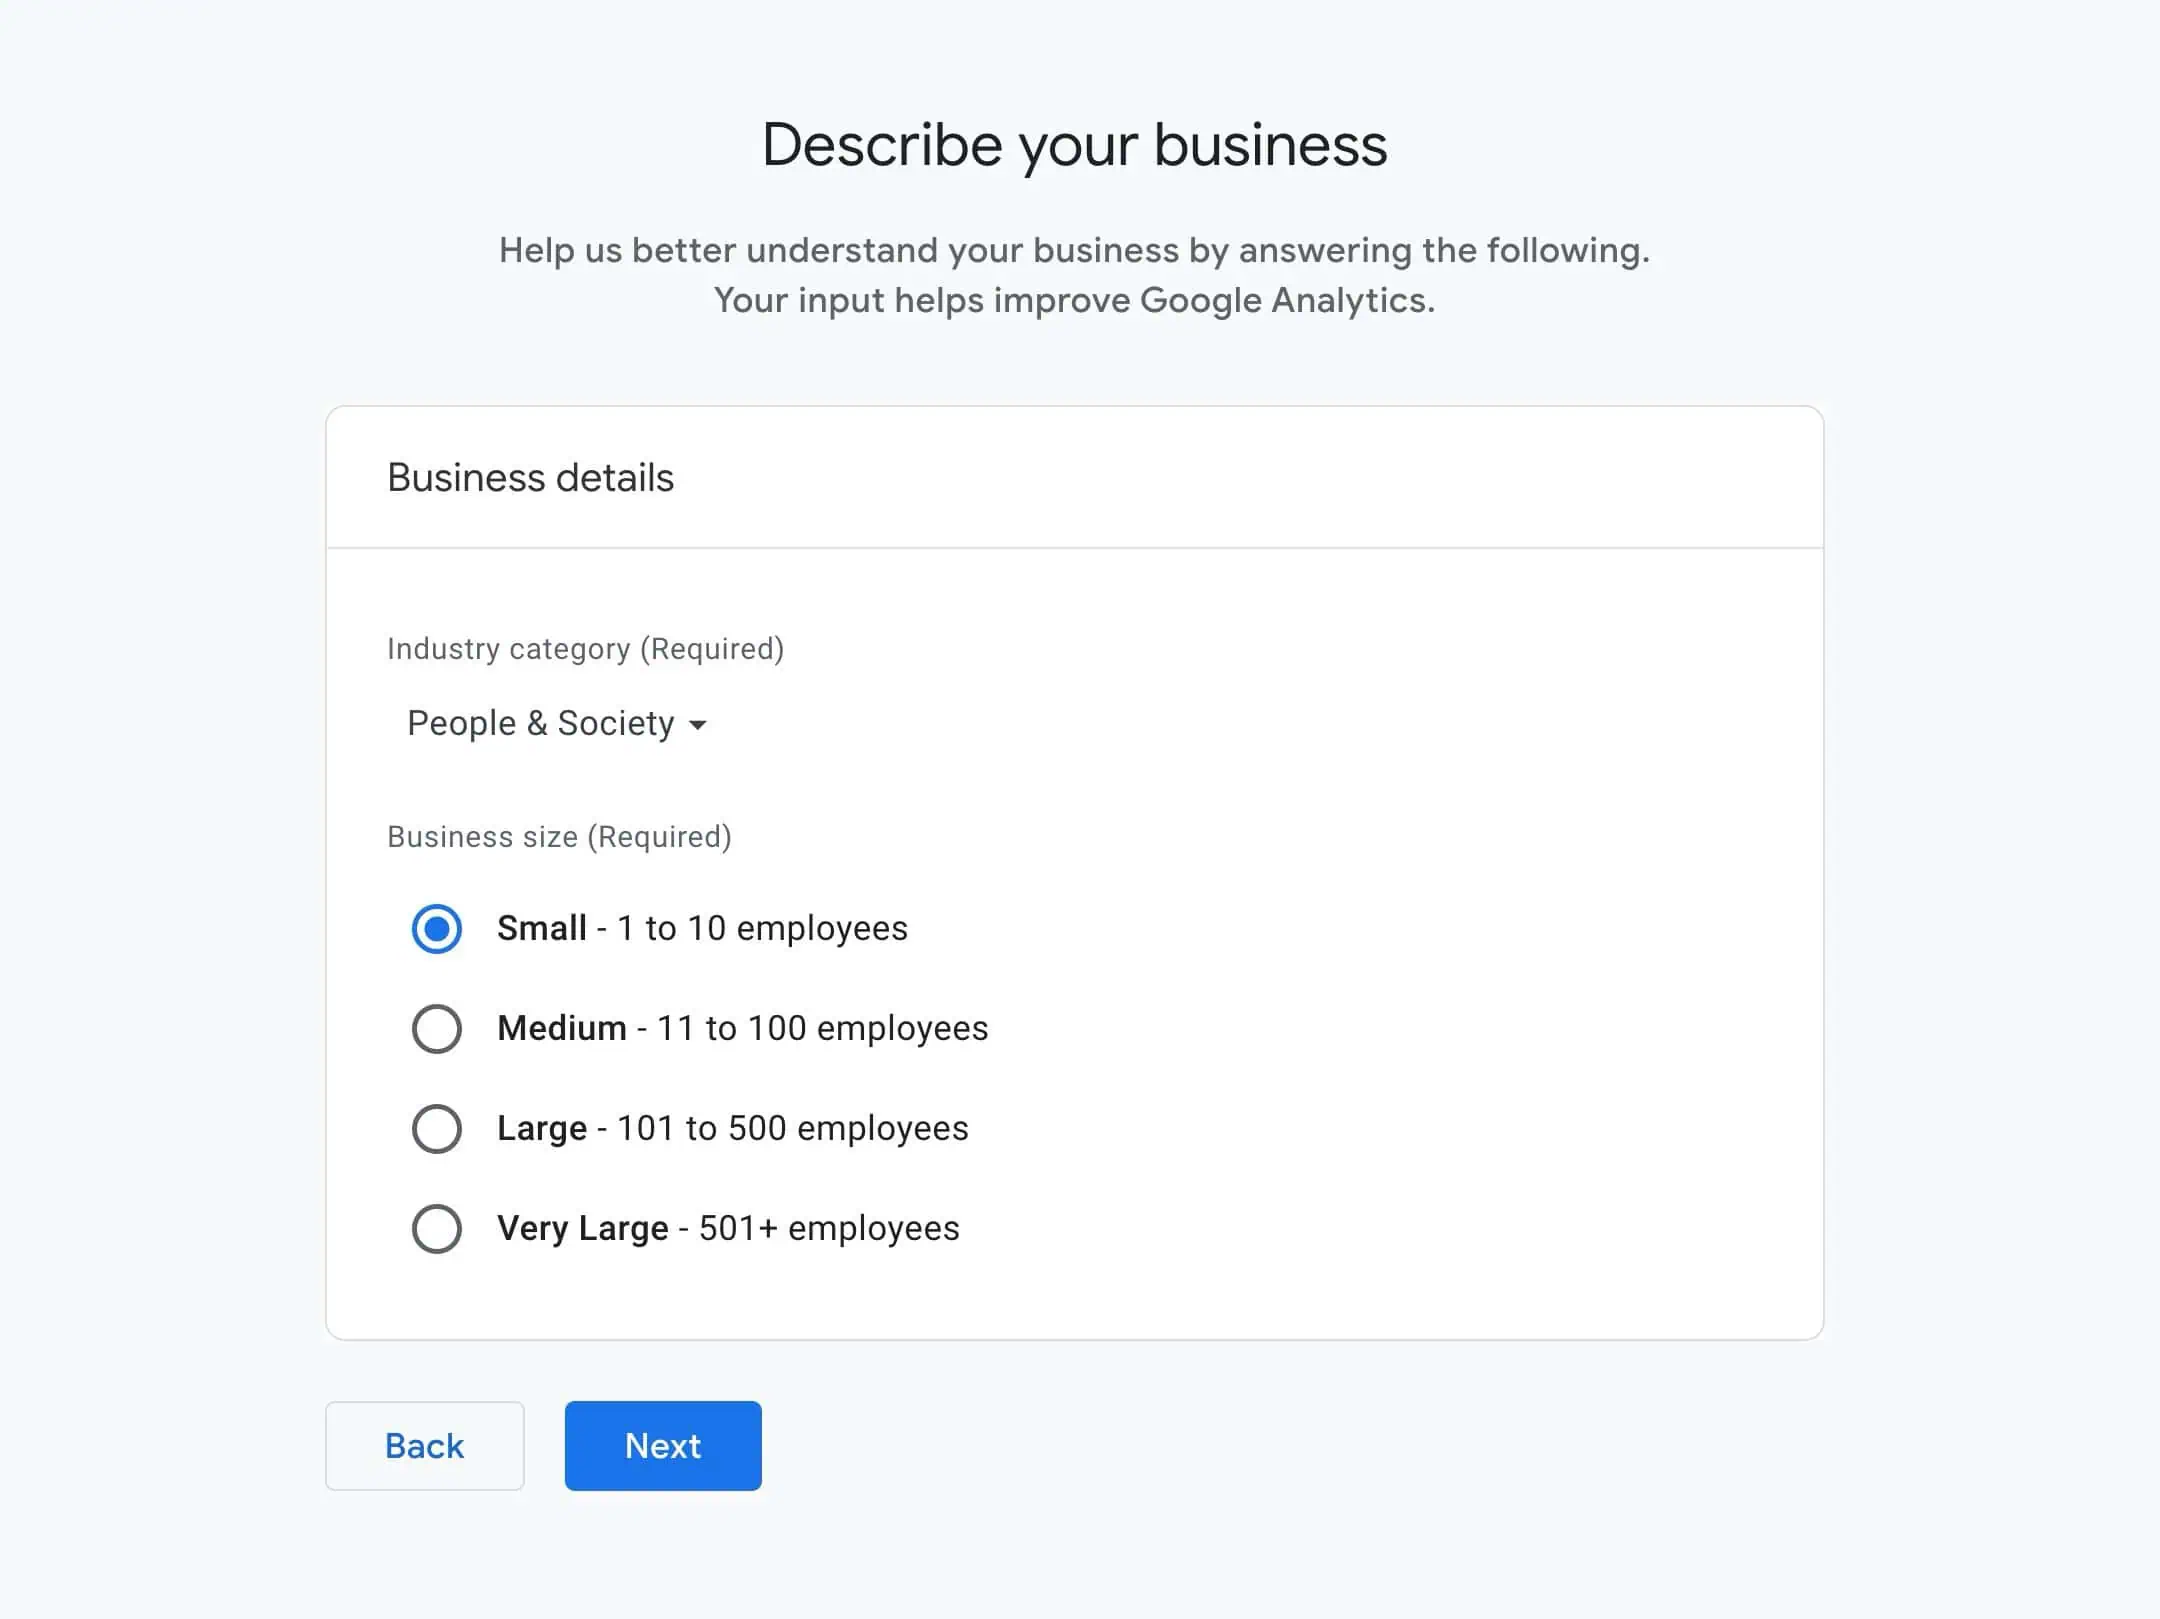
Describe your business and click Next:
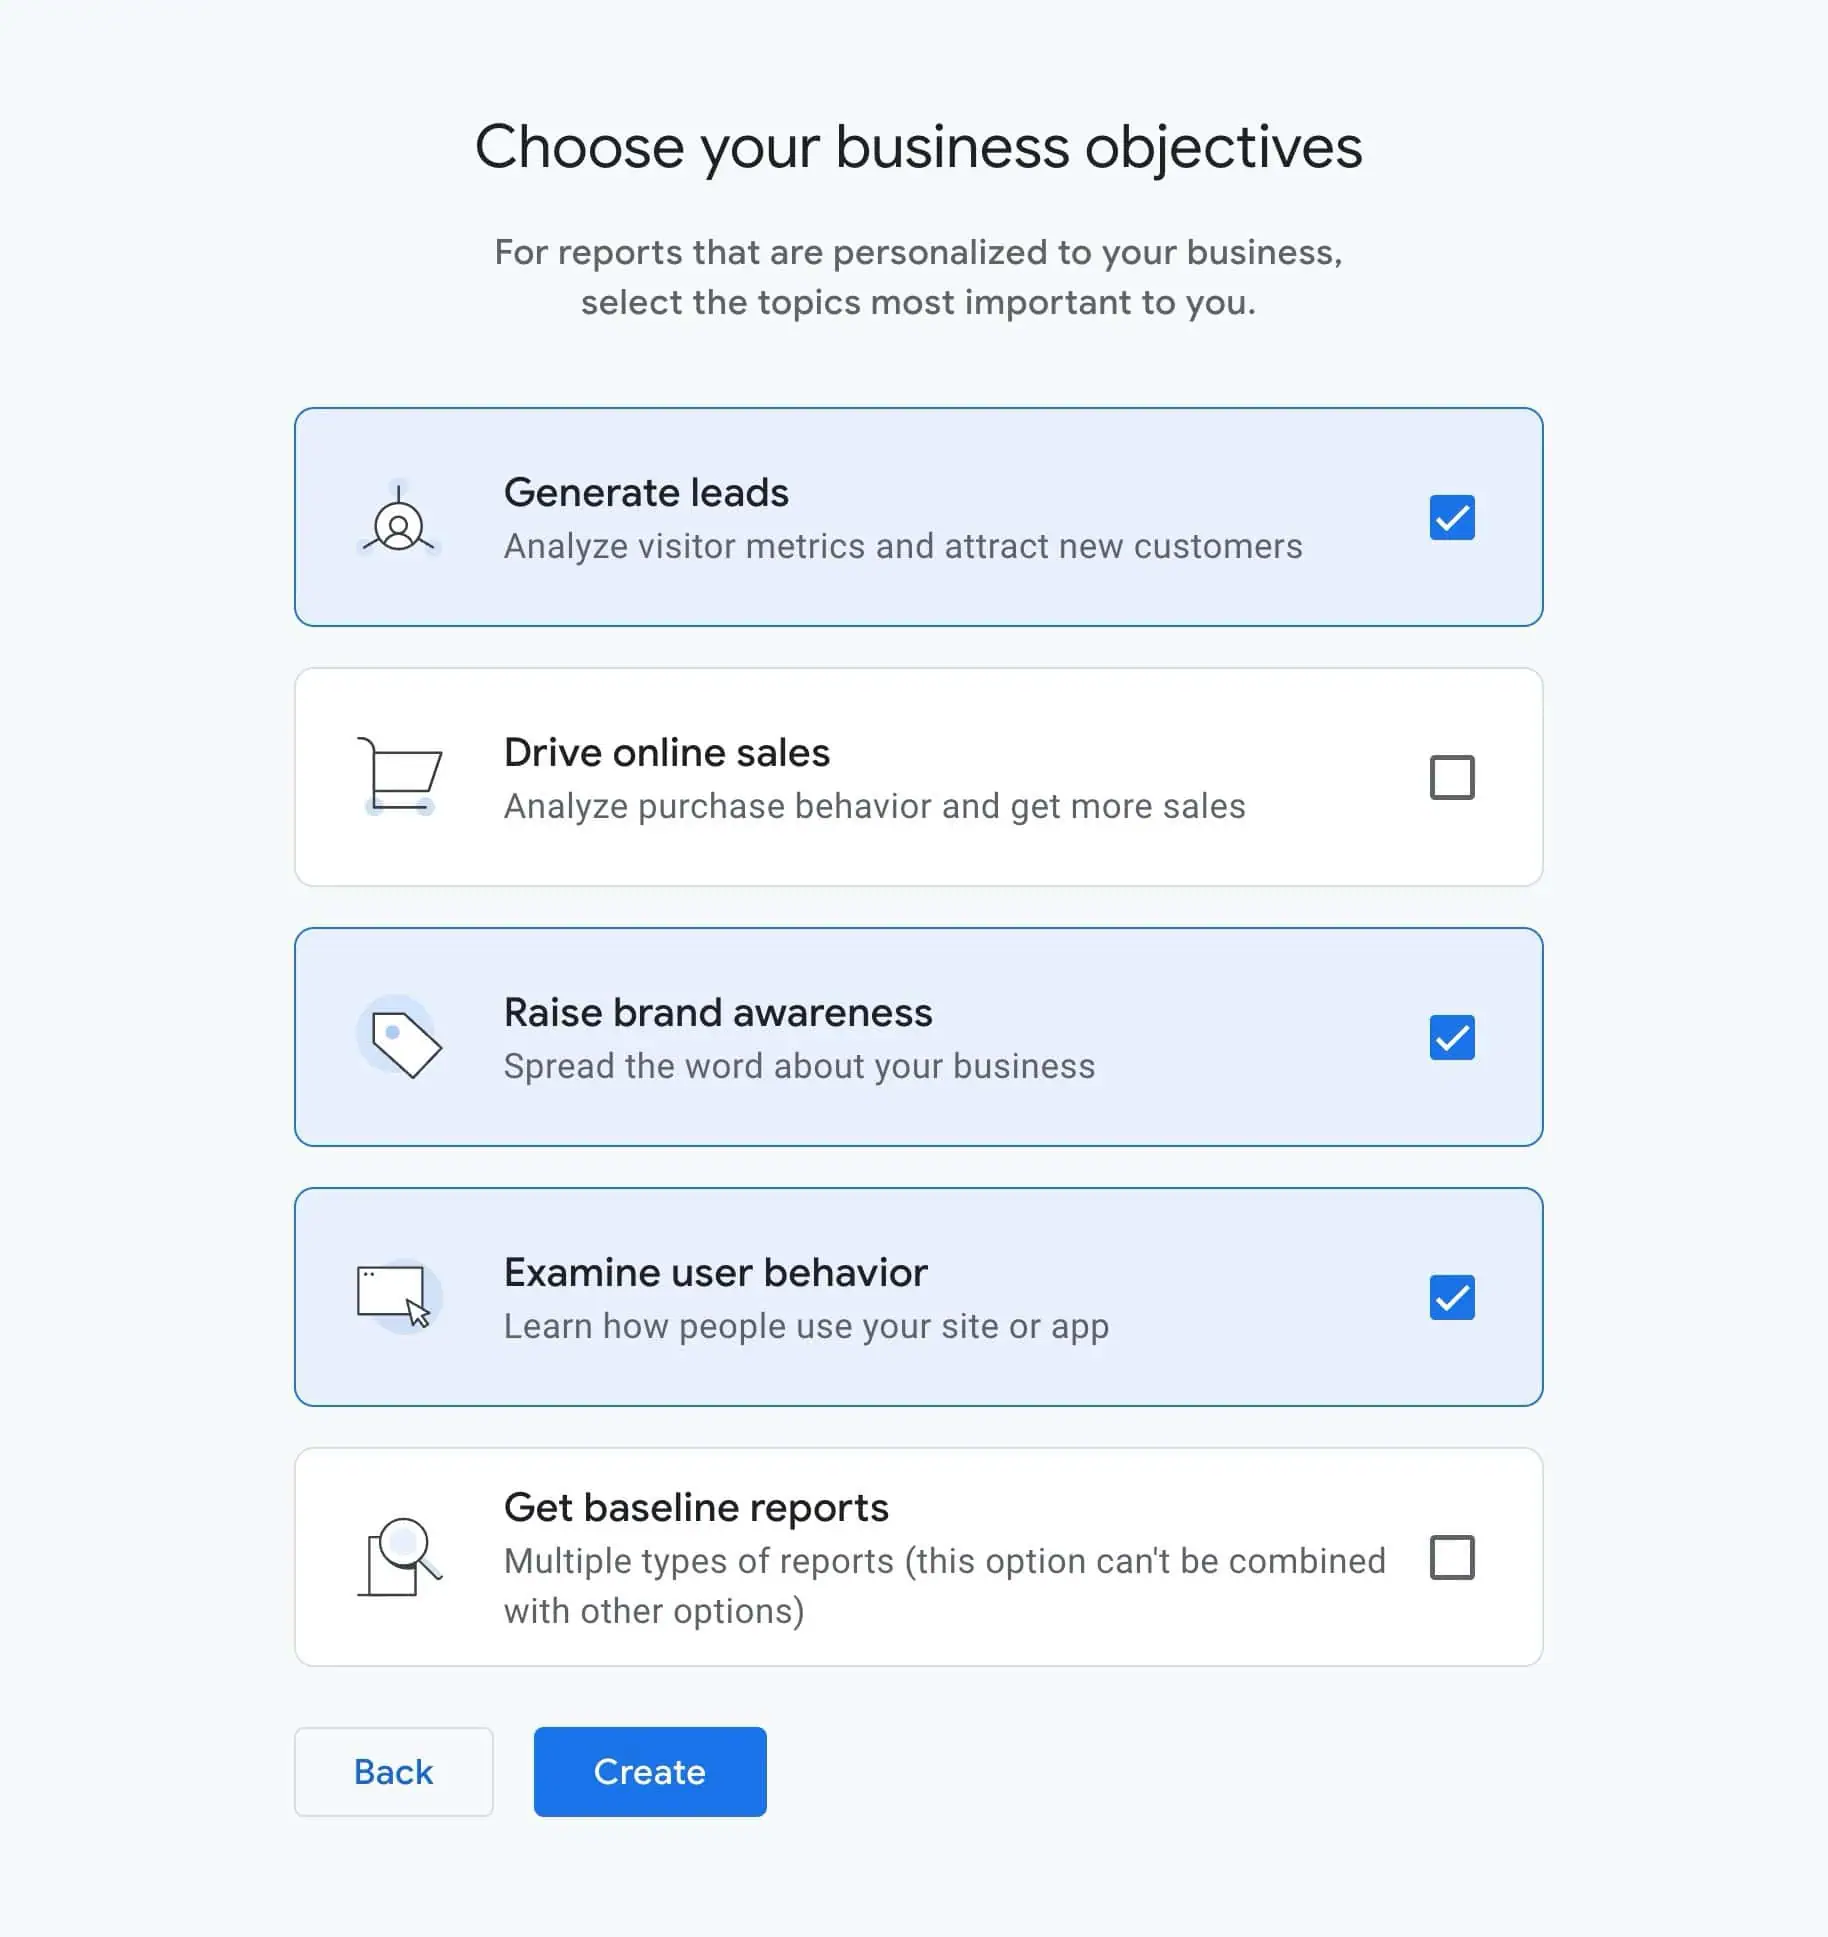
Choose your business objectives and click Create:
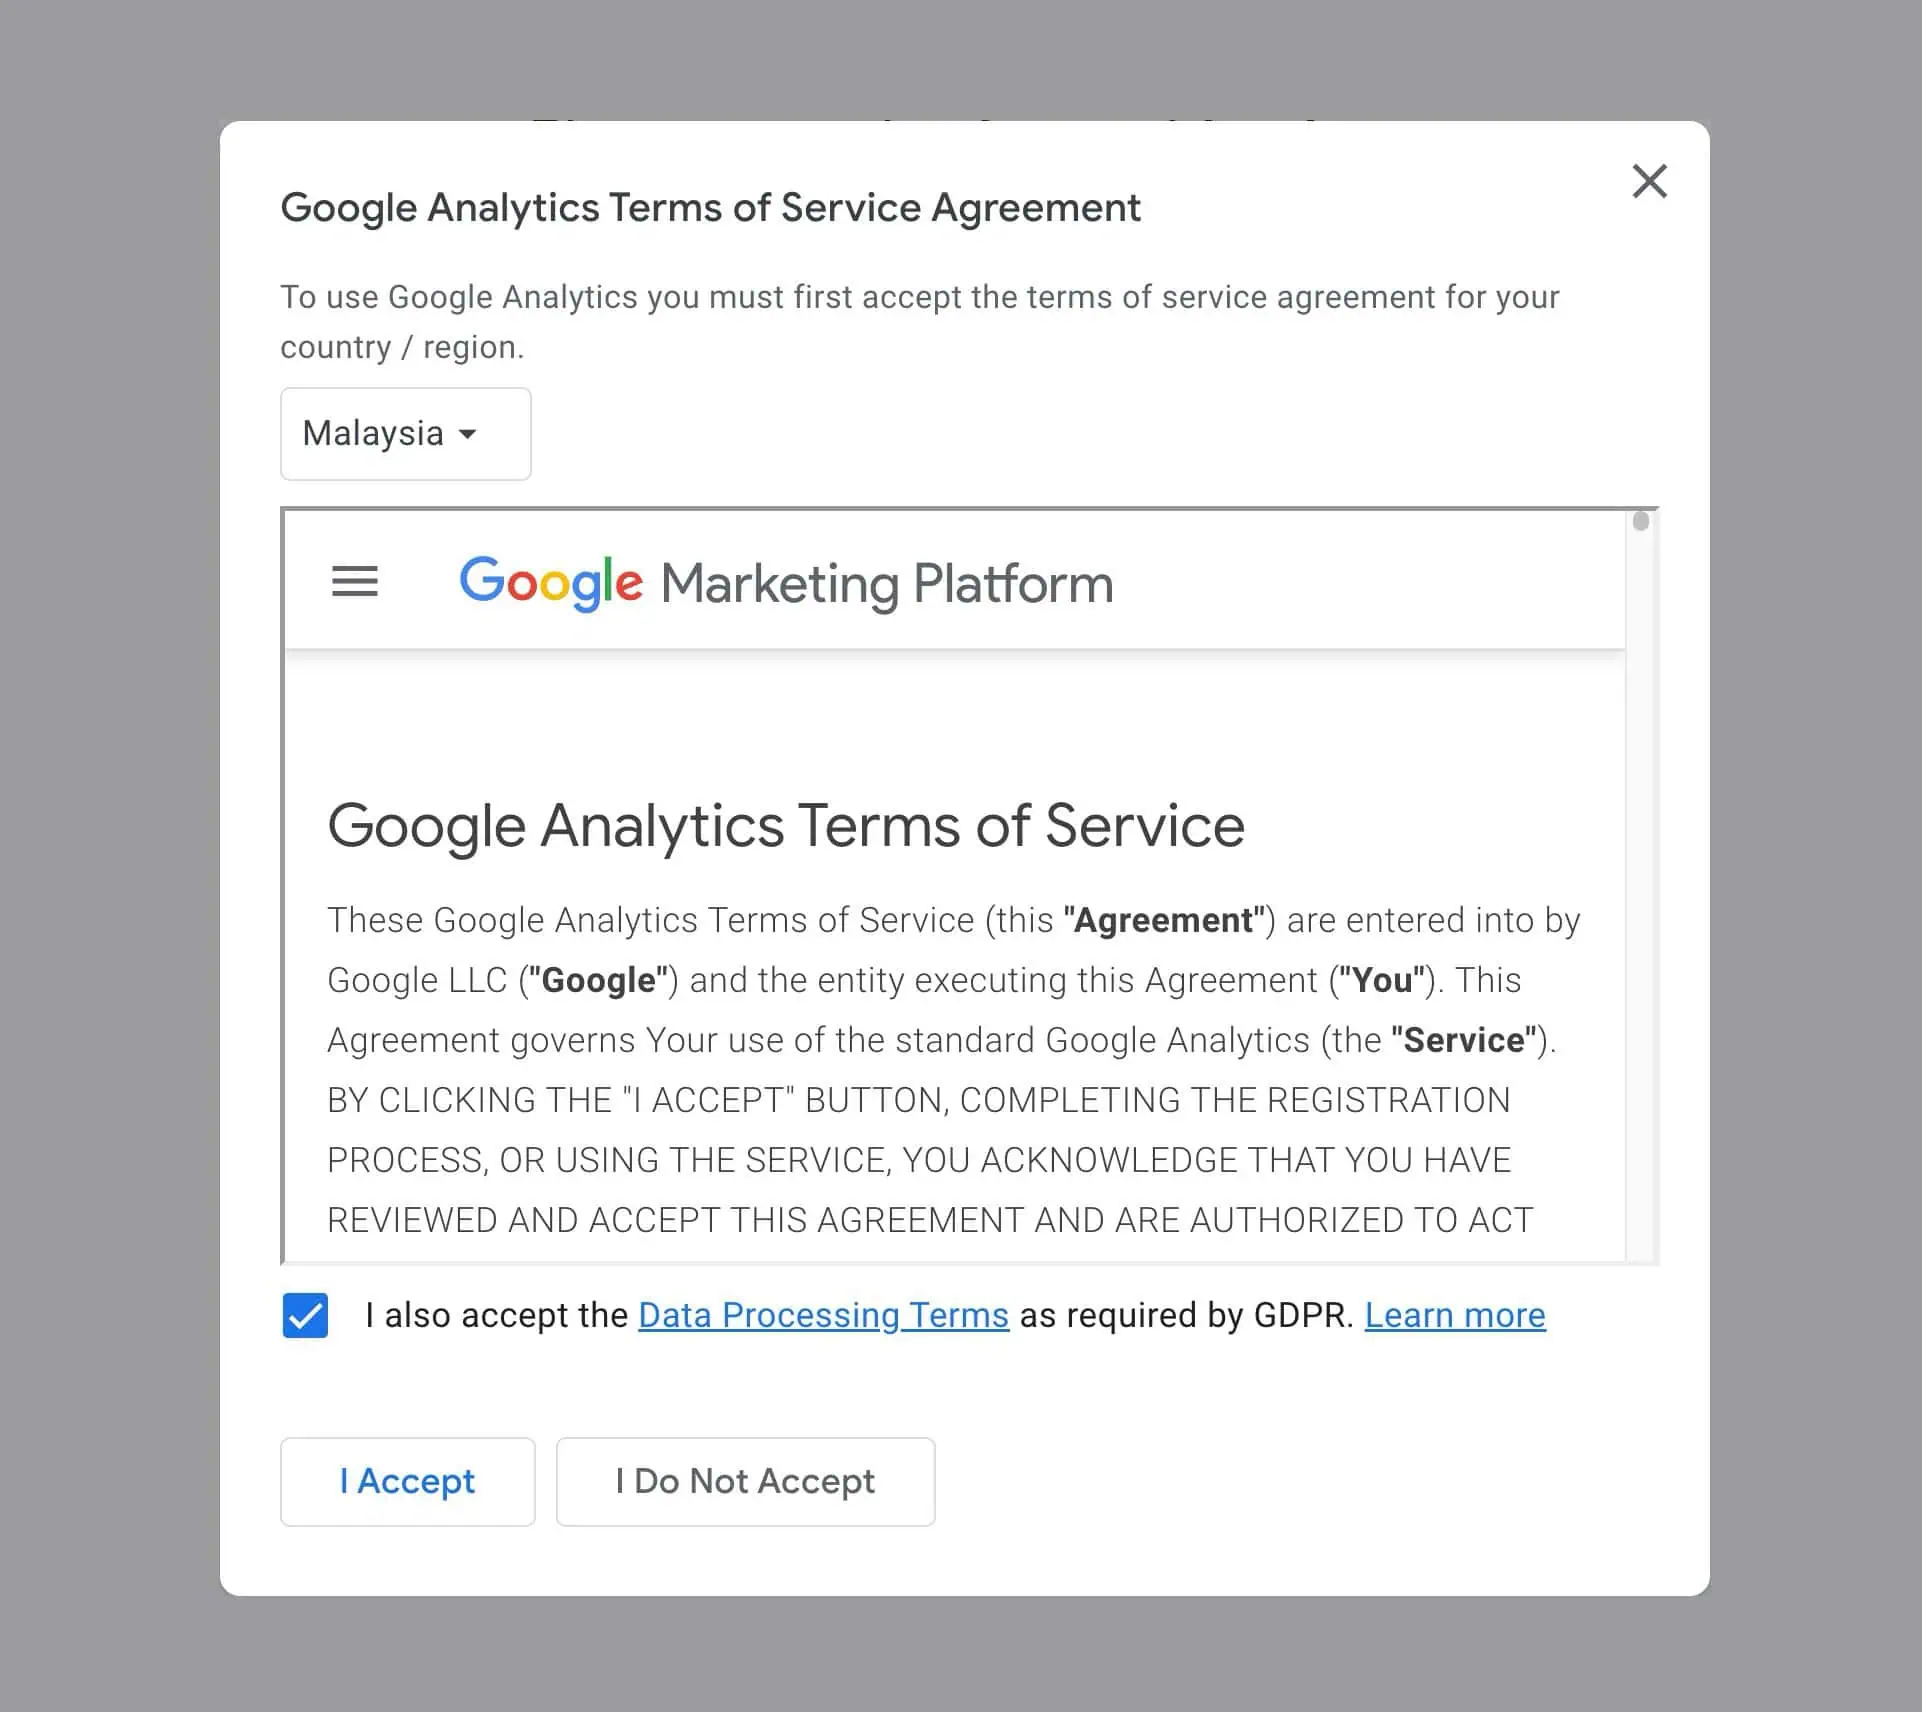
Select your country and accept the terms:
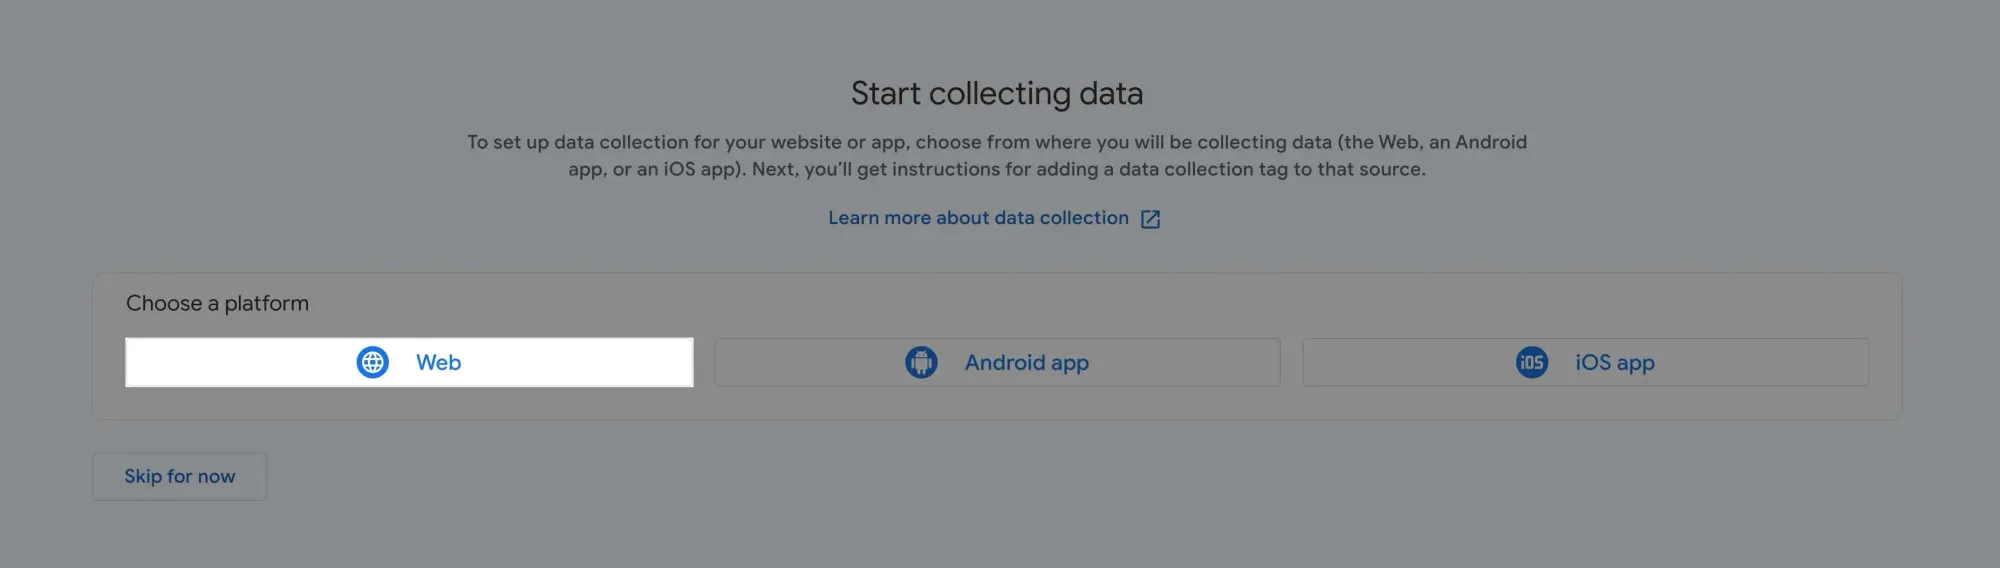
Choose your data collection platform. For website tracking, select Web:
Set up your data stream by entering your website URL and name:
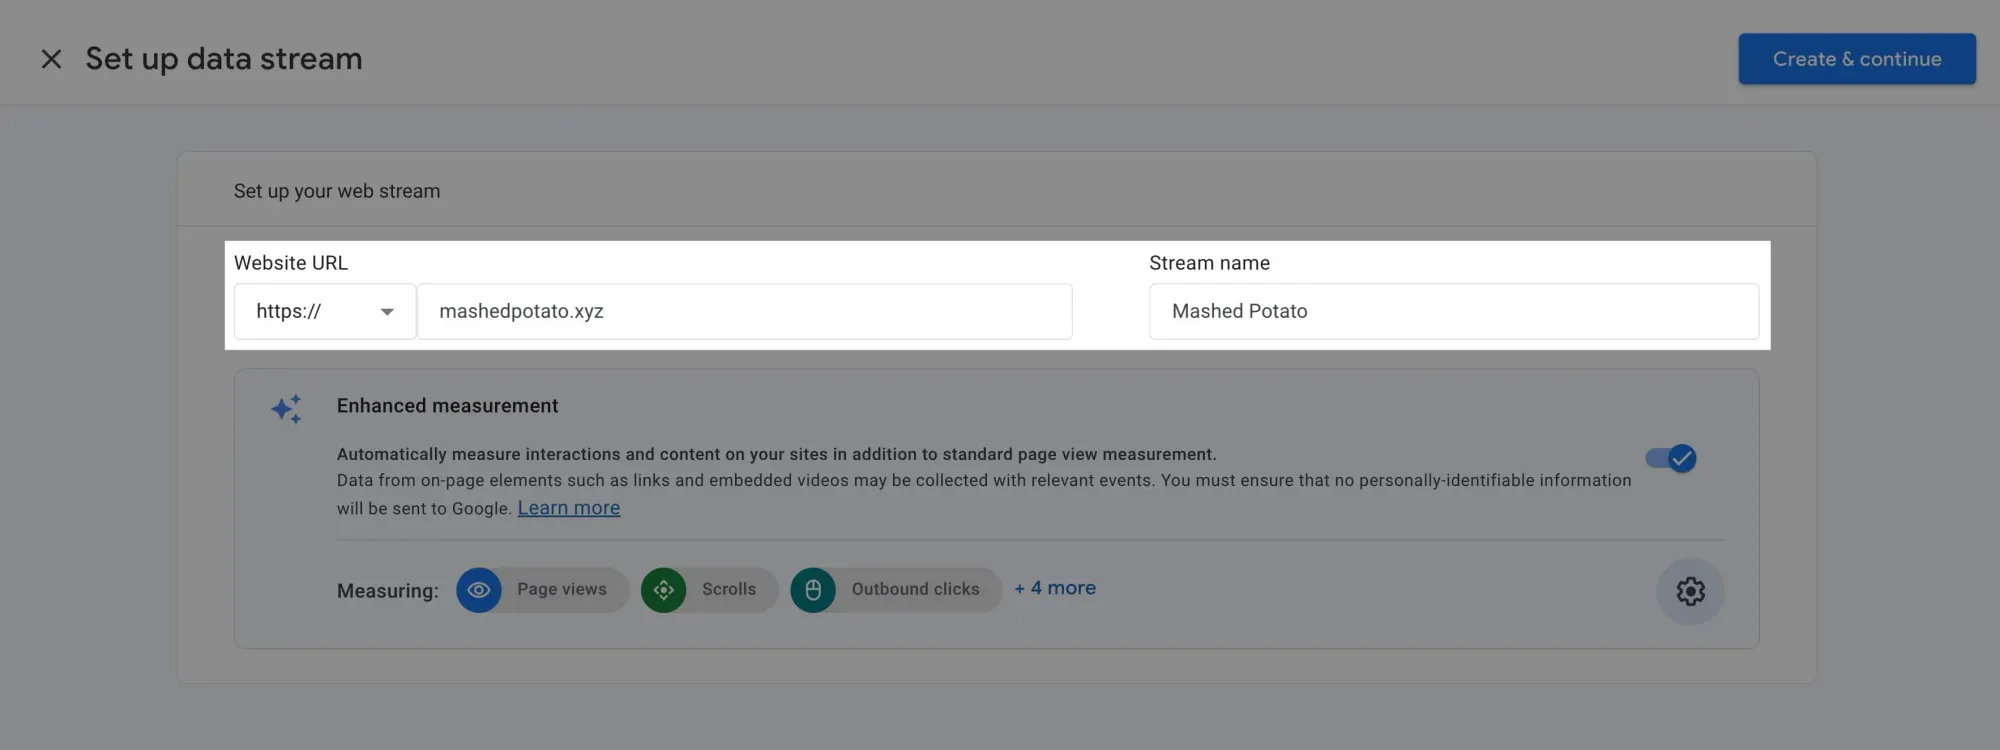
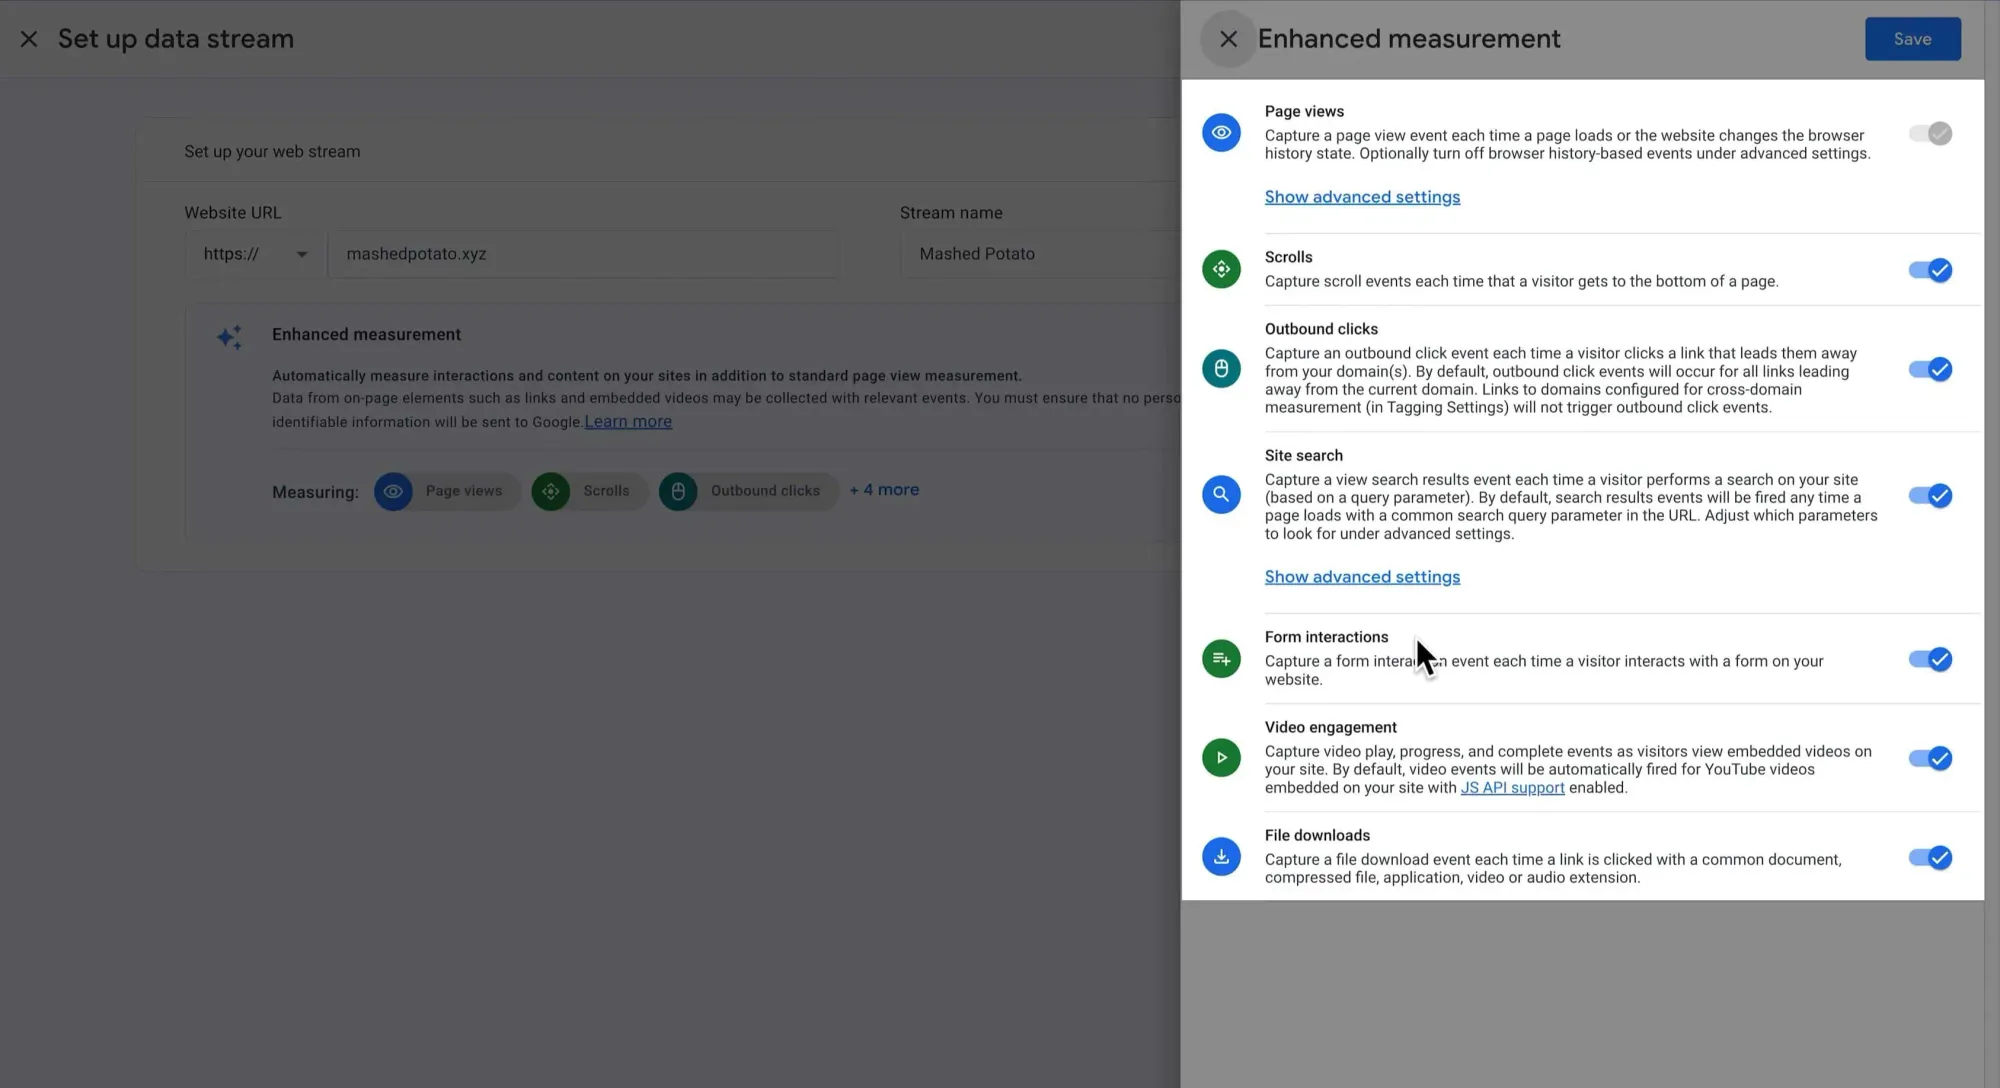
By default, all enhanced measurements are enabled, automatically tracking various events:
Click Next again to complete the setup:
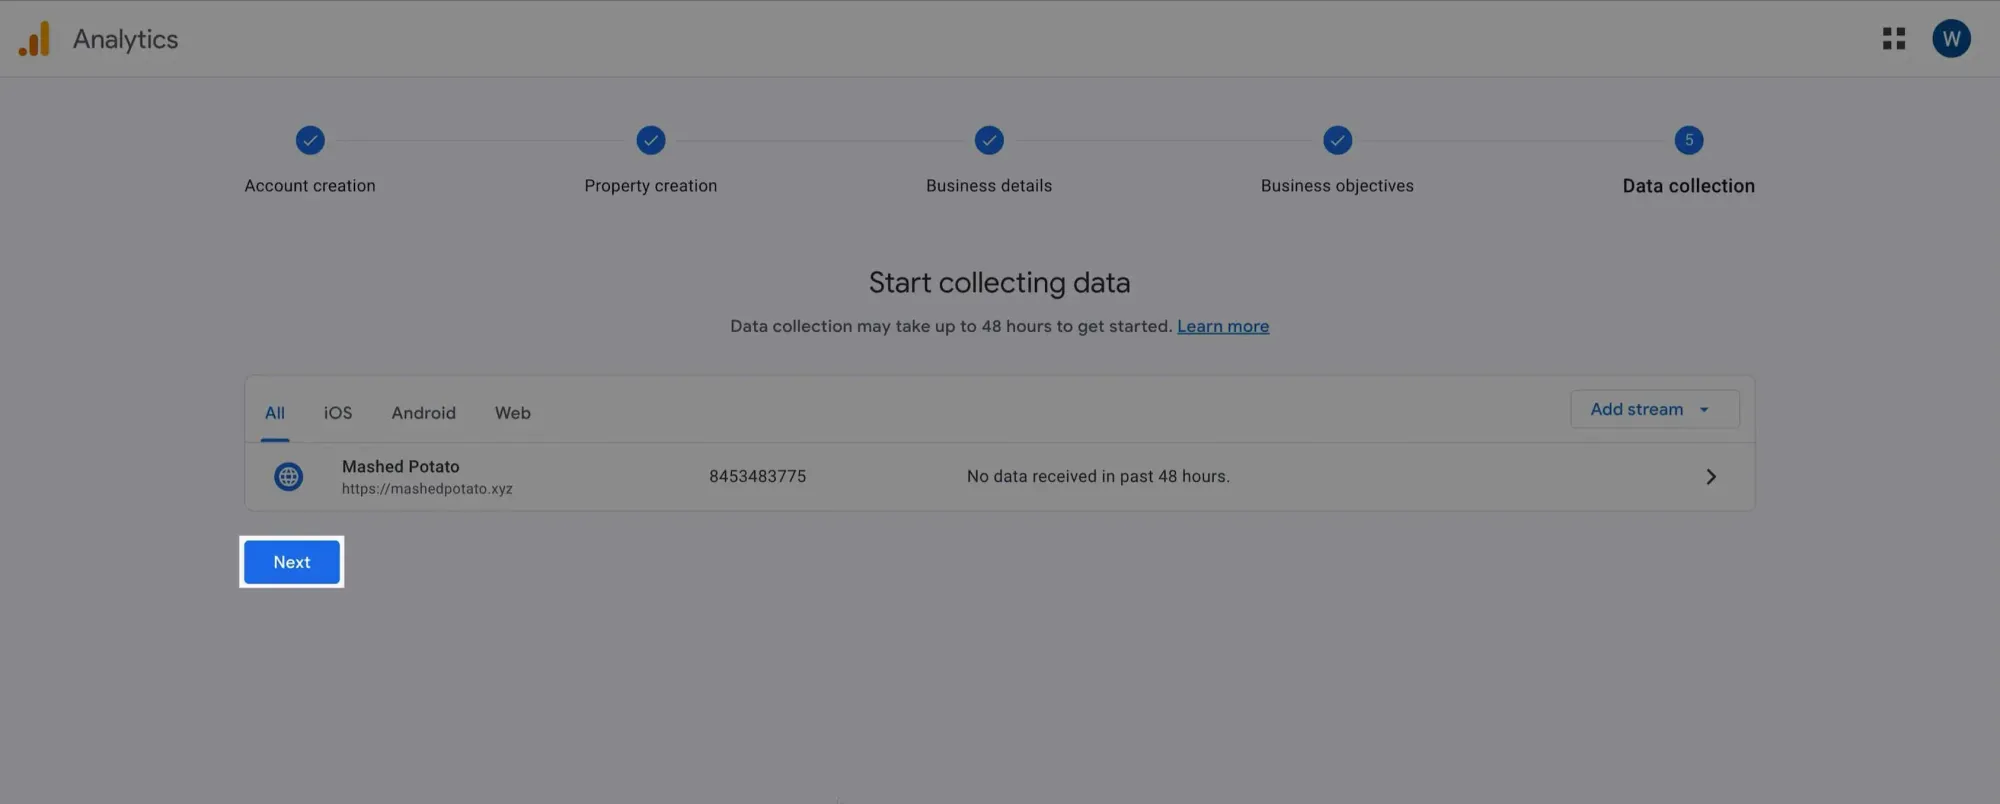
You'll see a prompt to install the Google tag. We'll skip this as we're using GTM.
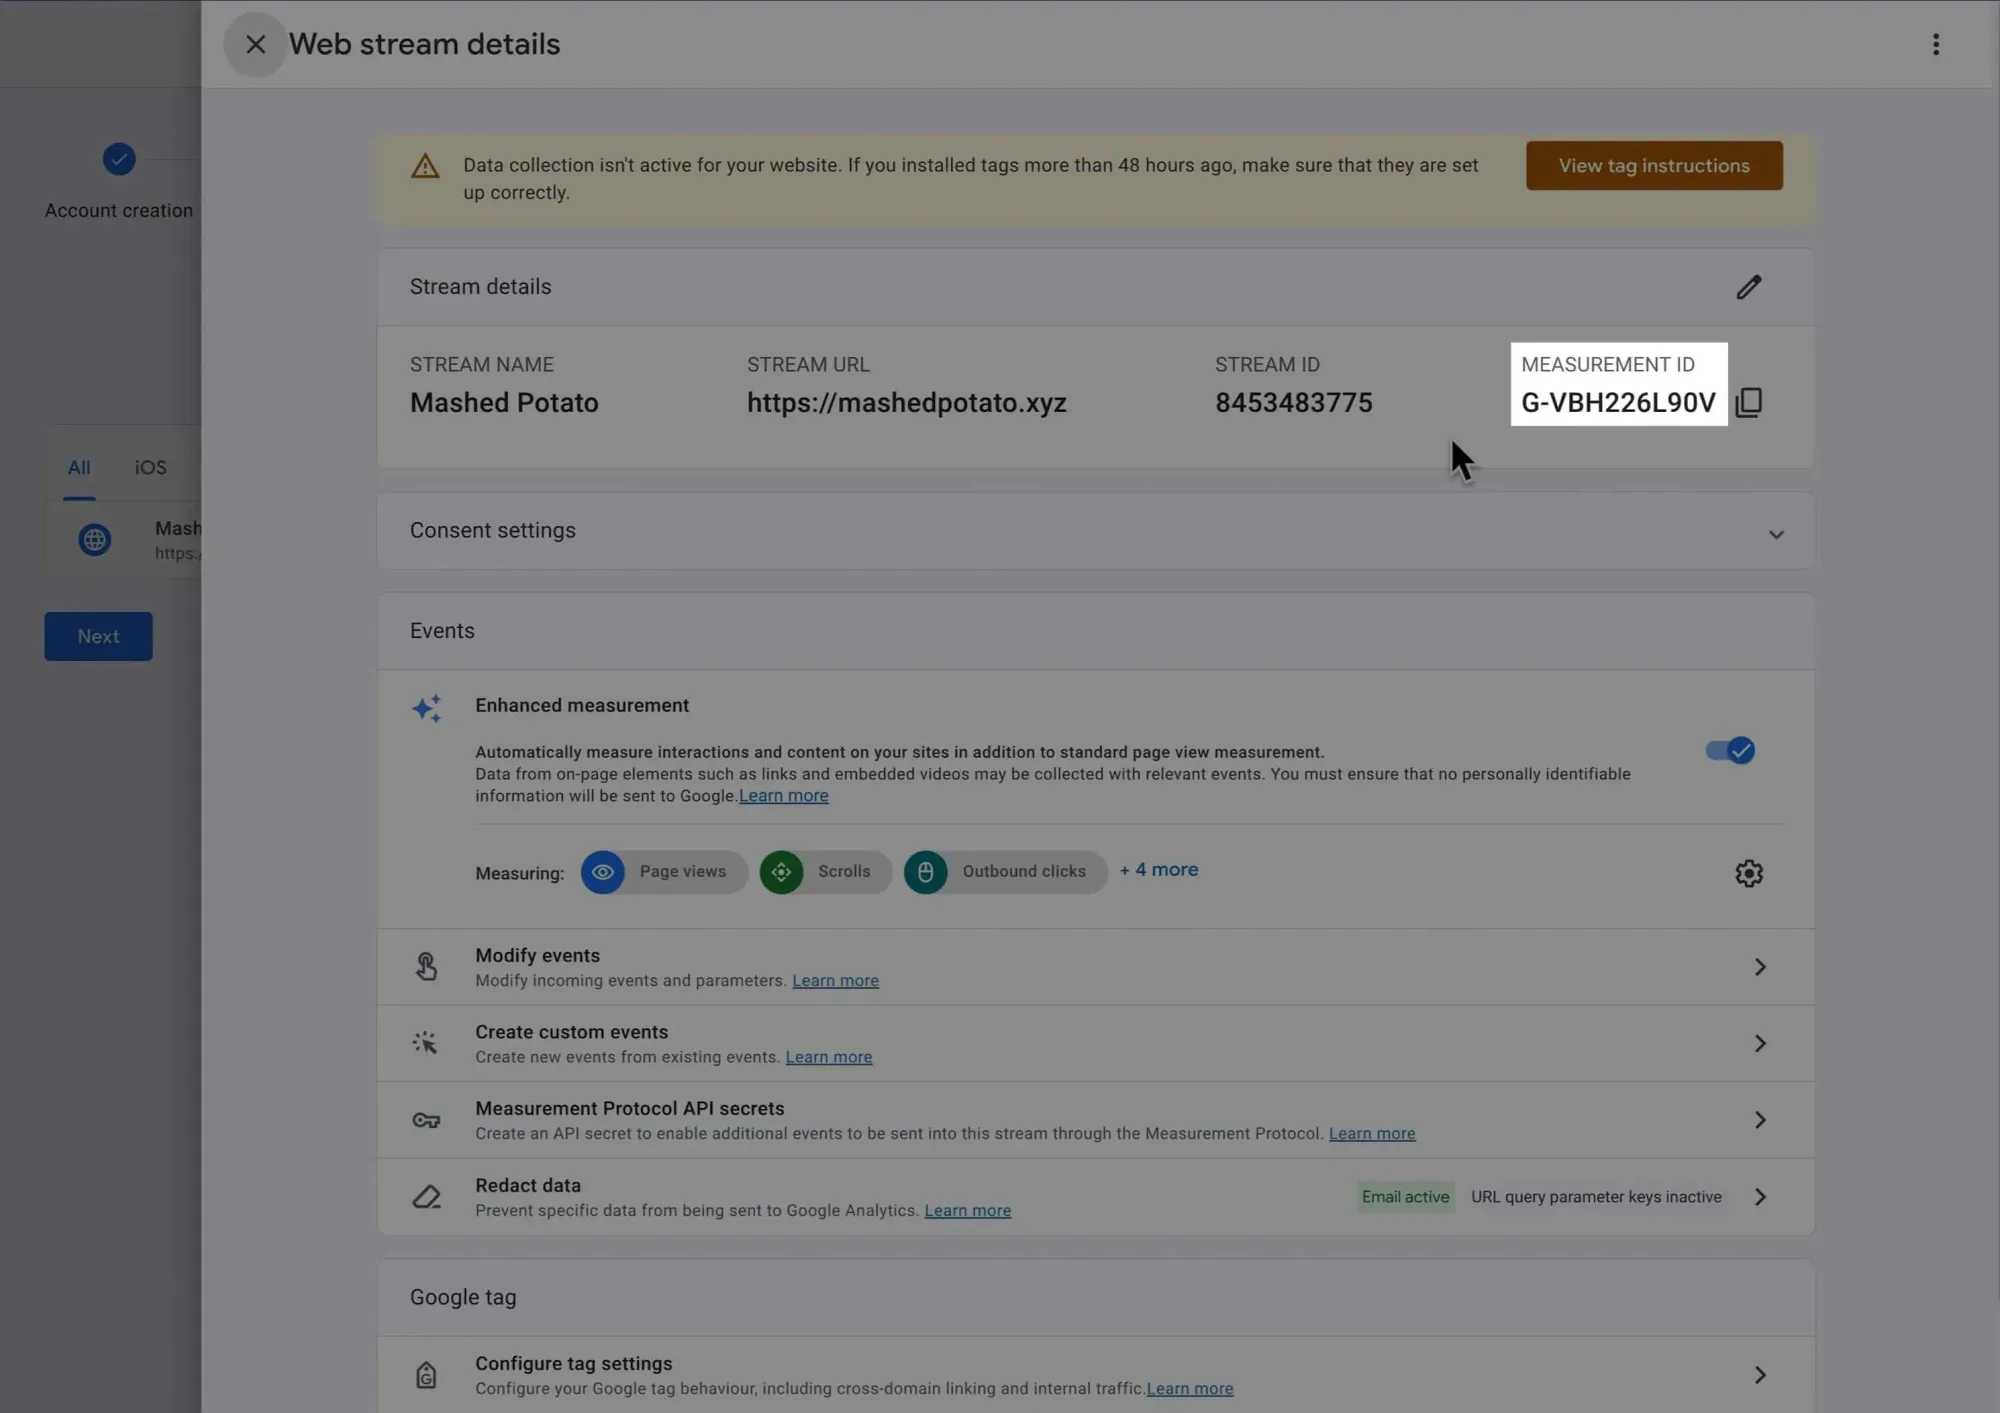
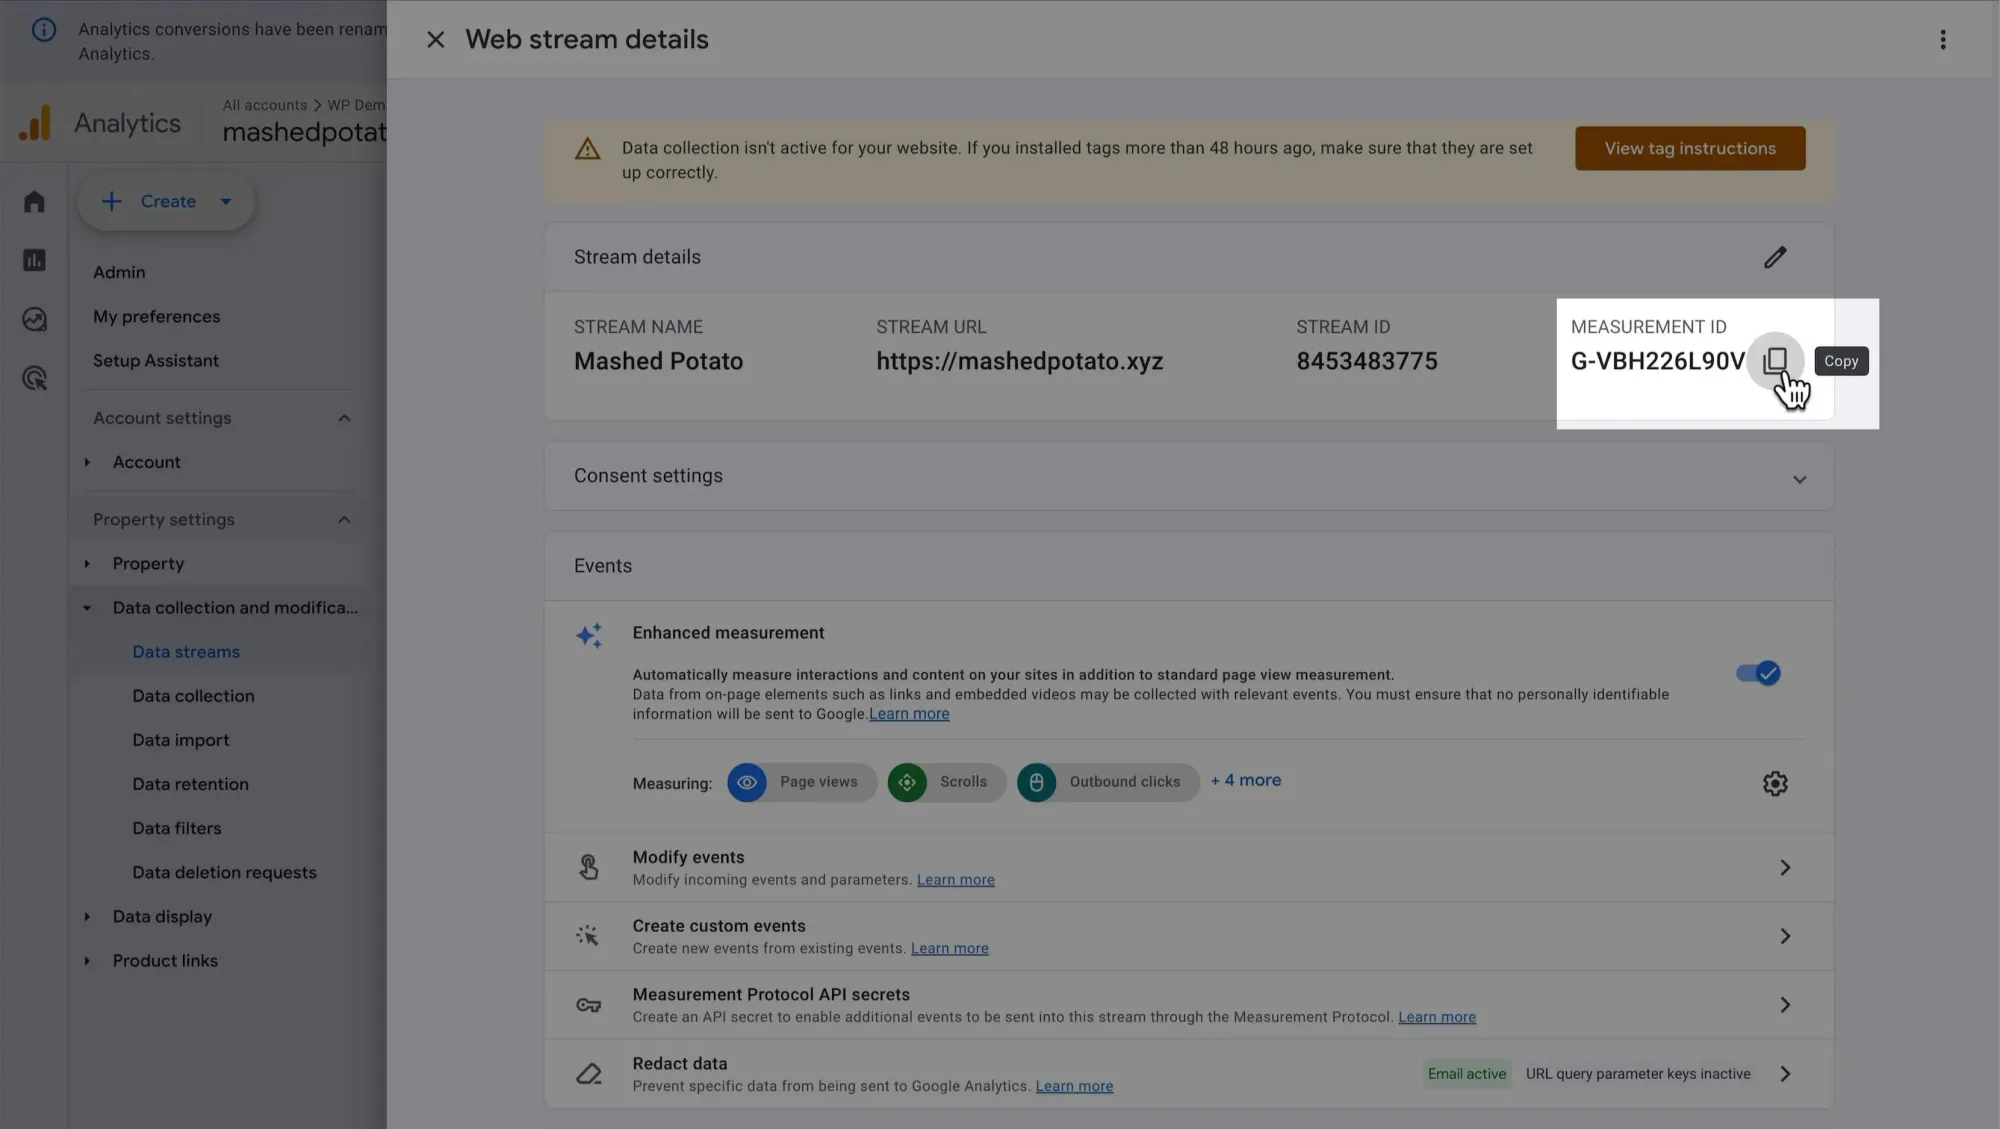
Exit this window. You'll see your web stream details. We’ll need the Measurement ID later, so keep this tab open.
Creating Your Google Tag Manager (GTM) Account
Navigate to Google Tag Manager and click Create Account:
Enter your account details. This process is pretty similar to the GA4 account setup.
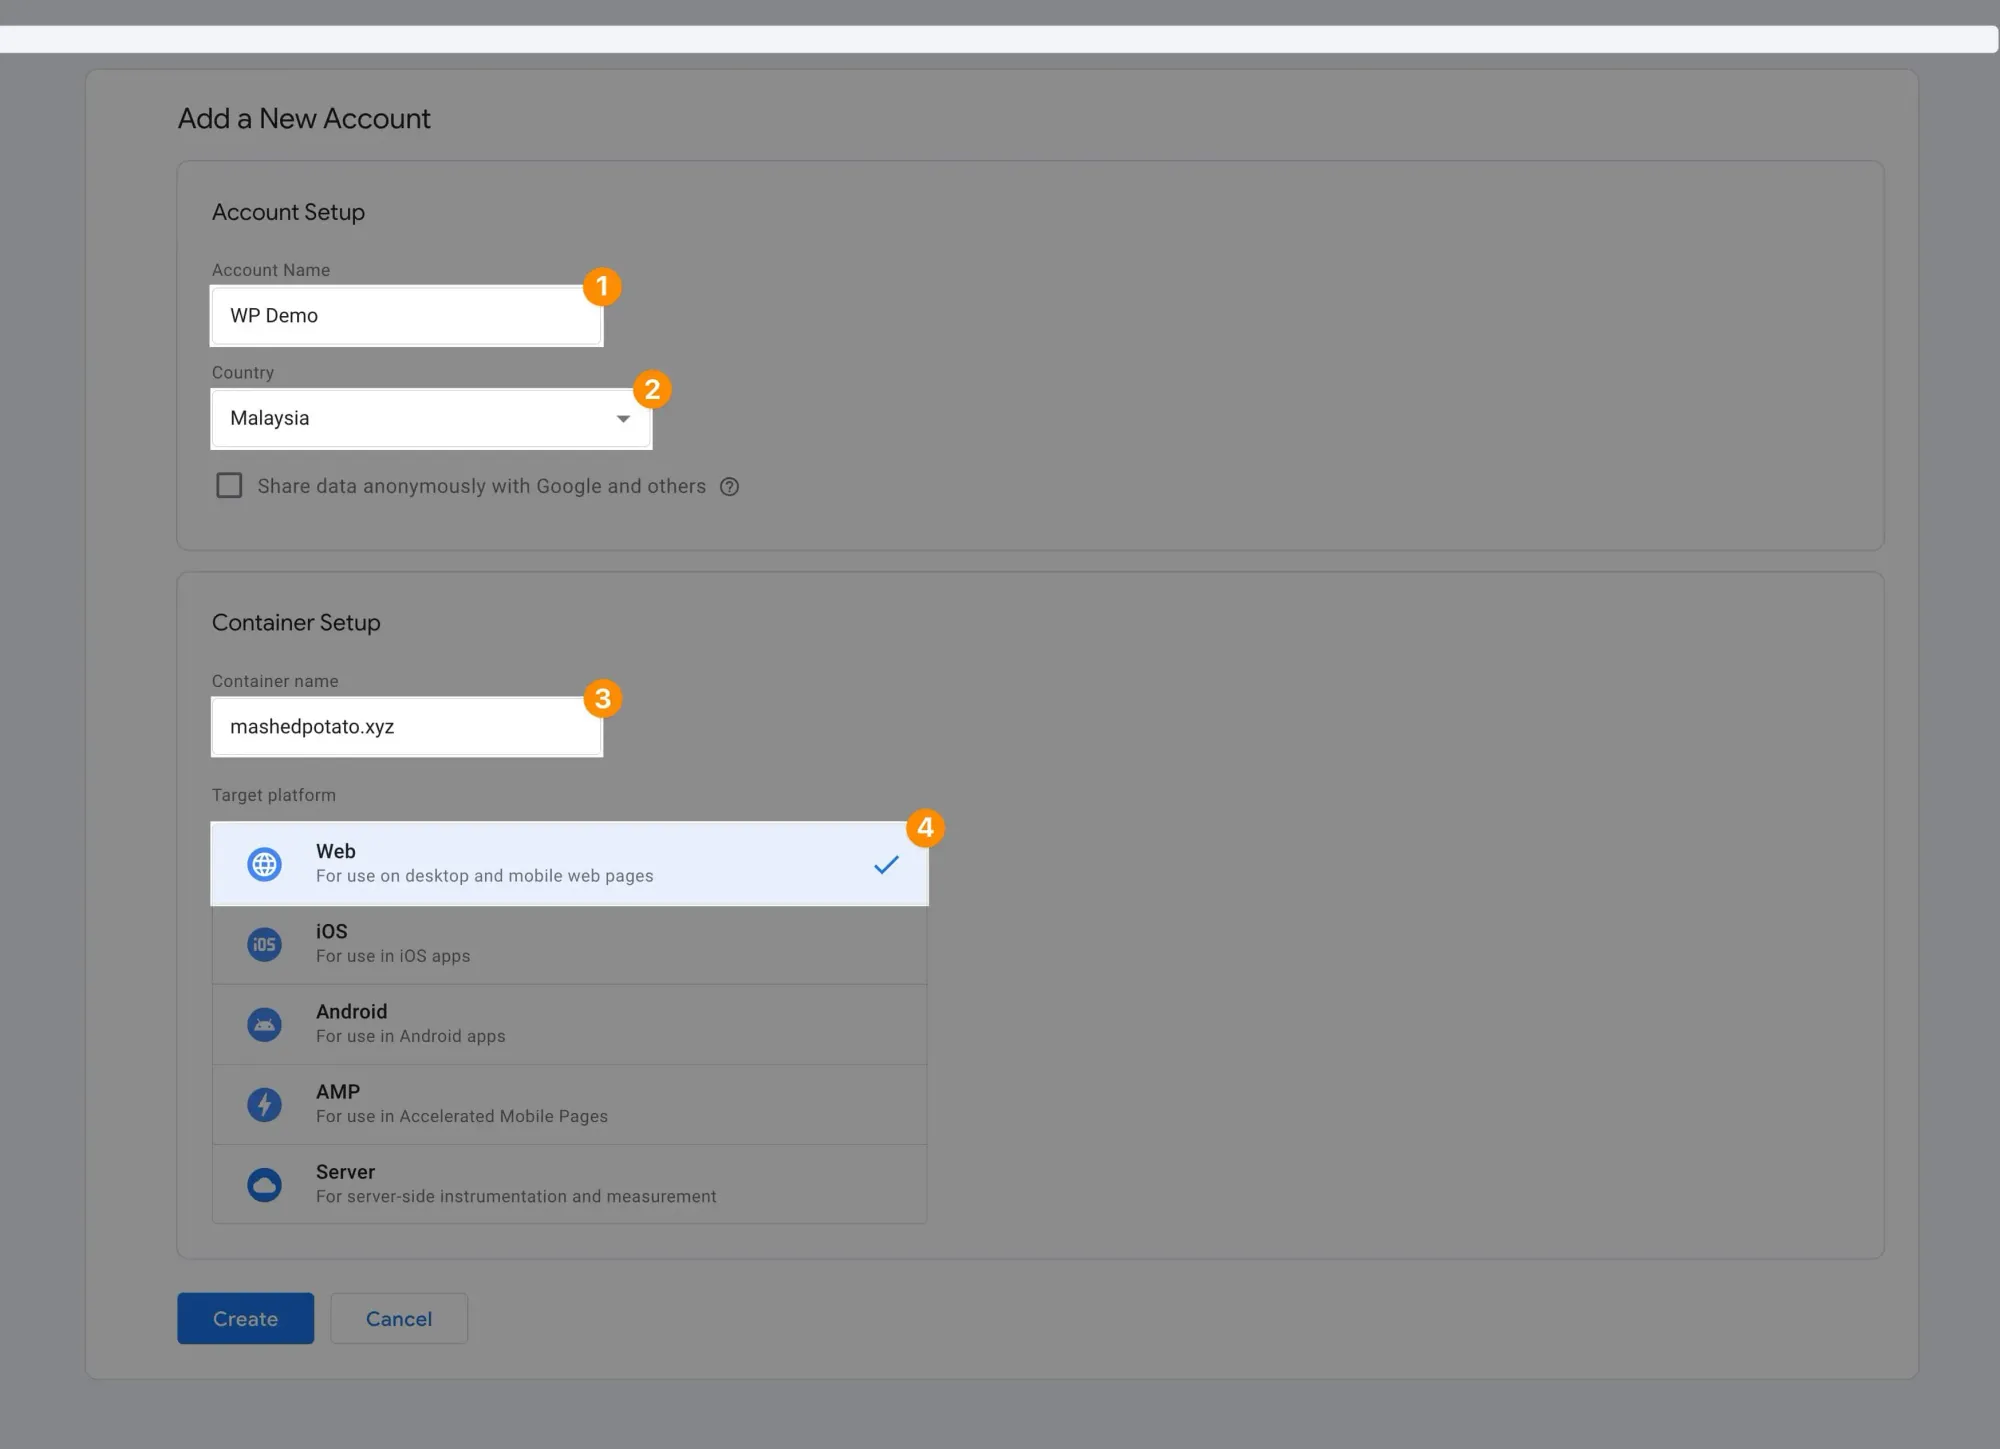
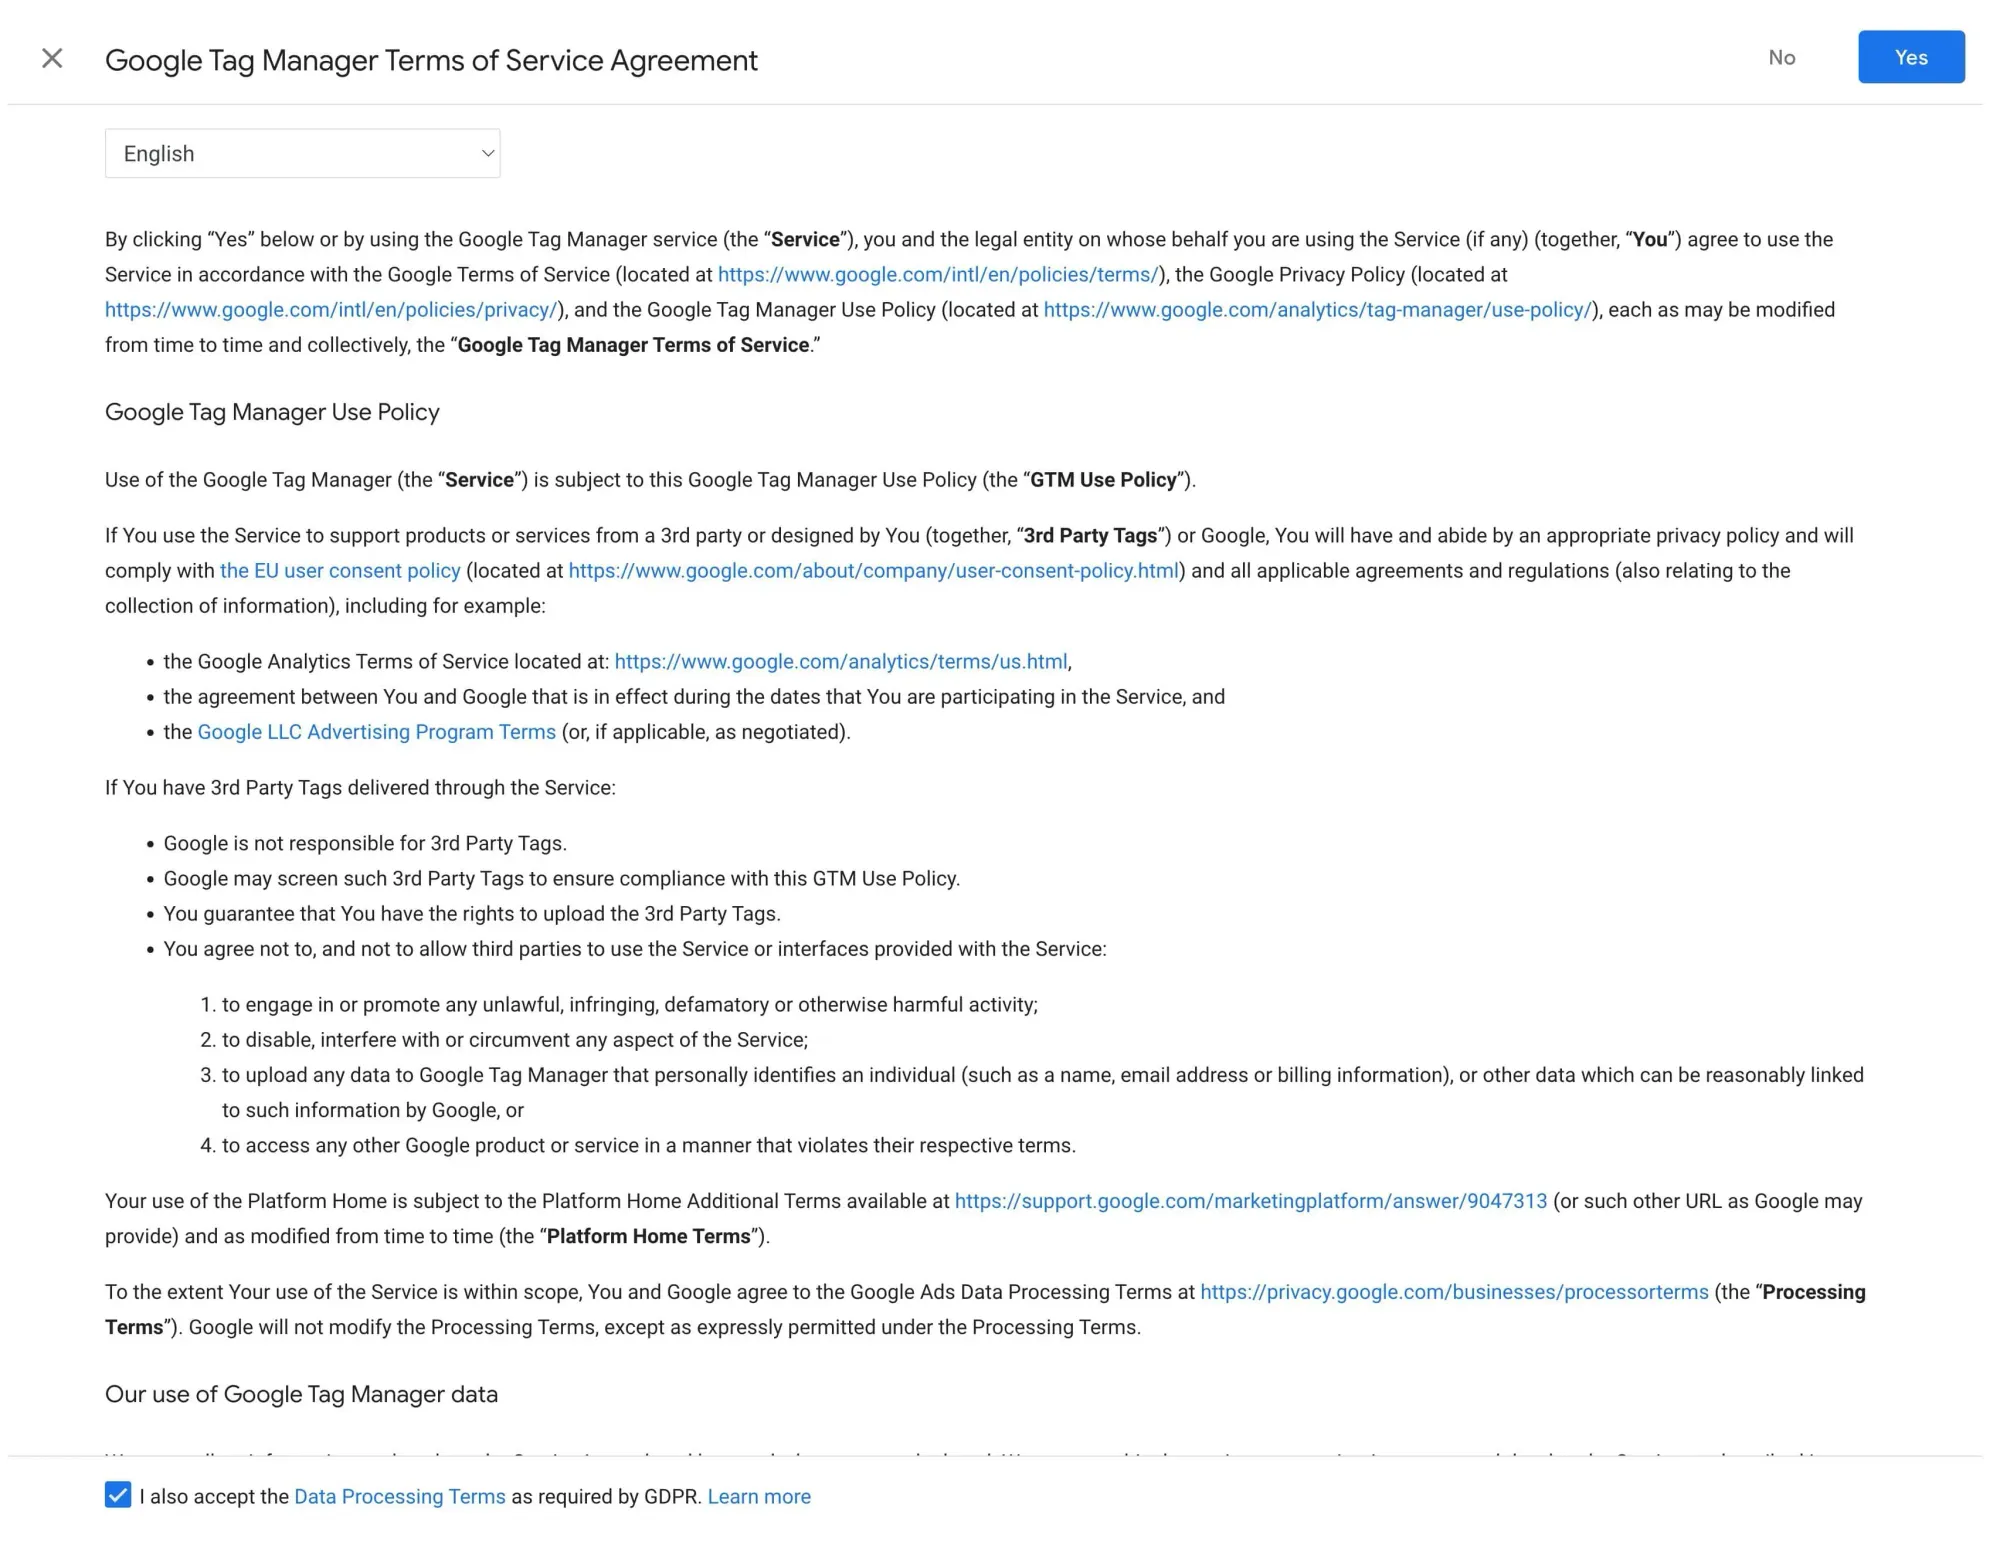
Accept GTM's terms:
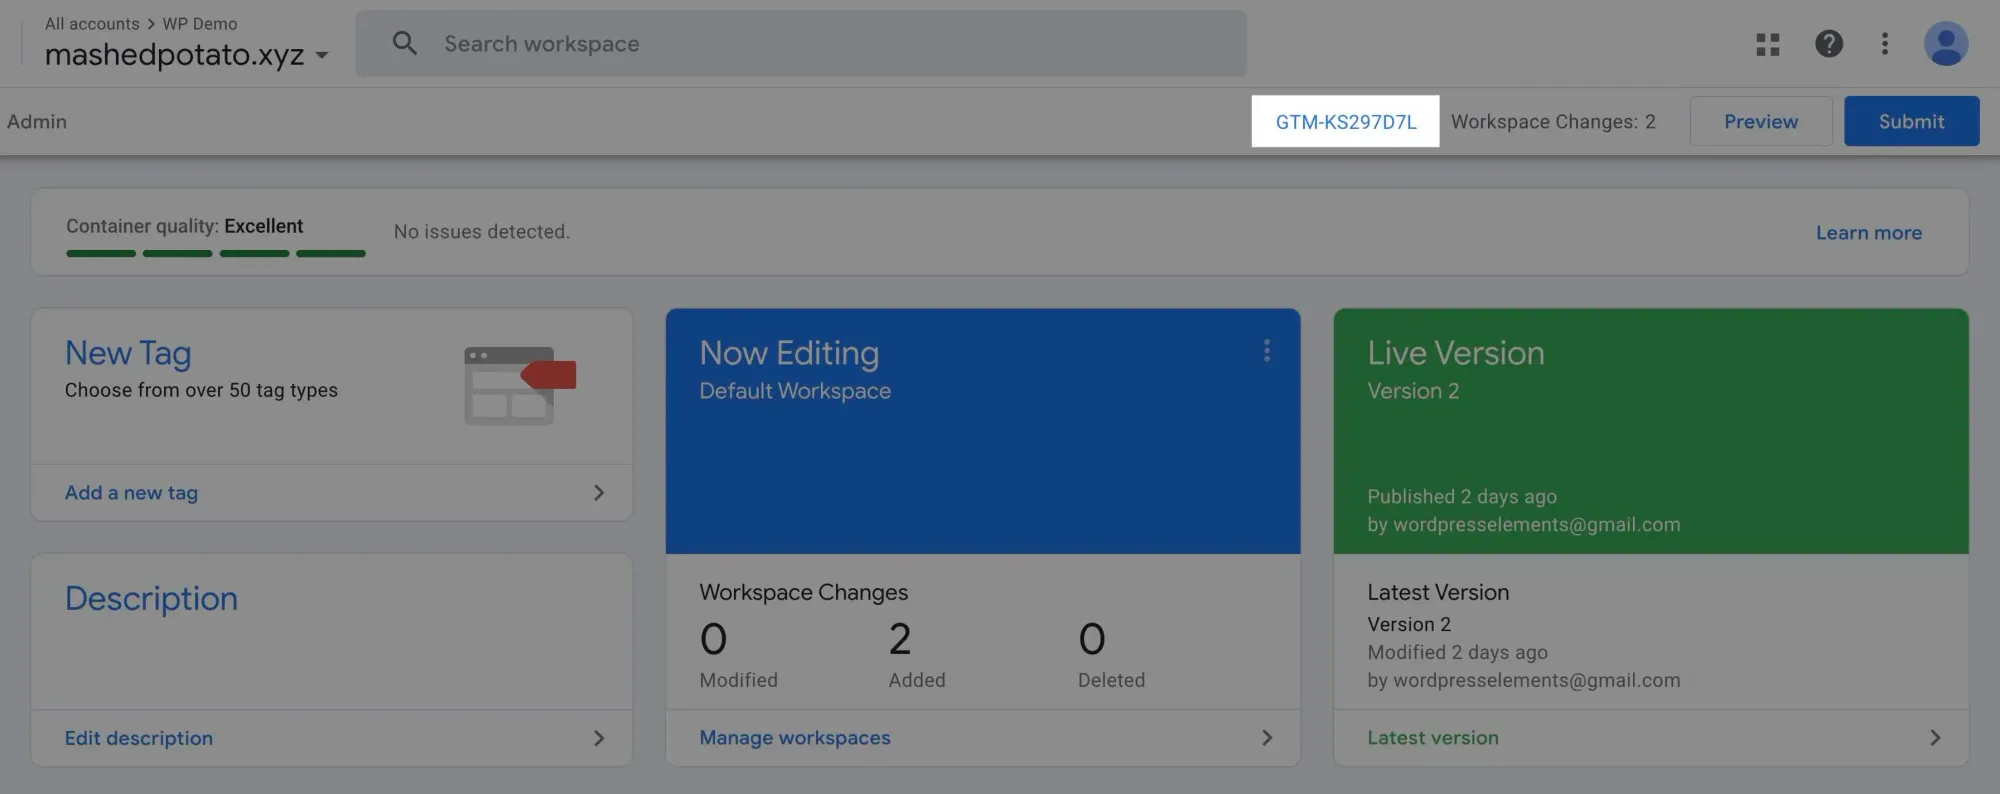
You'll receive two code snippets. We'll add these to your WordPress site next.
Btw, if you accidentally close this, click your container ID to retrieve the codes again:
Adding GTM Tracking Code to WordPress
In your WordPress dashboard, if you have Kadence Theme Premium, you can use Header/Footer Scripts to add those tracking codes to your site.
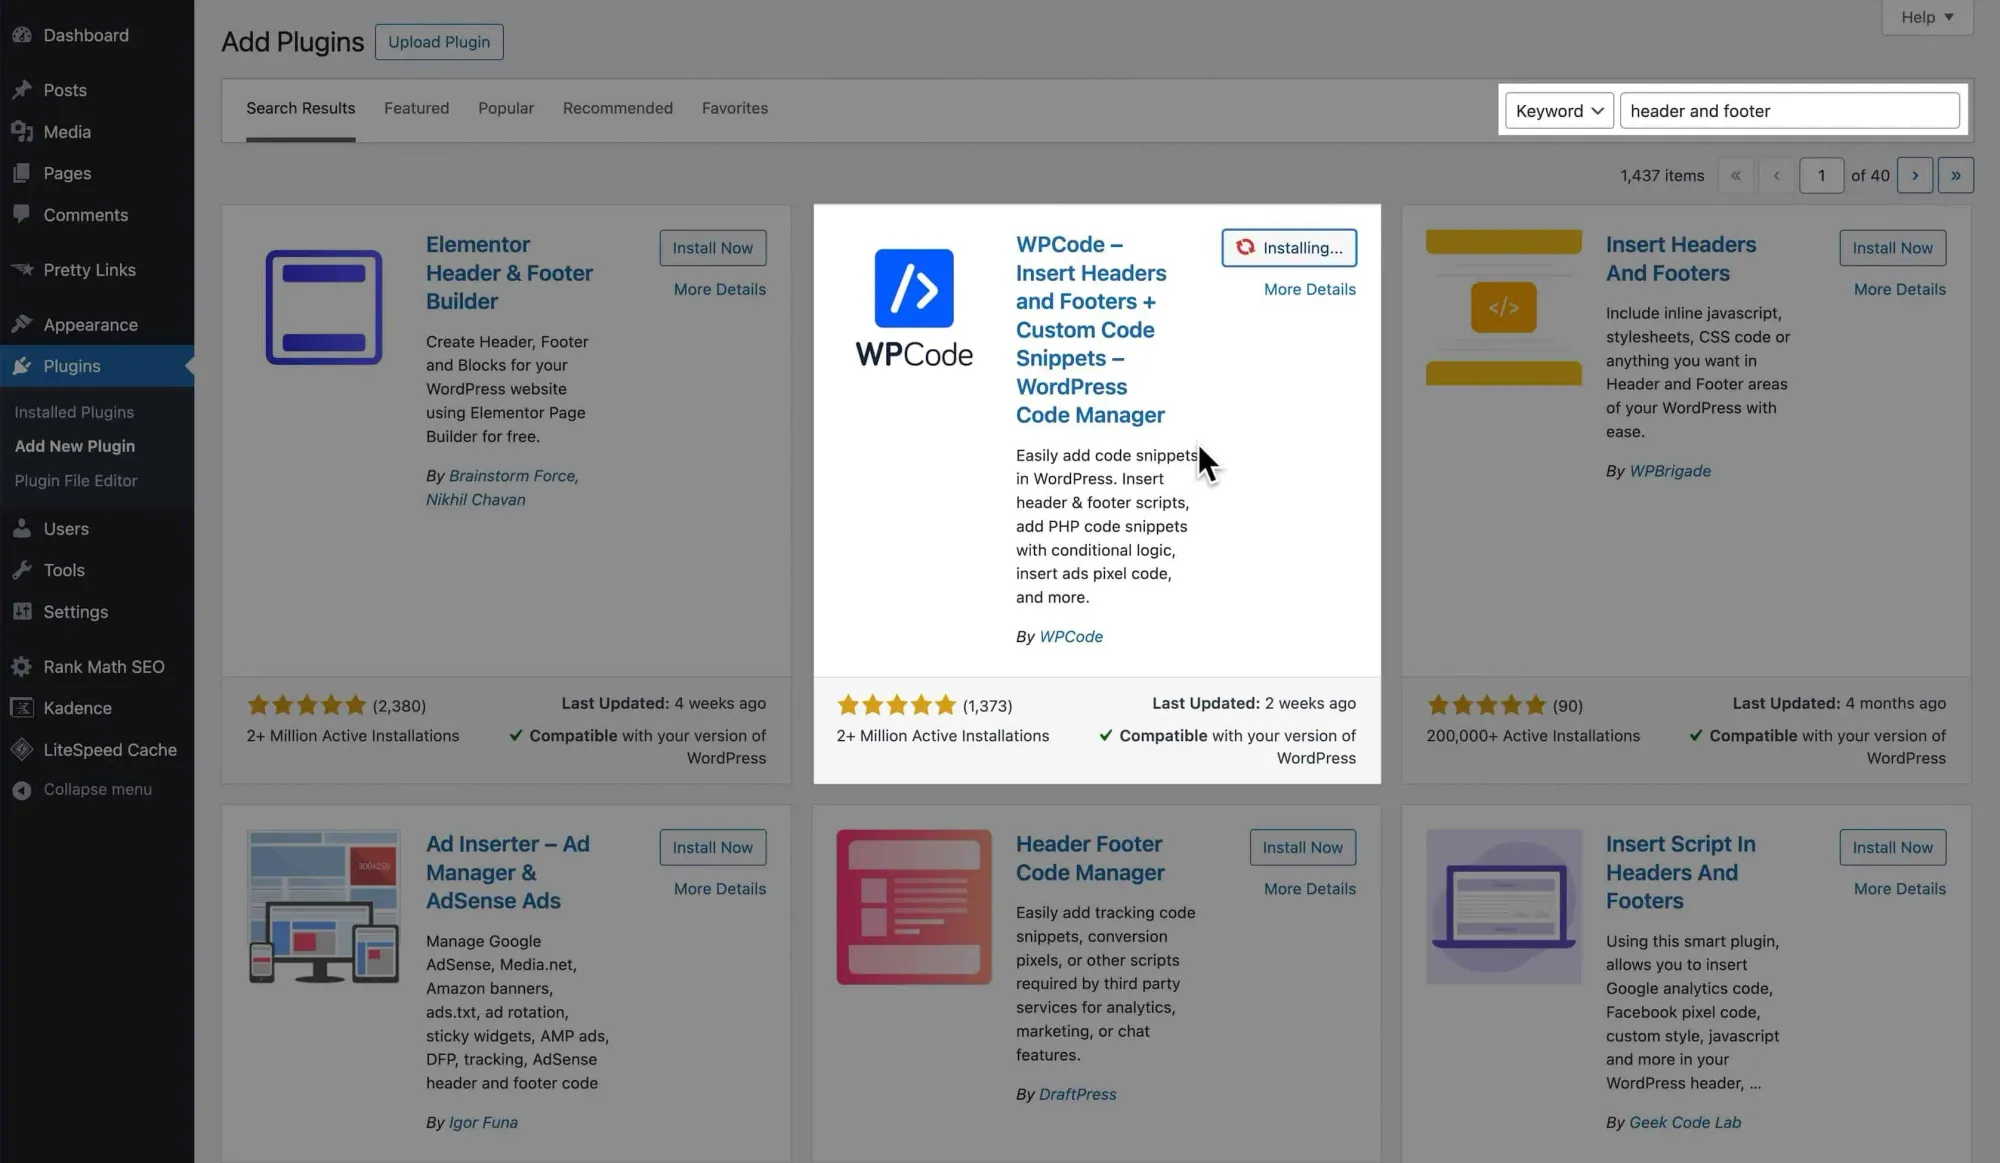
But if you don’t, go ahead and install the WPCode - Insert Headers and Footers plugin:
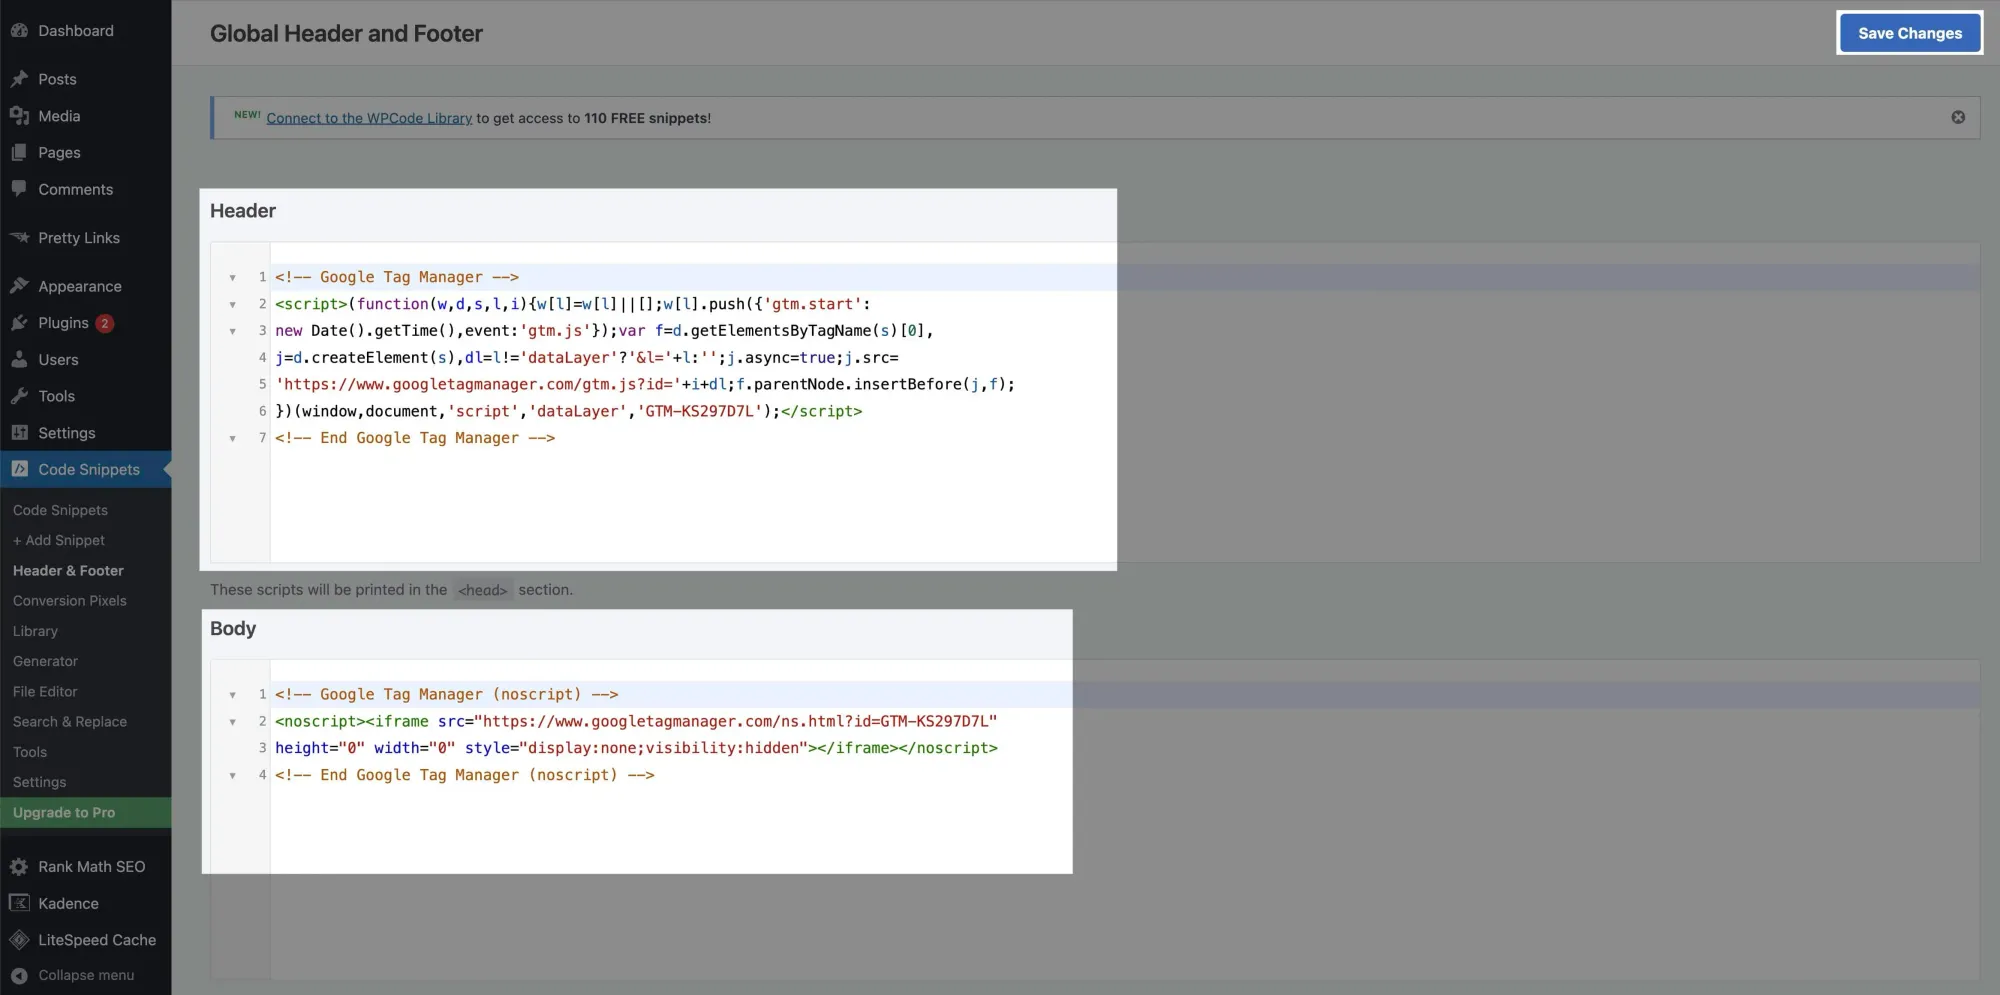
Go to Code Snippets → Header & Footer. Paste the GTM <head> code into the Header section:
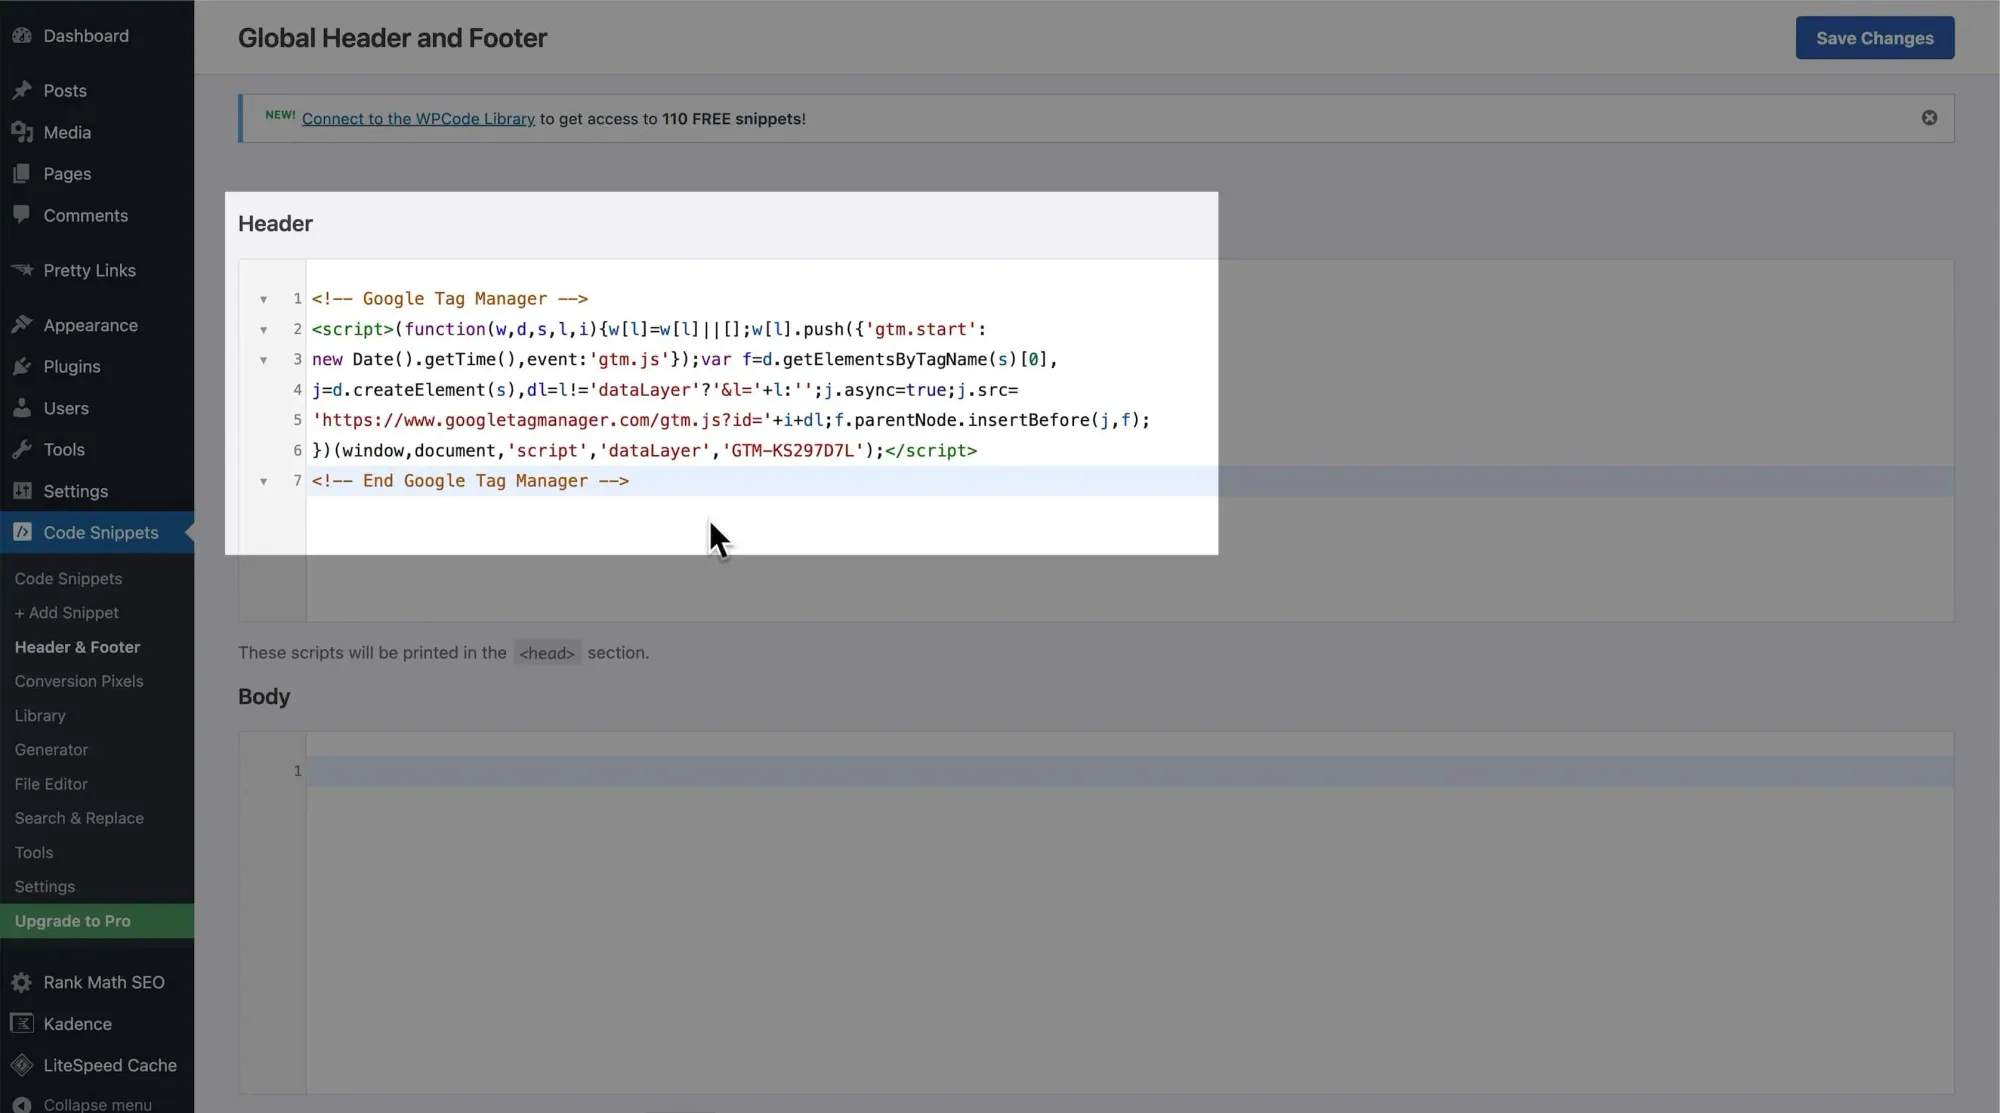
Repeat for the <body> code in the Body section, then save your changes:
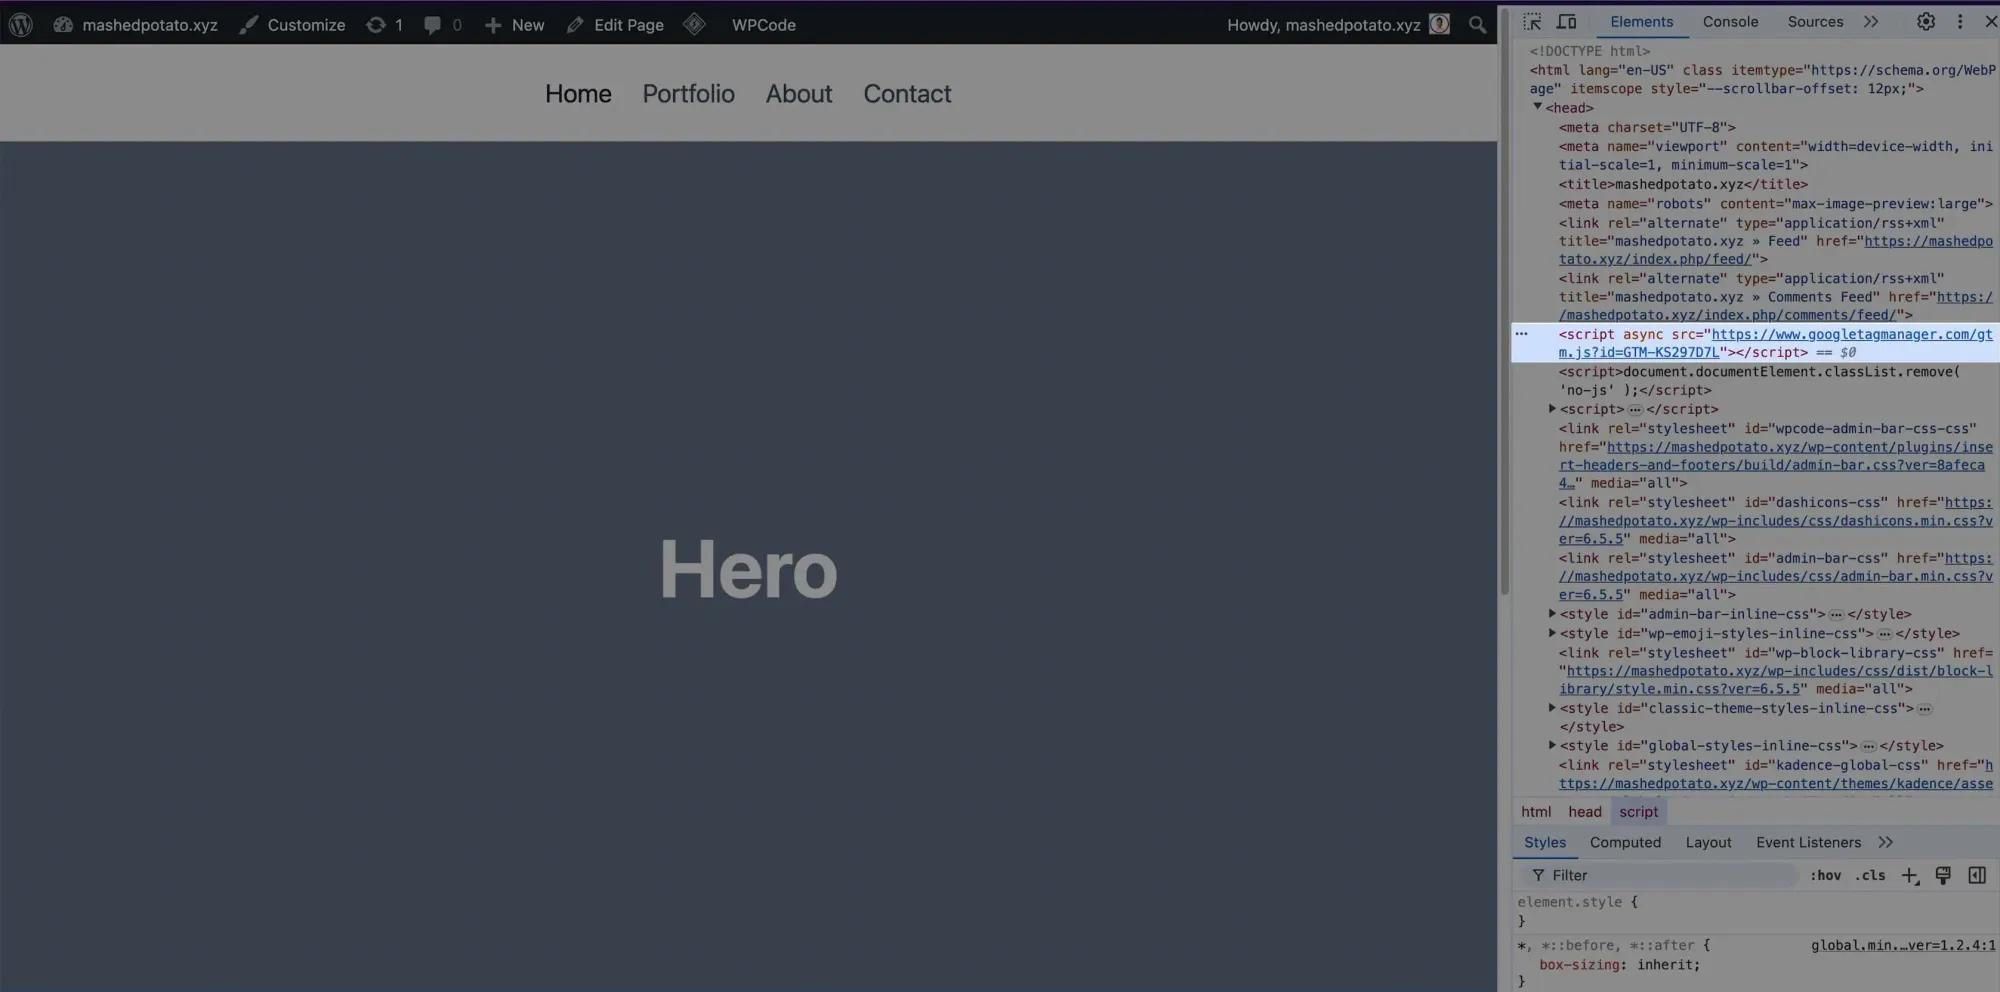
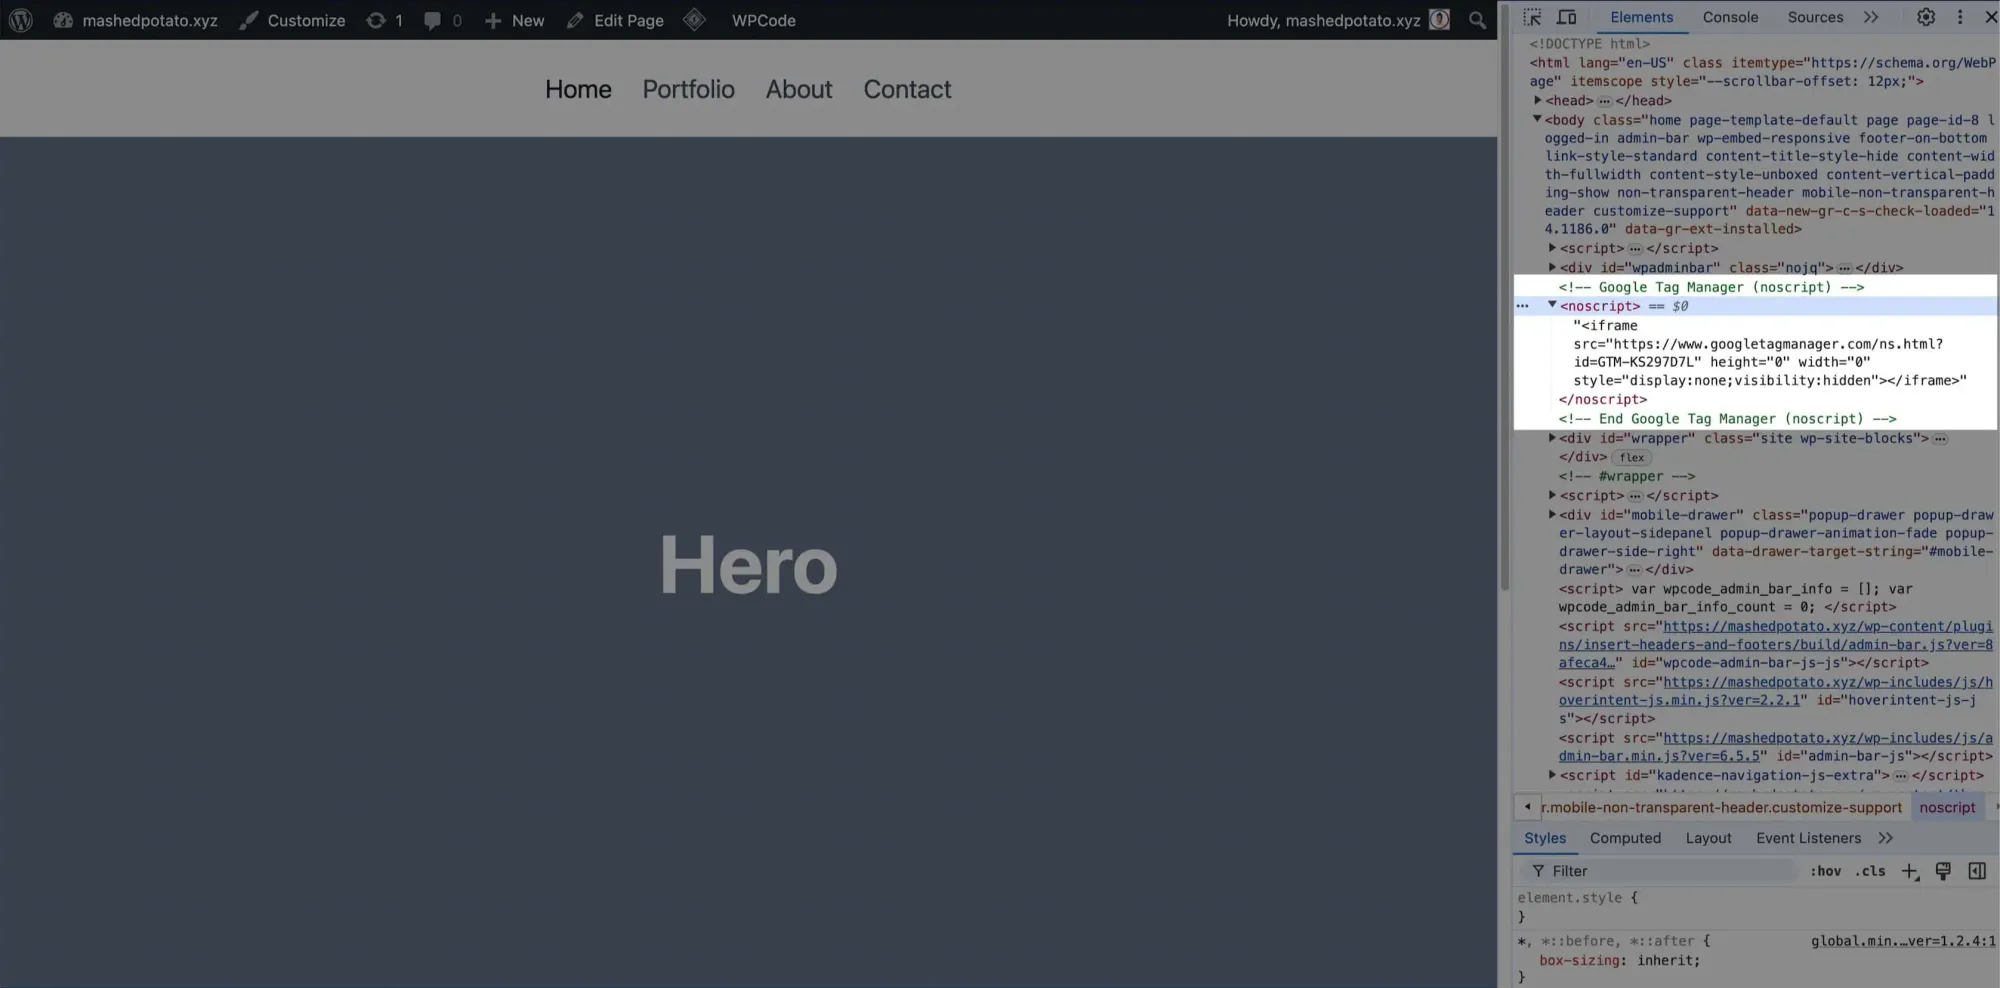
To verify, visit your website and inspect the elements (press F12 or Command + Option + C).
You should see the GTM script in both the <head> and <body> sections:
Integrating GA4 with GTM
To integrate GA4 with GTM, start by copying your measurement ID from GA4:
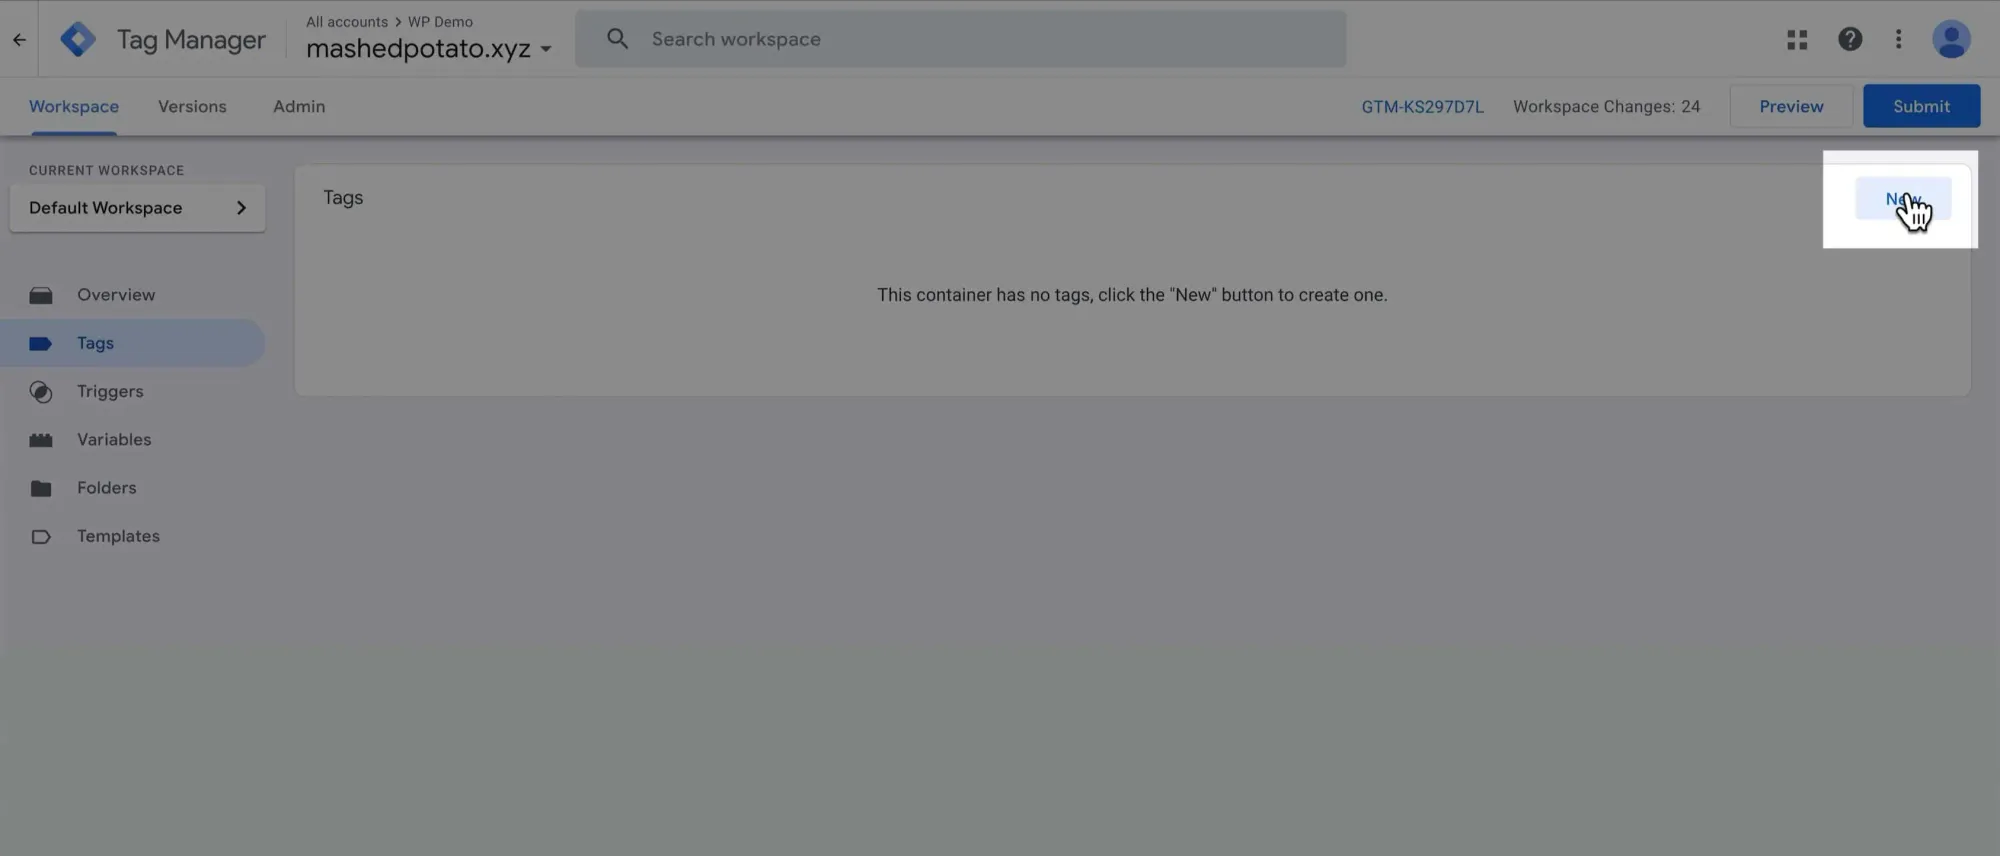
Next, we'll create a tag in GTM to fire an event to GA4. In GTM, go to Tags and click New:
Click the Tag Configuration panel and select Google Analytics as the tag type:
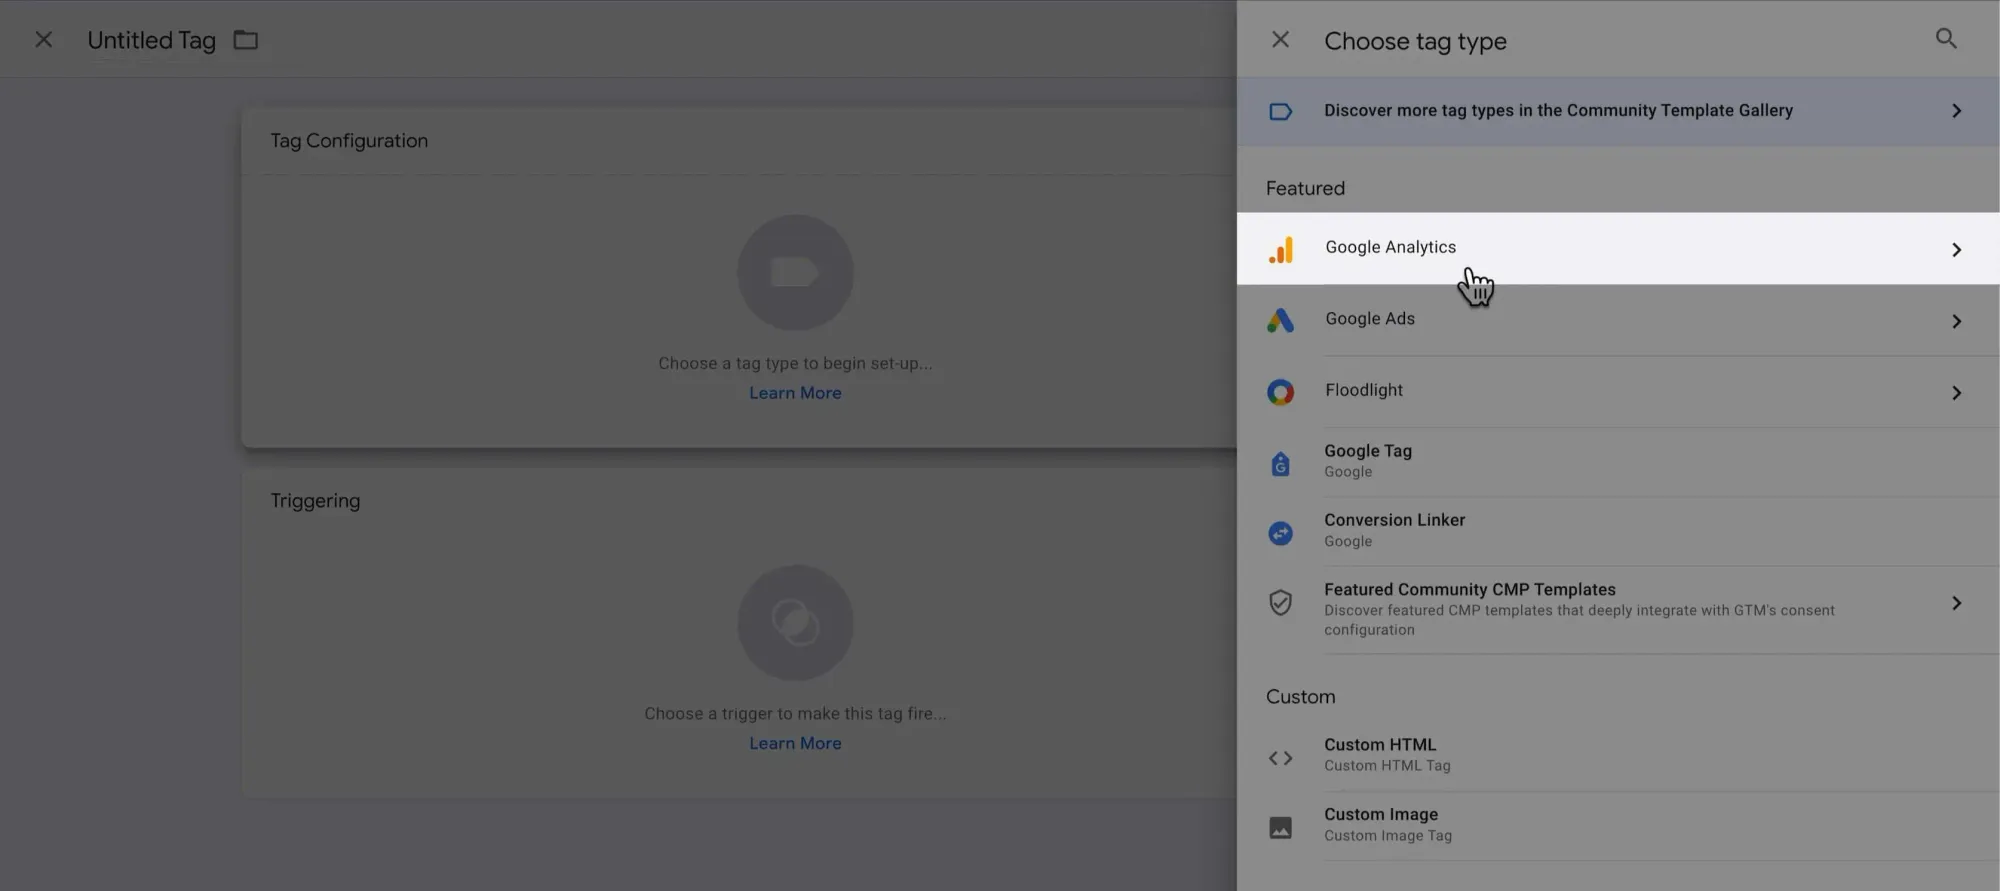
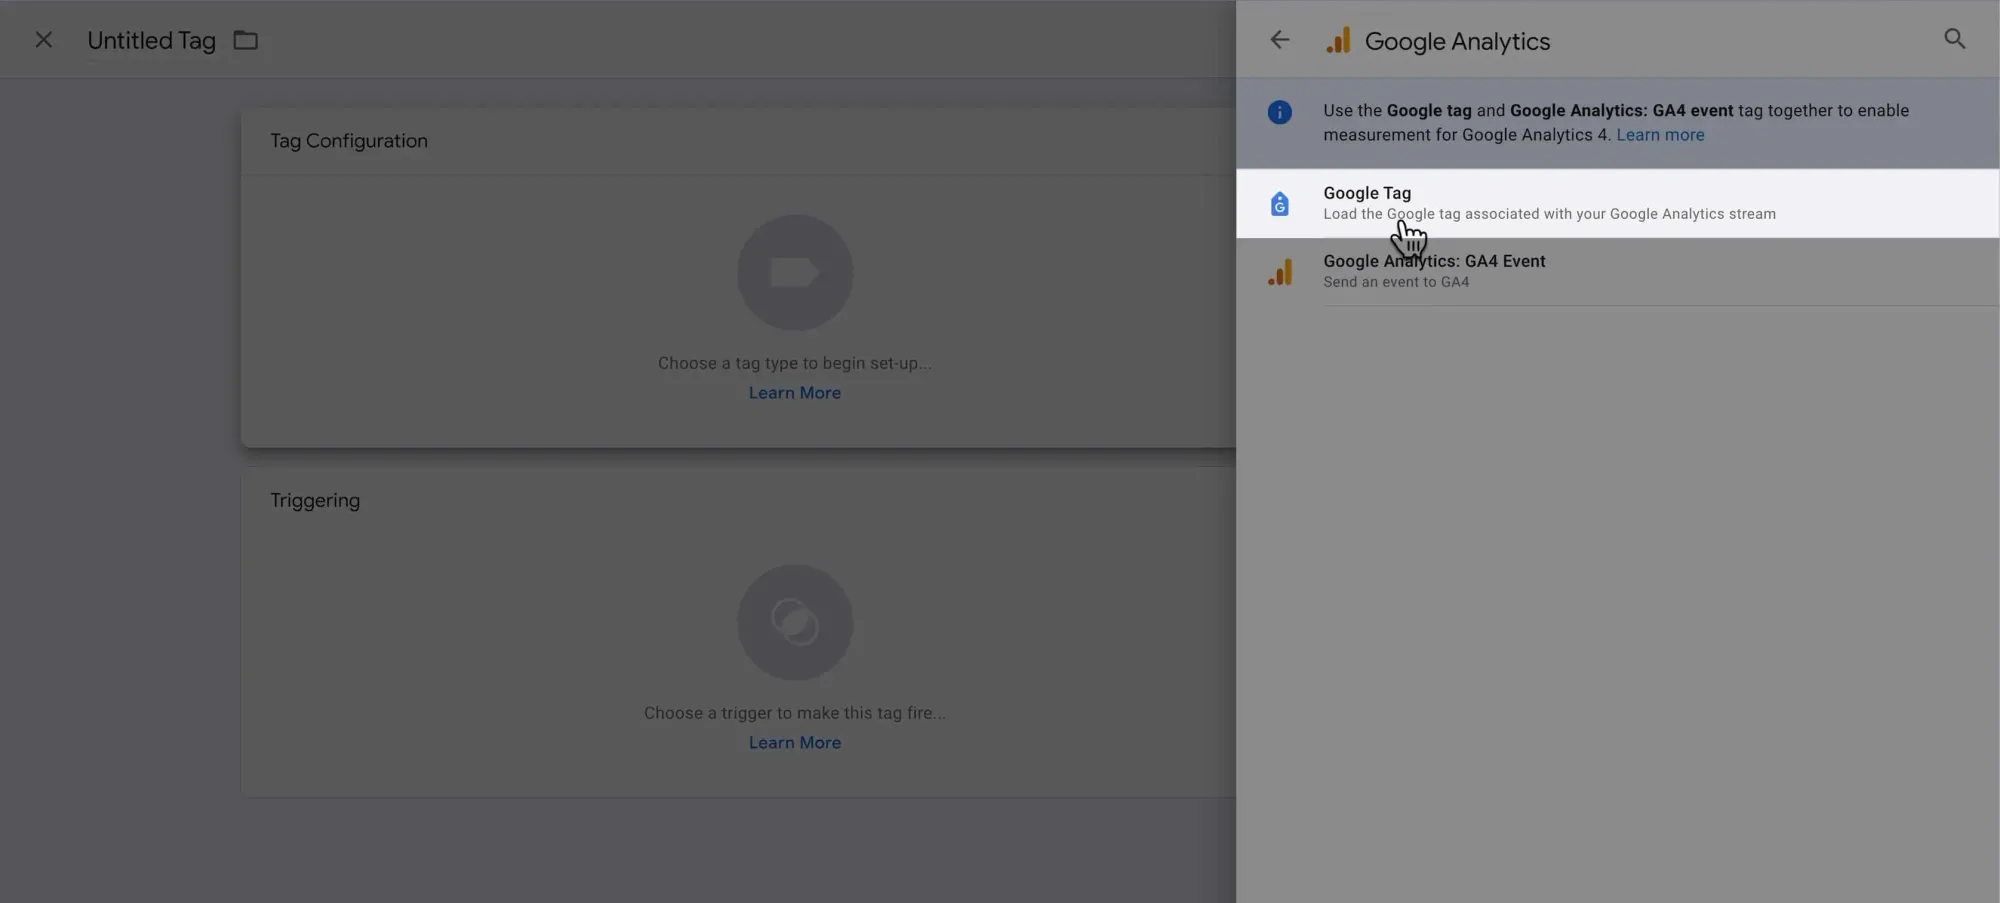
Then choose Google Tag. This is the base tag that needs to fire before any GA4 Event.
After this base tag, all subsequent tags will be GA4 event tags.
Now, you can paste your GA4 measurement ID directly into the Tag ID field like this:

However, this approach can be a pain in the ass when you have a lot of tags and need to update a single value across all of them.
The better way?
Create a variable that acts as a placeholder for the value instead. Click the placeholder symbol next to the Tag ID field:
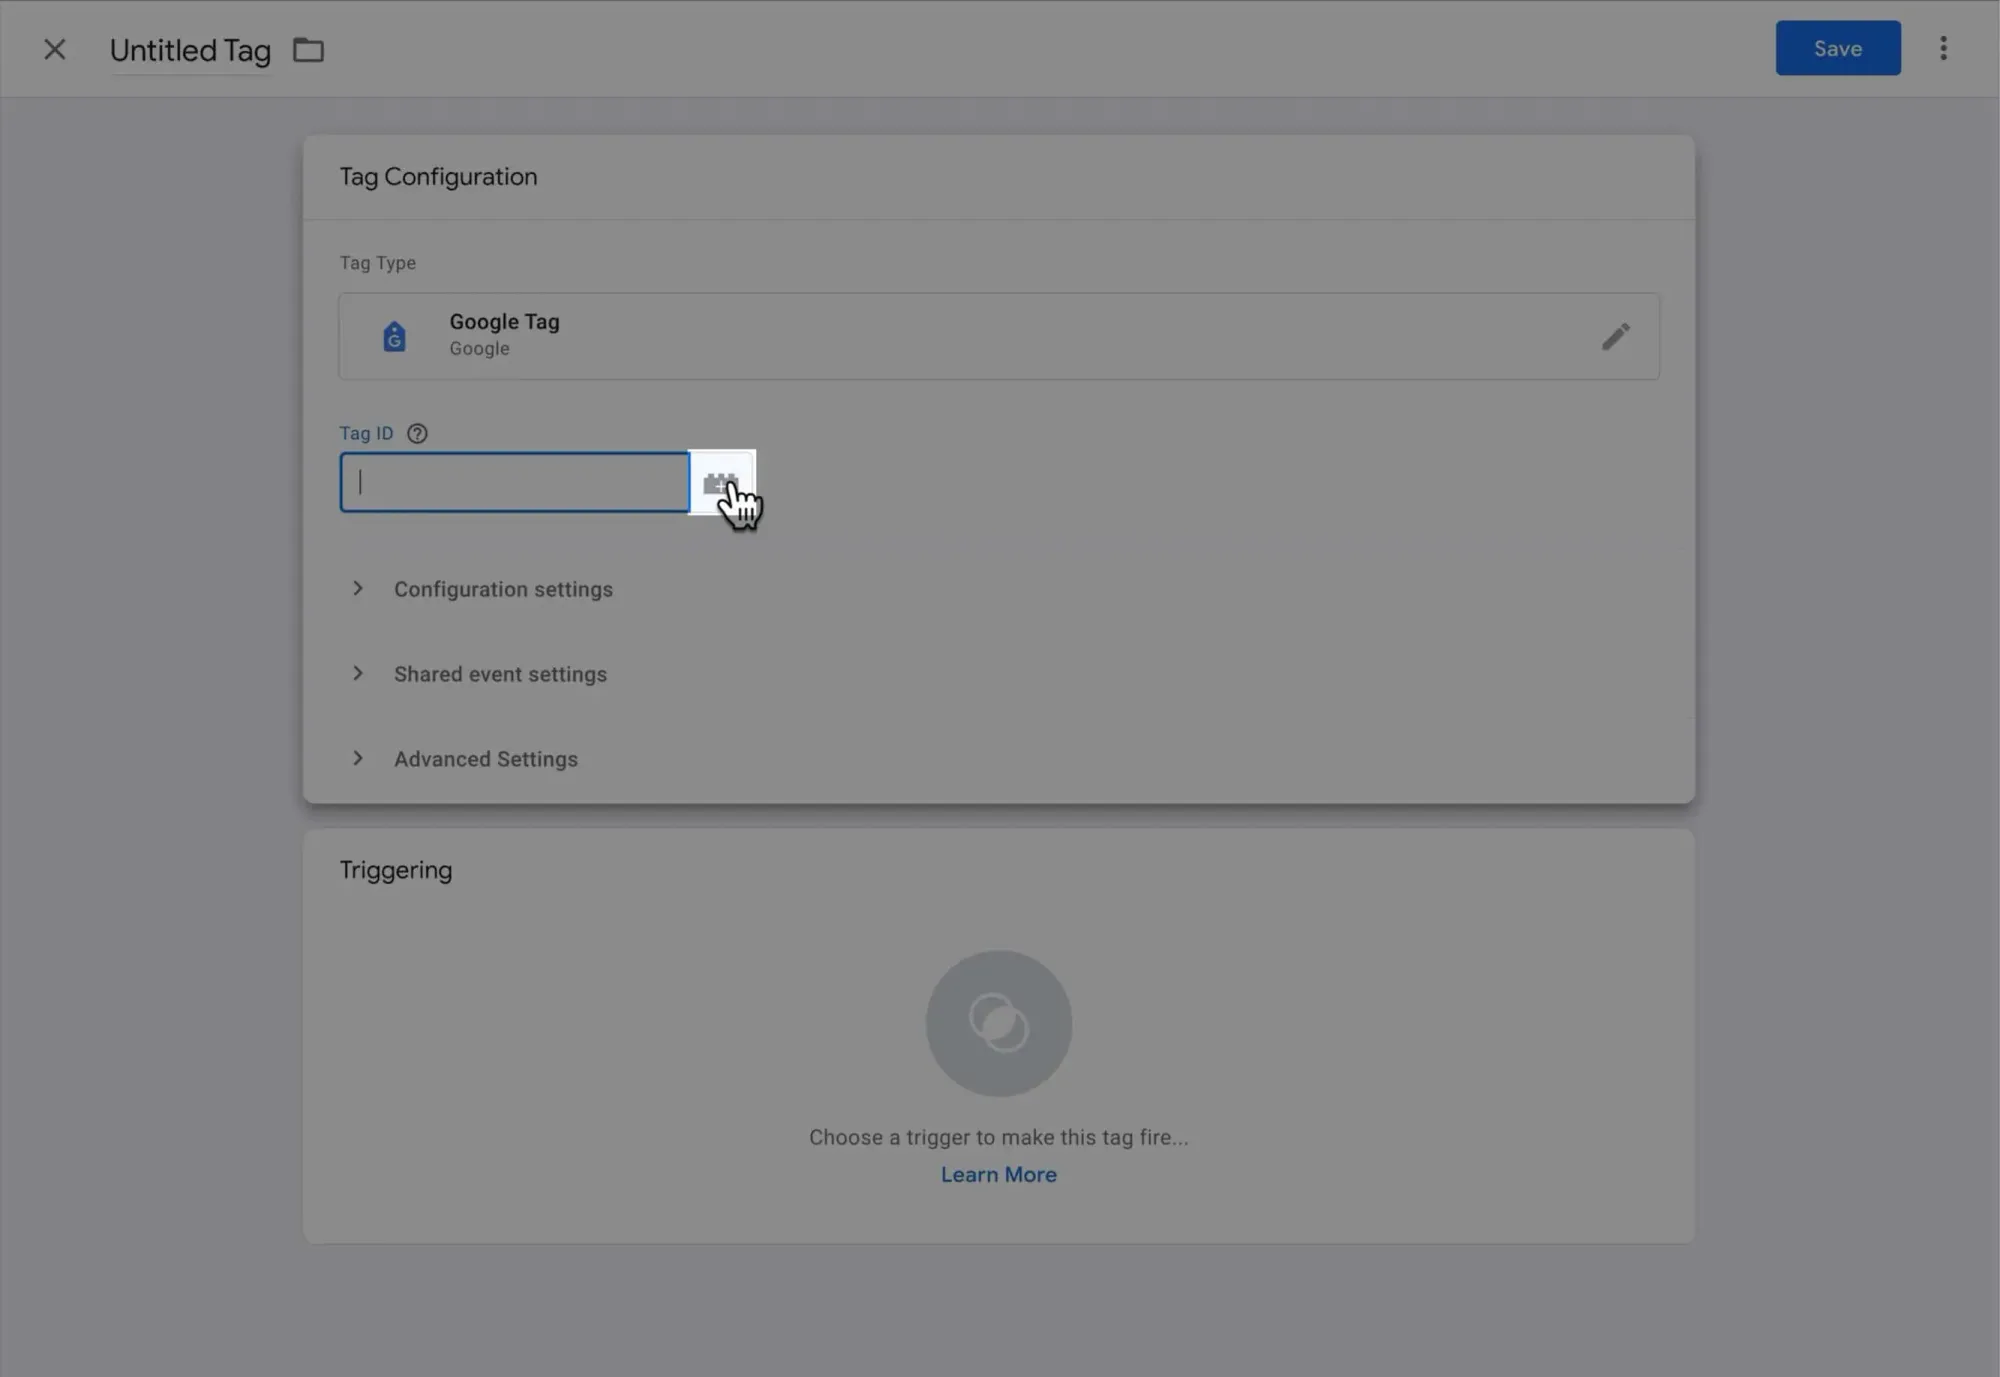
Then click the + symbol to create a new variable:
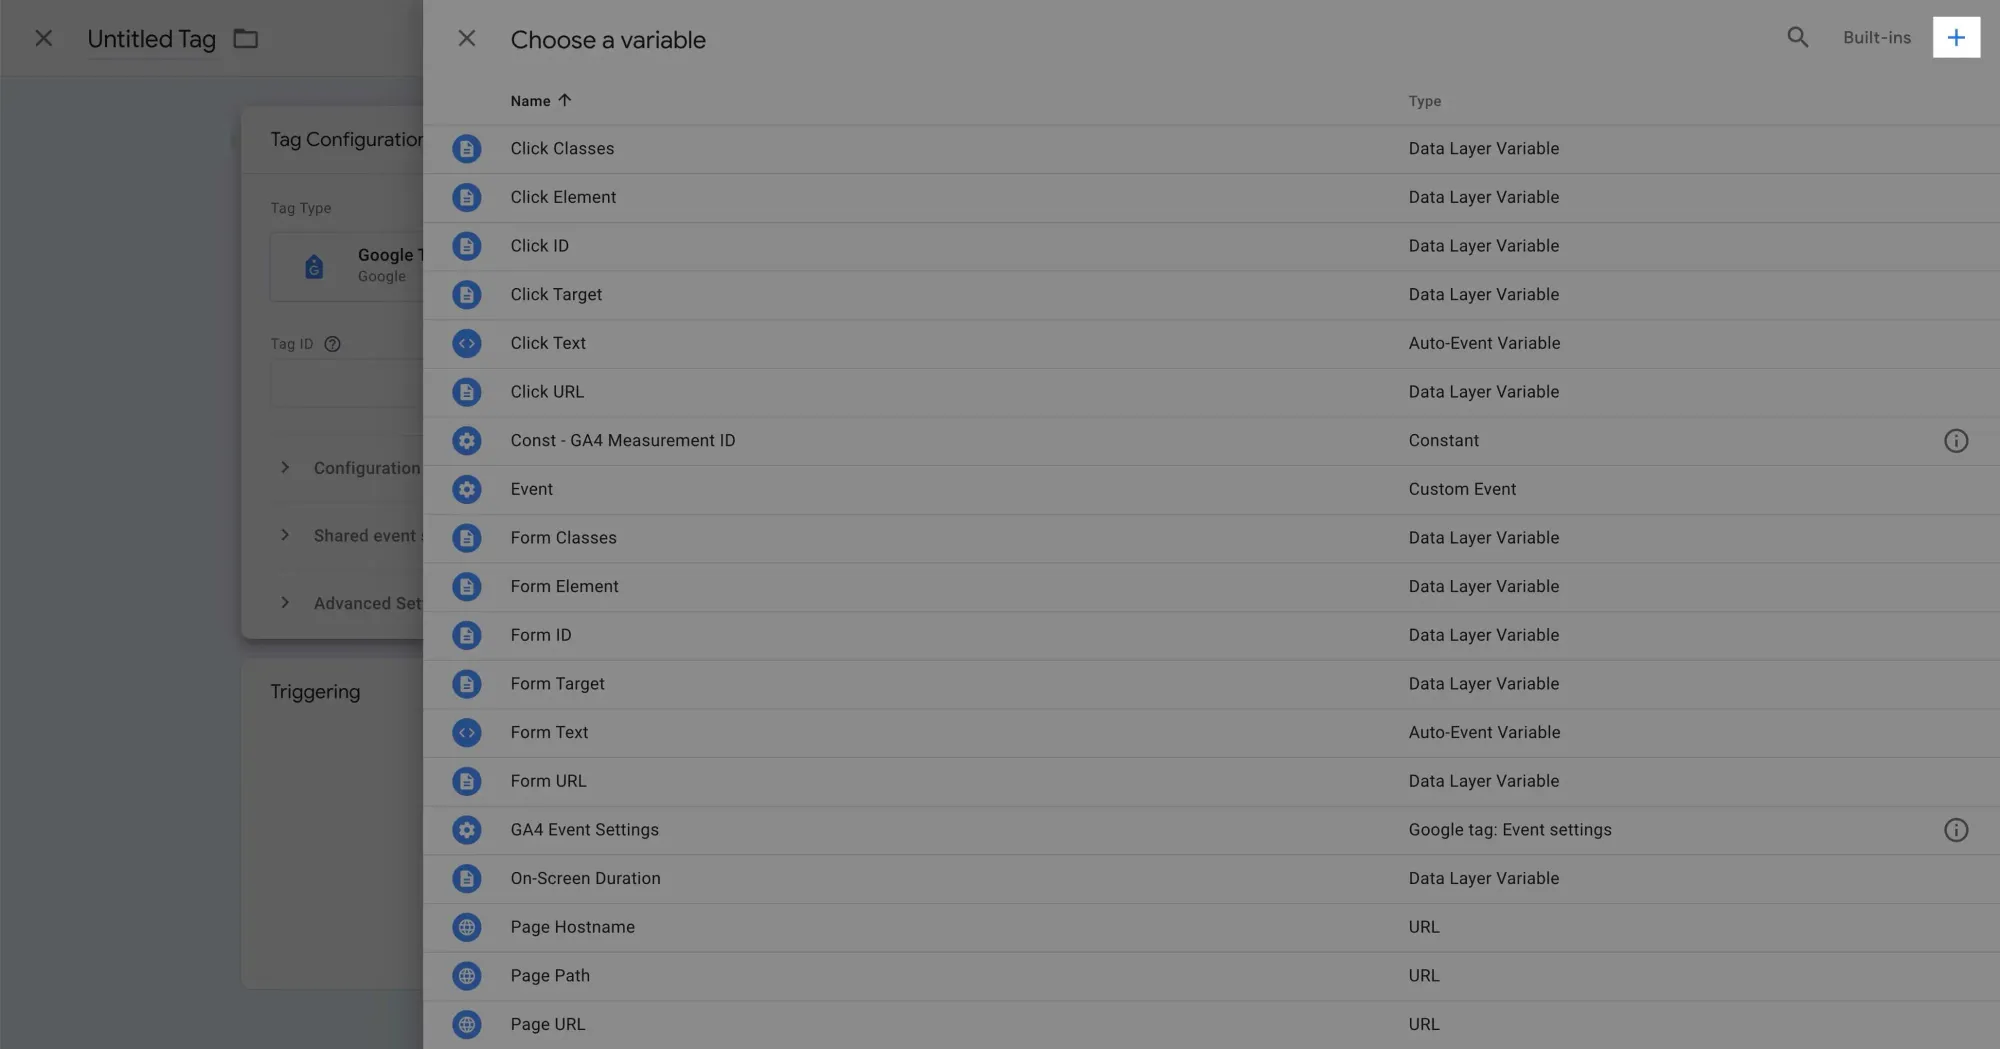
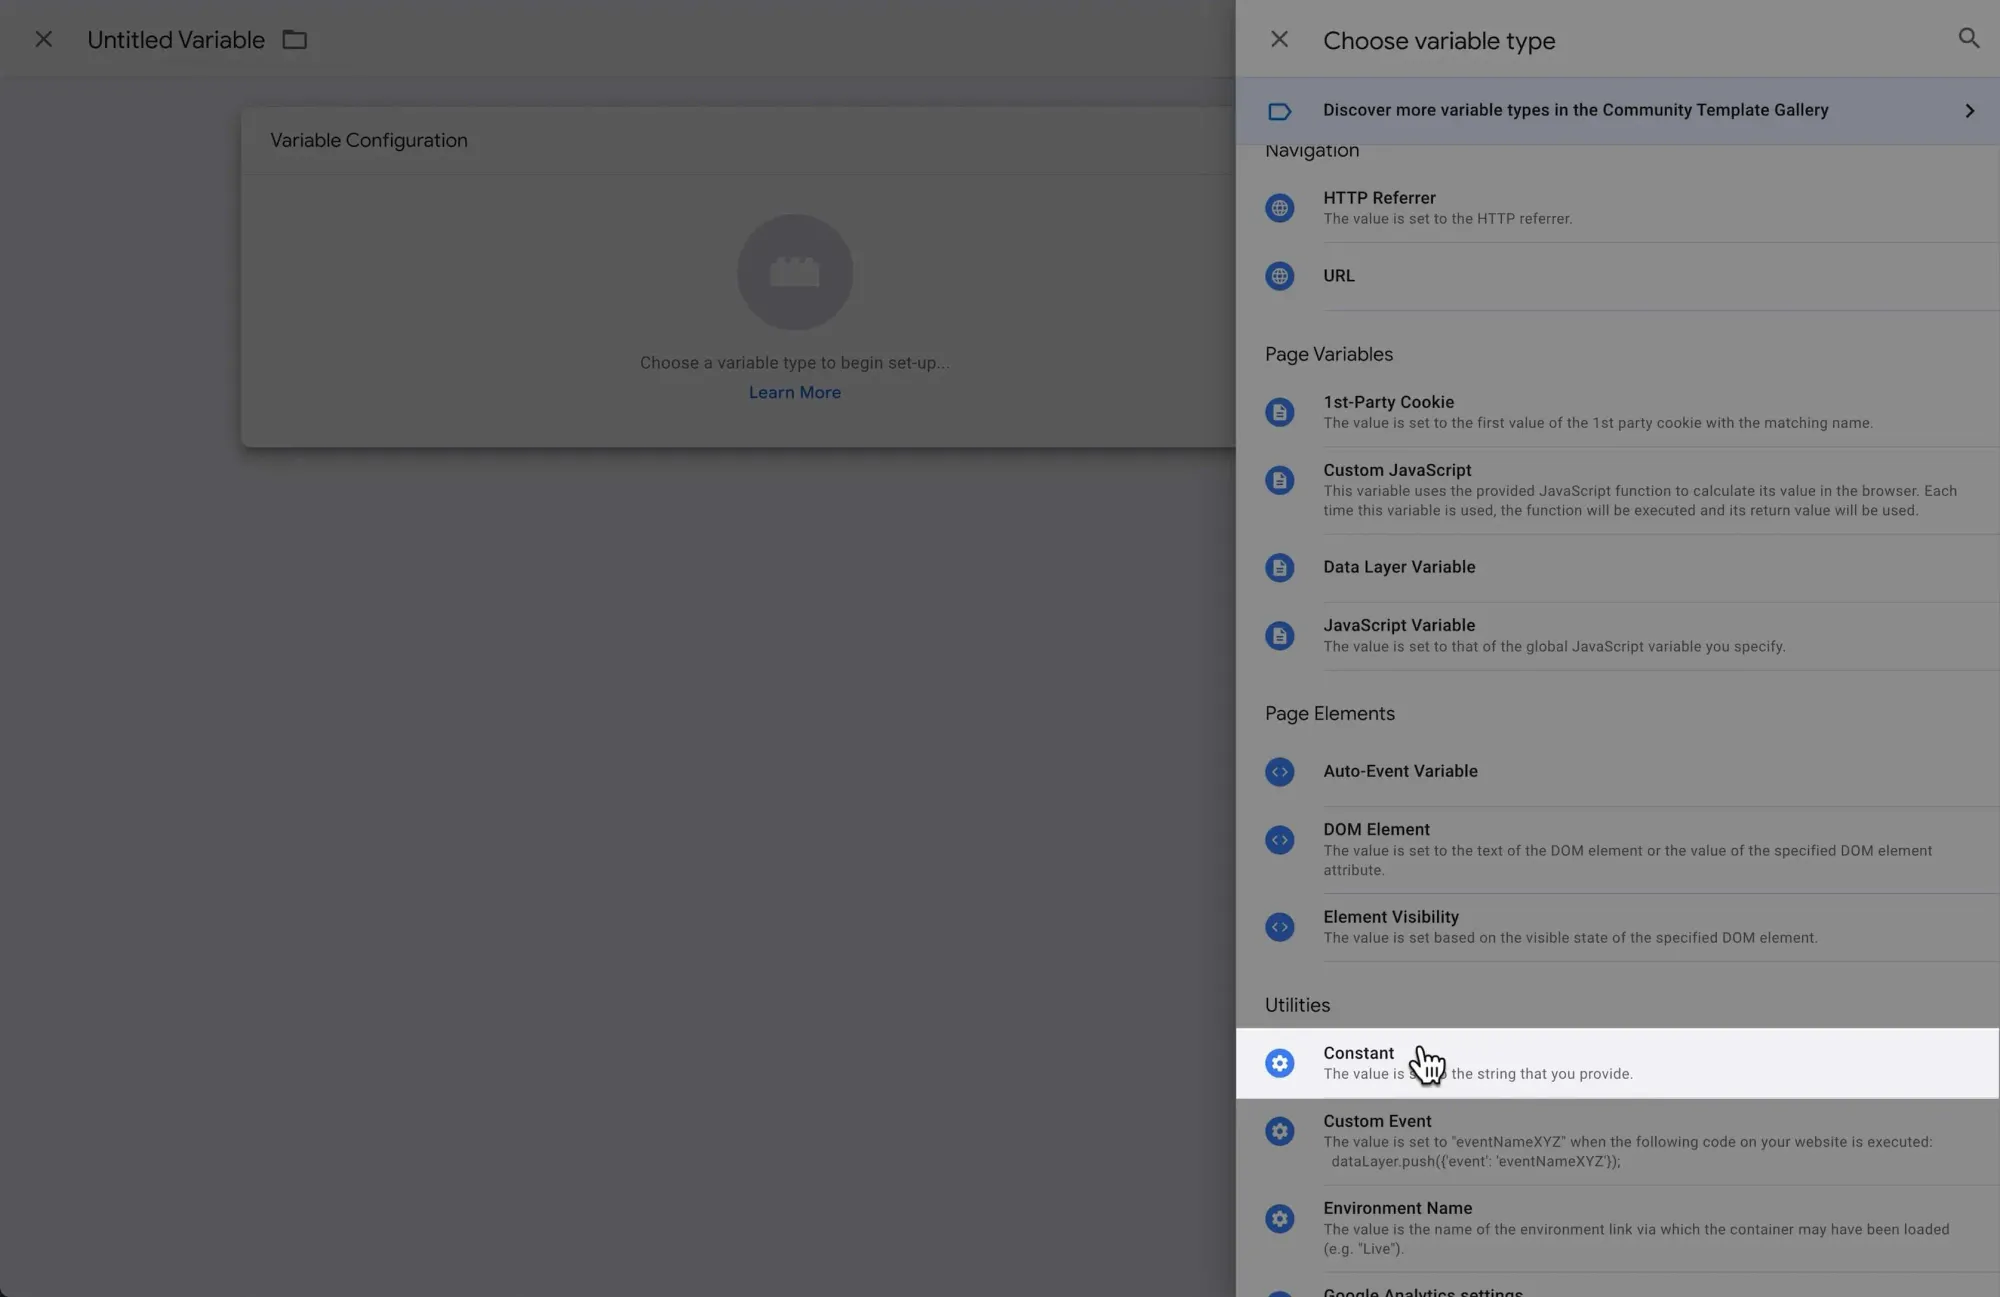
Click the Variable Configuration panel to choose a variable type:

Since the GA4 measurement ID is a fixed value that won't change, select Constant as the variable type:
Paste your GA4 measurement ID into the Value field, give it a descriptive name, then click Save:
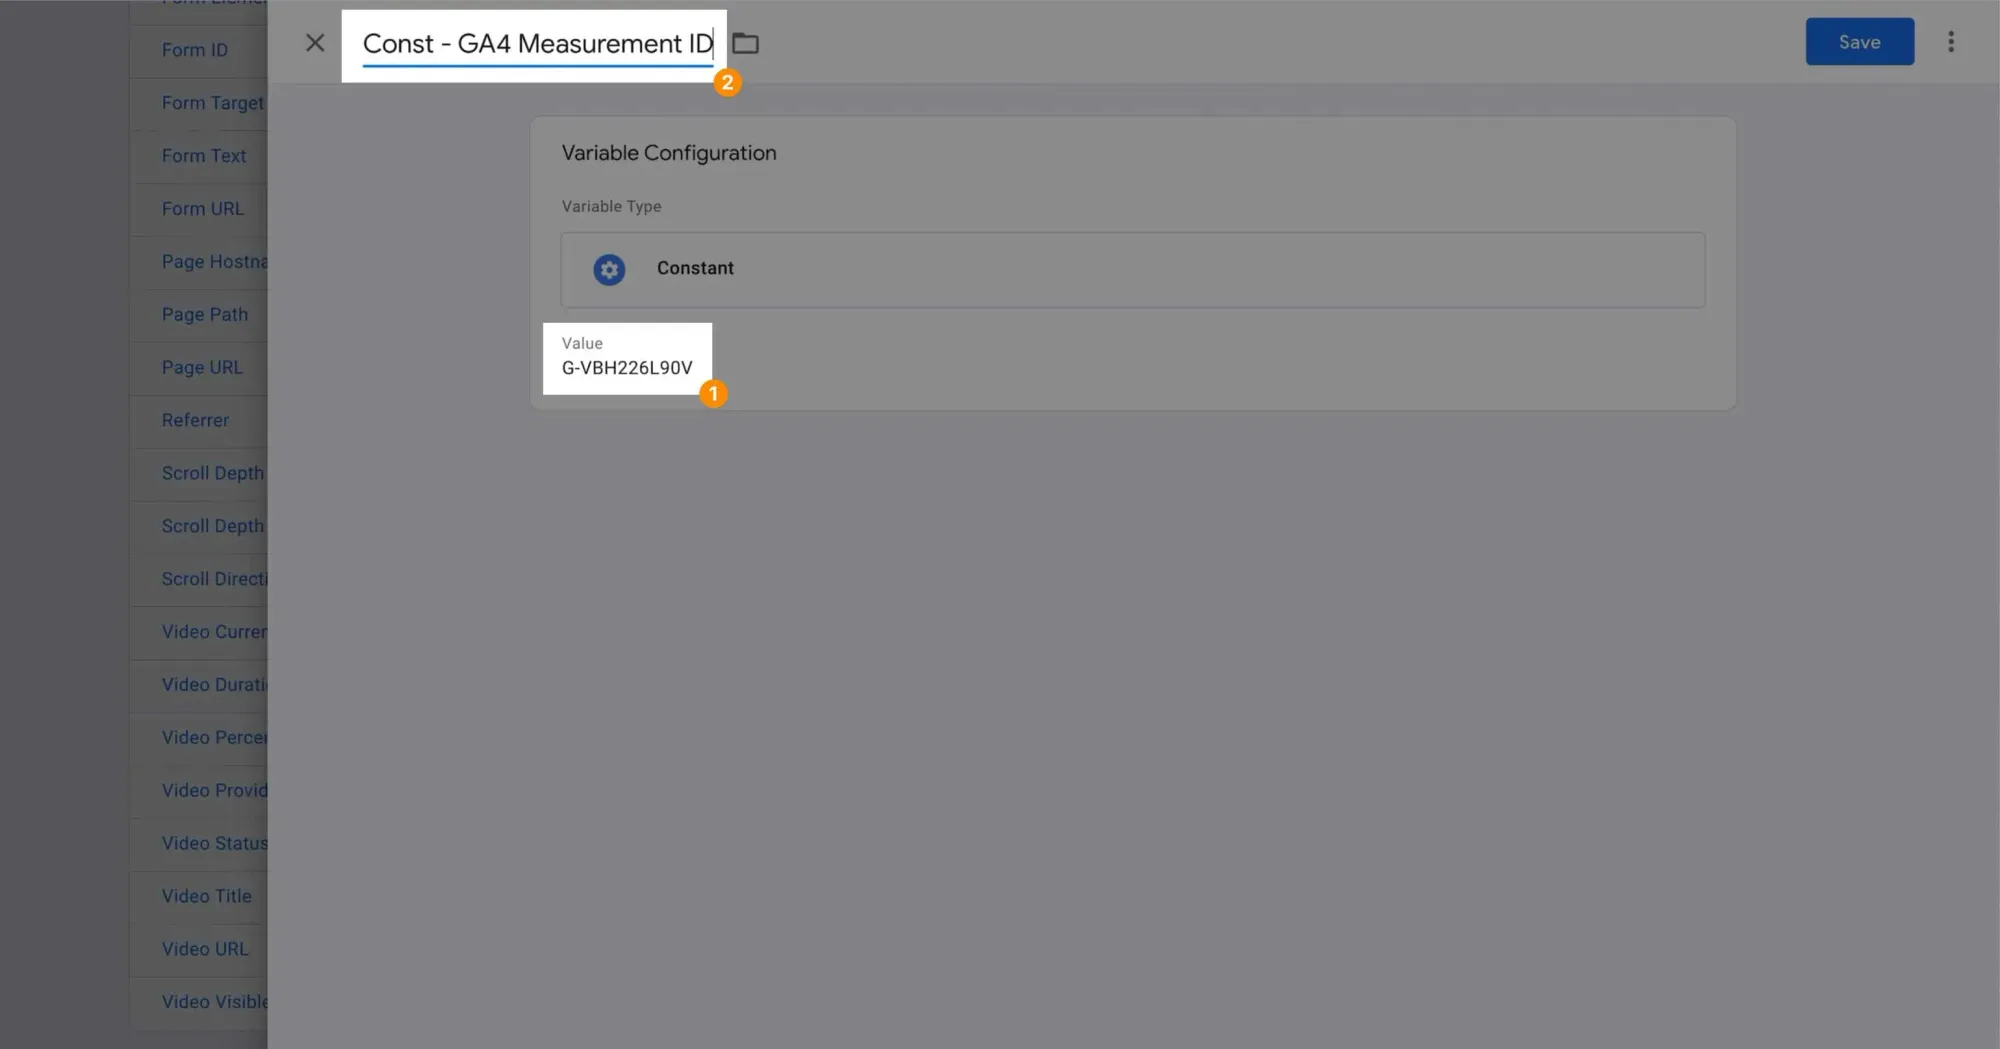
The Constant variable will be automatically plugged into the Tag ID field.
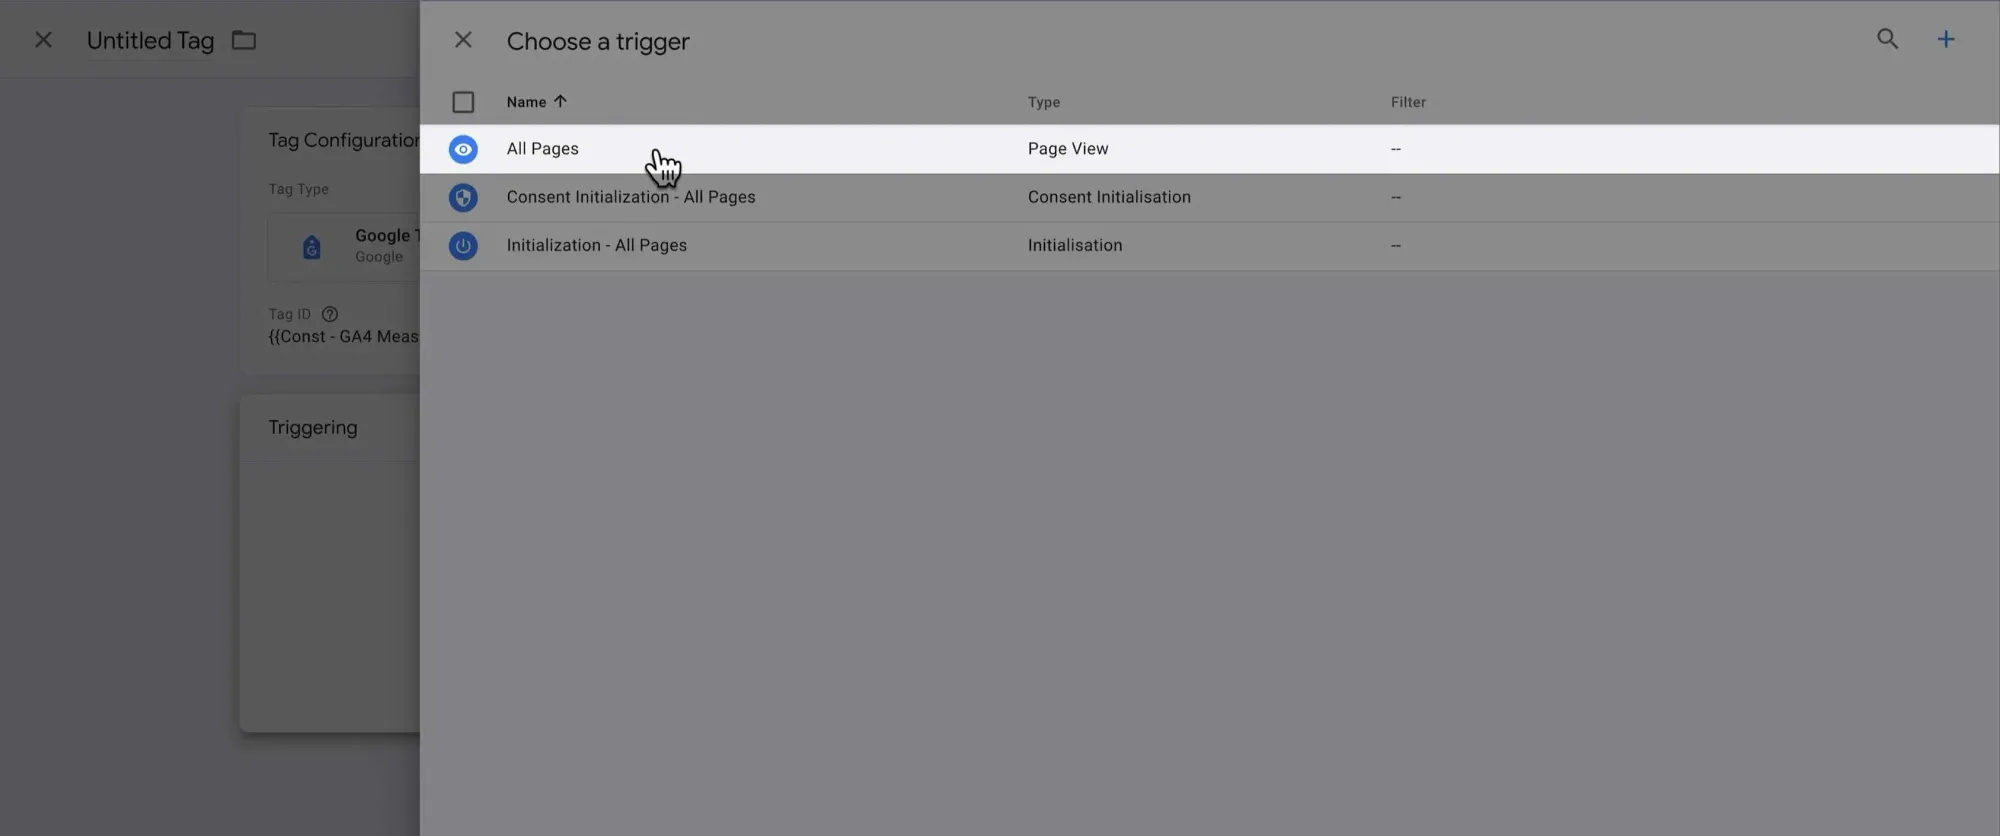
Next, click Triggering to specify when the tag will fire:
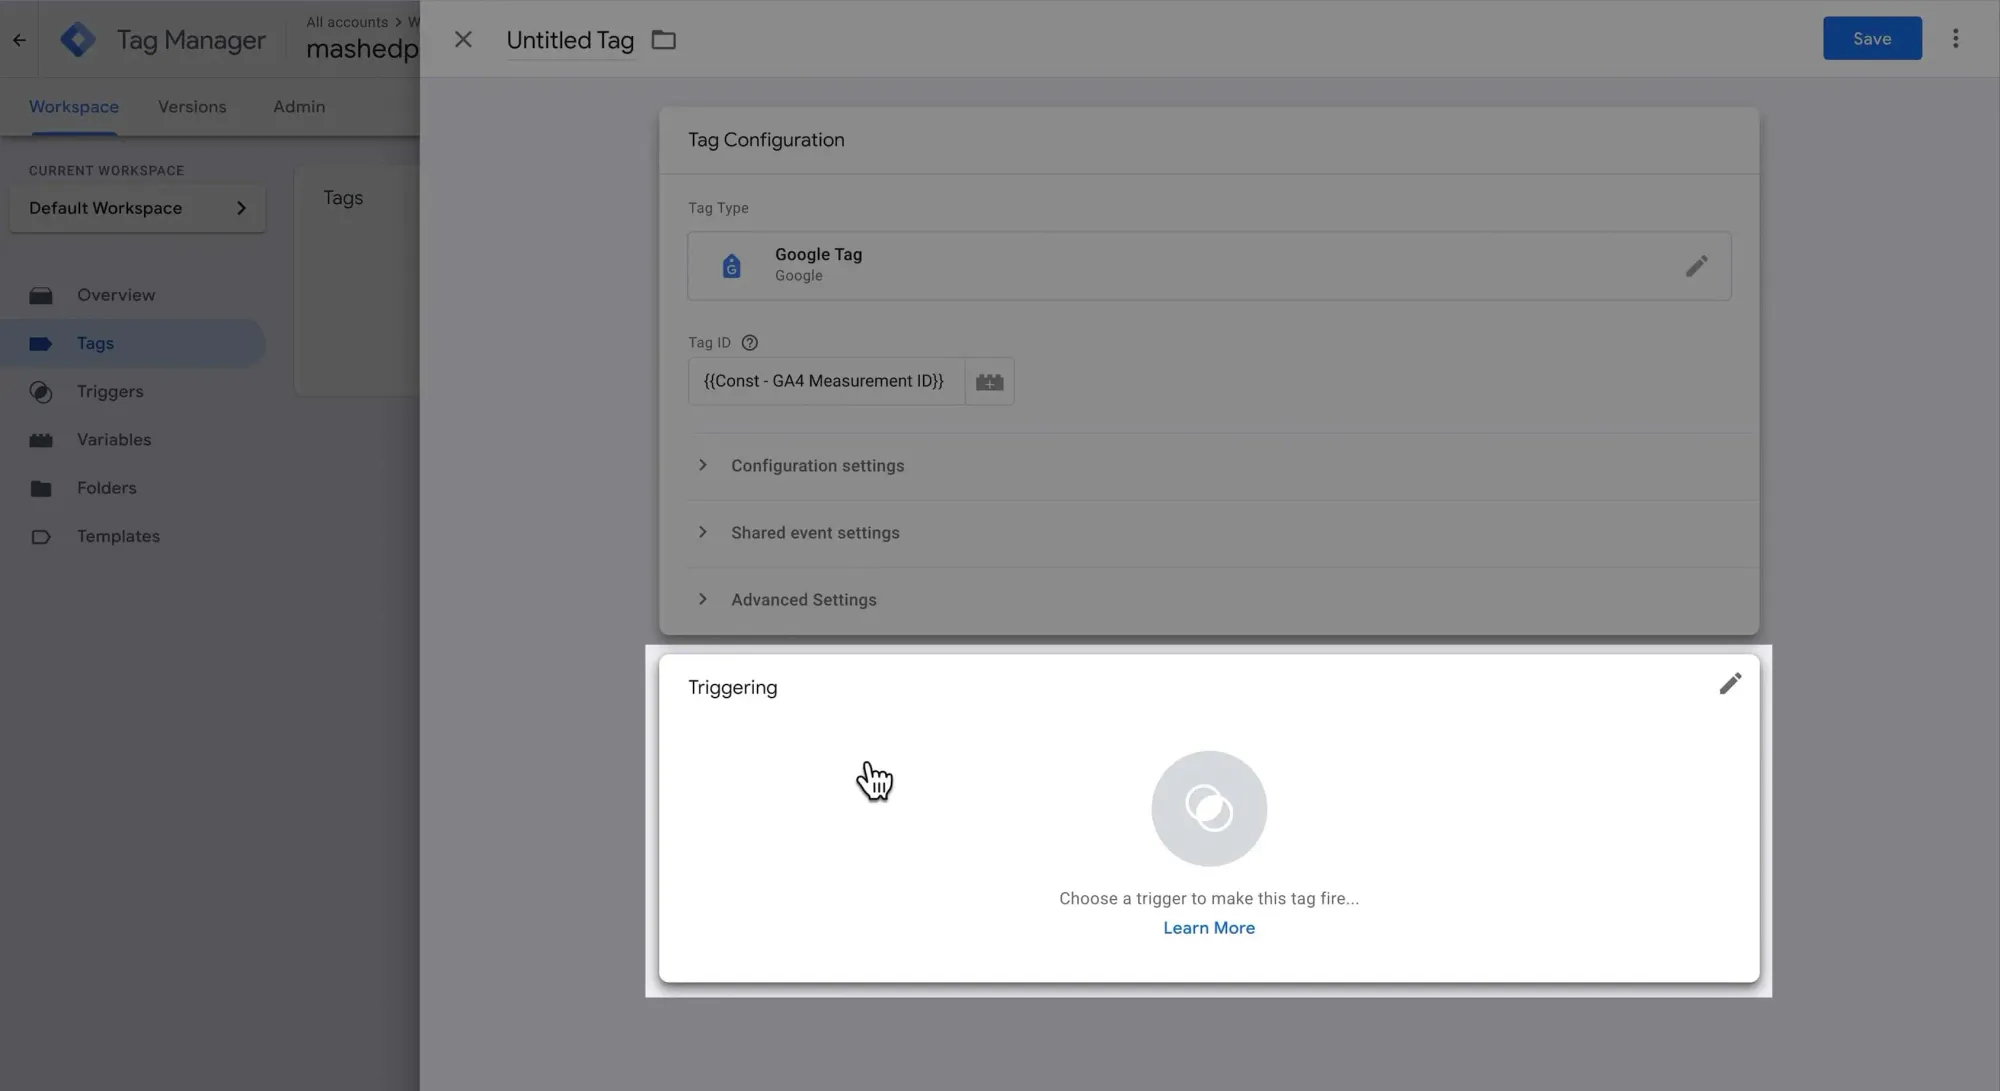
As this is the base GA4 tag, we want it to fire on every page. Select All Pages:
Finally, give it a descriptive name, then click Save:

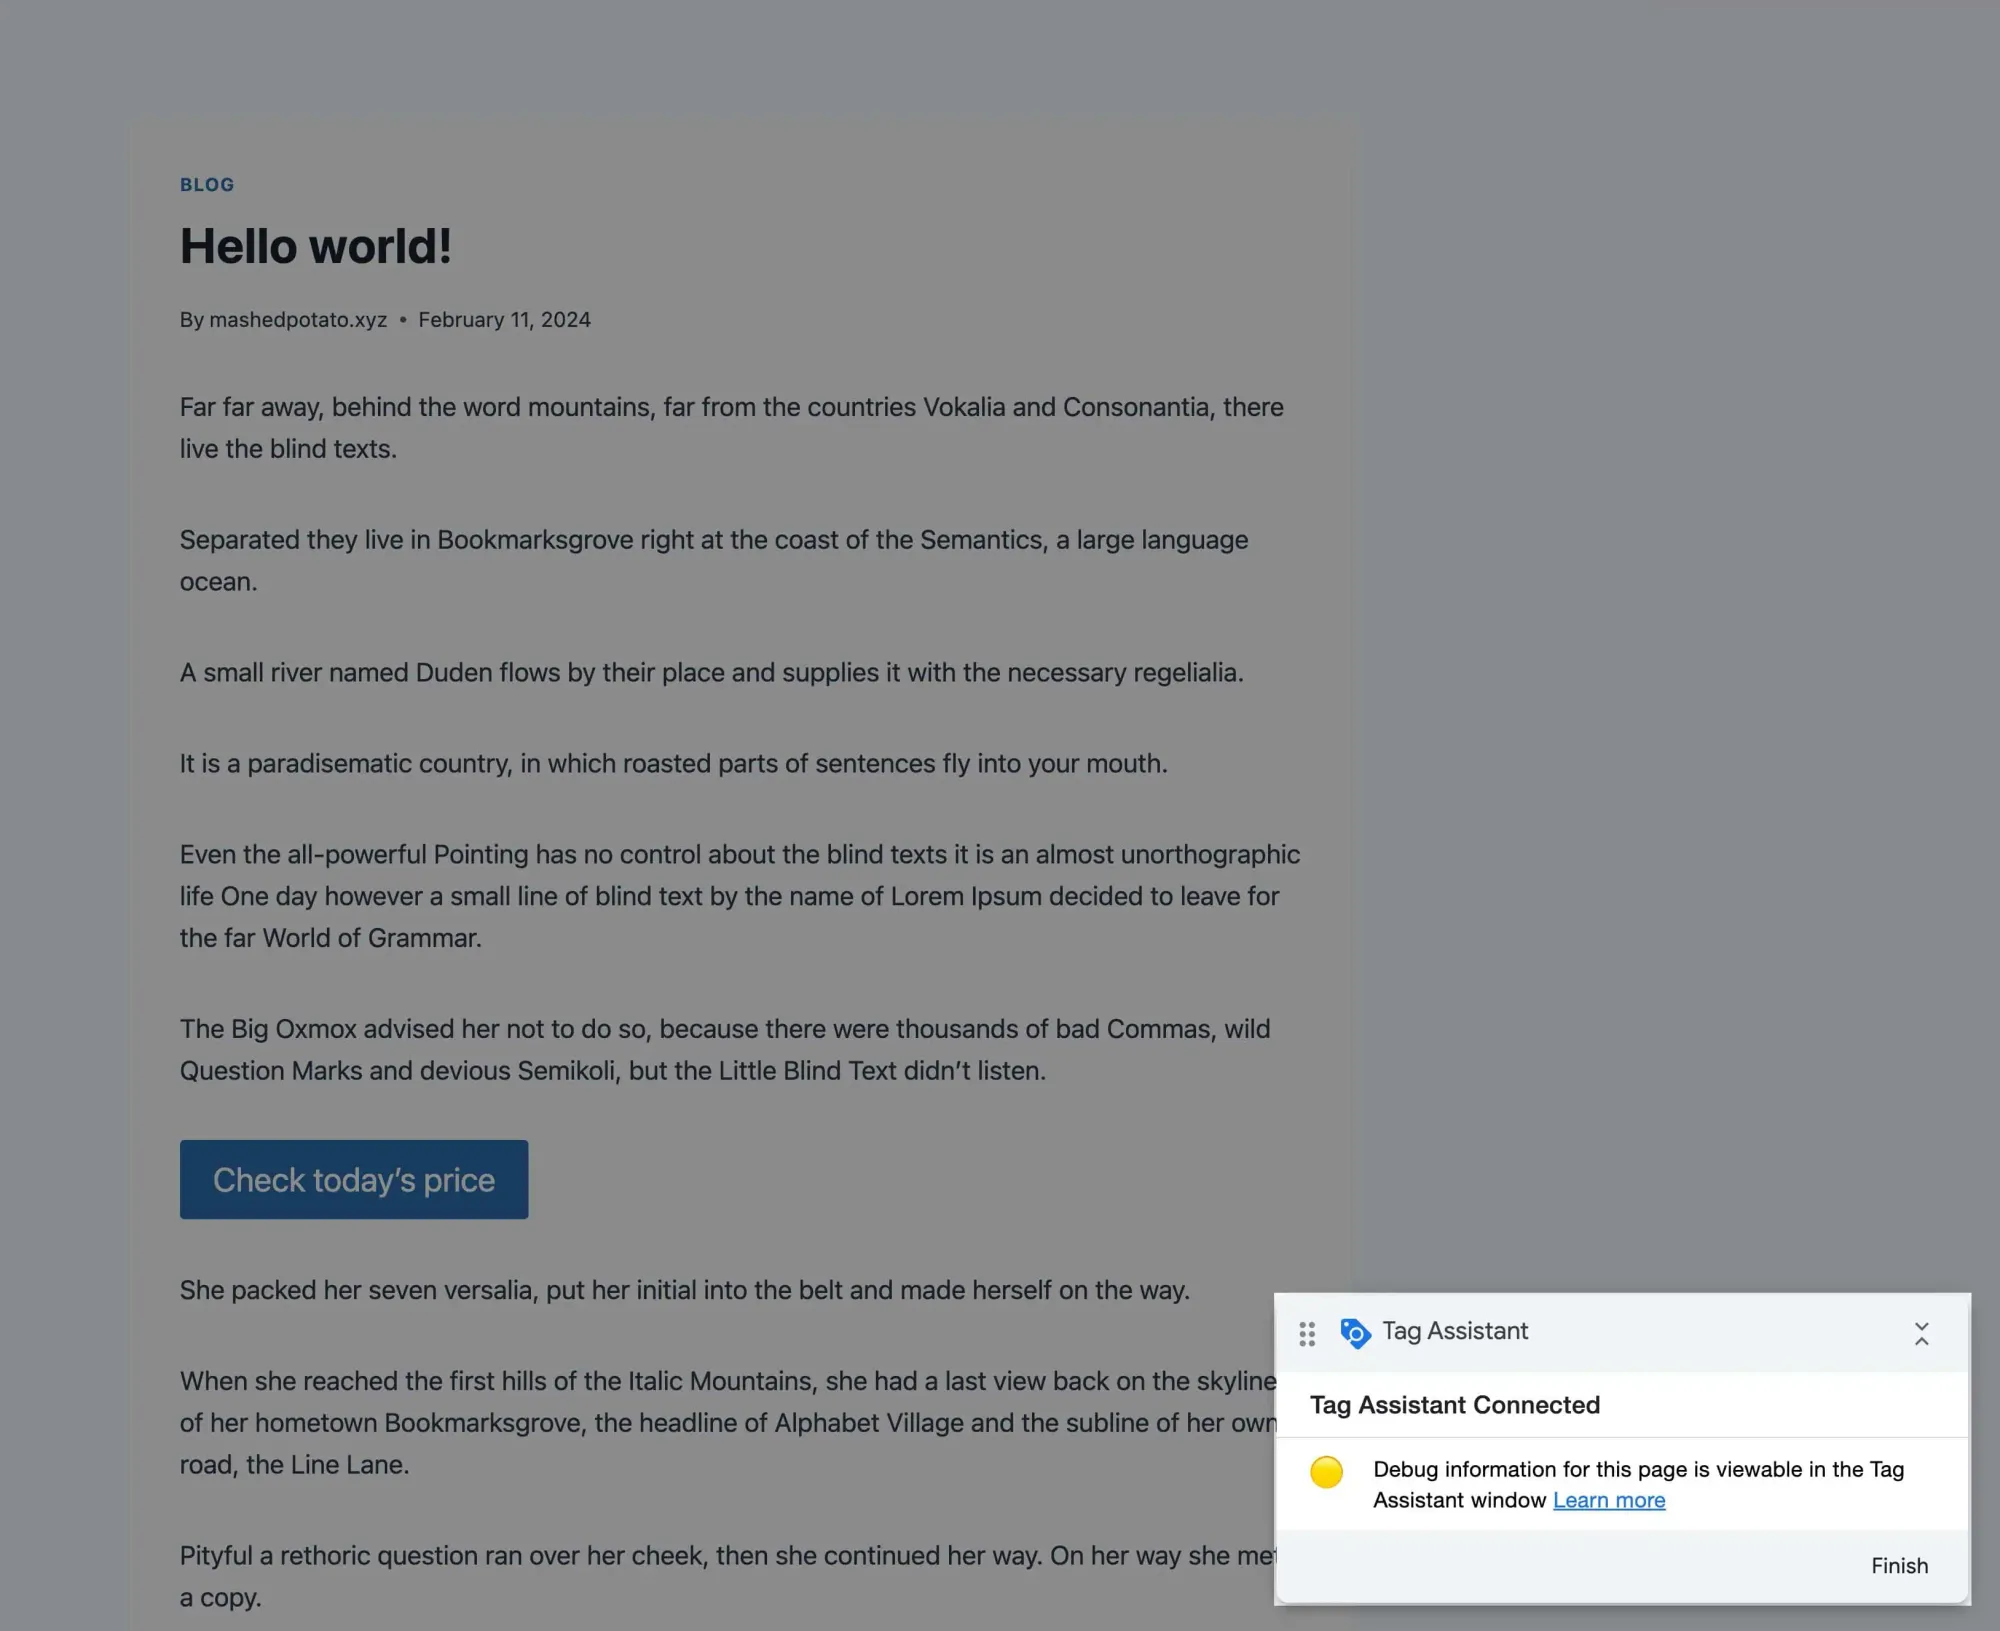
Now, click Preview to review the changes before pushing them live:
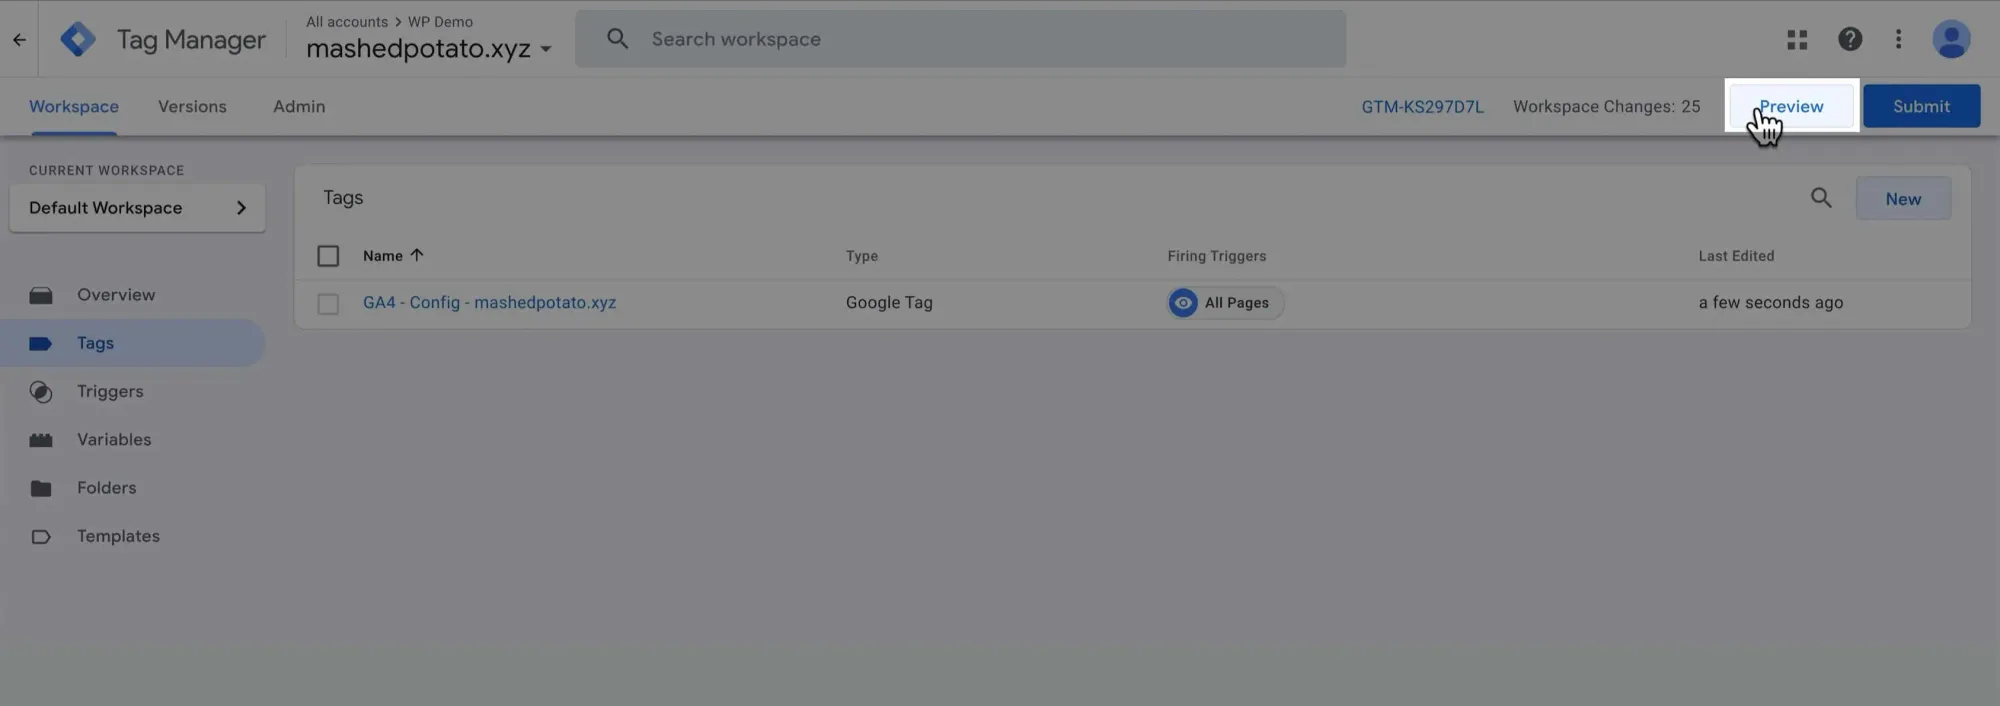
Tag Assistant will open in a new tab. Enter your website URL to connect it to your site:
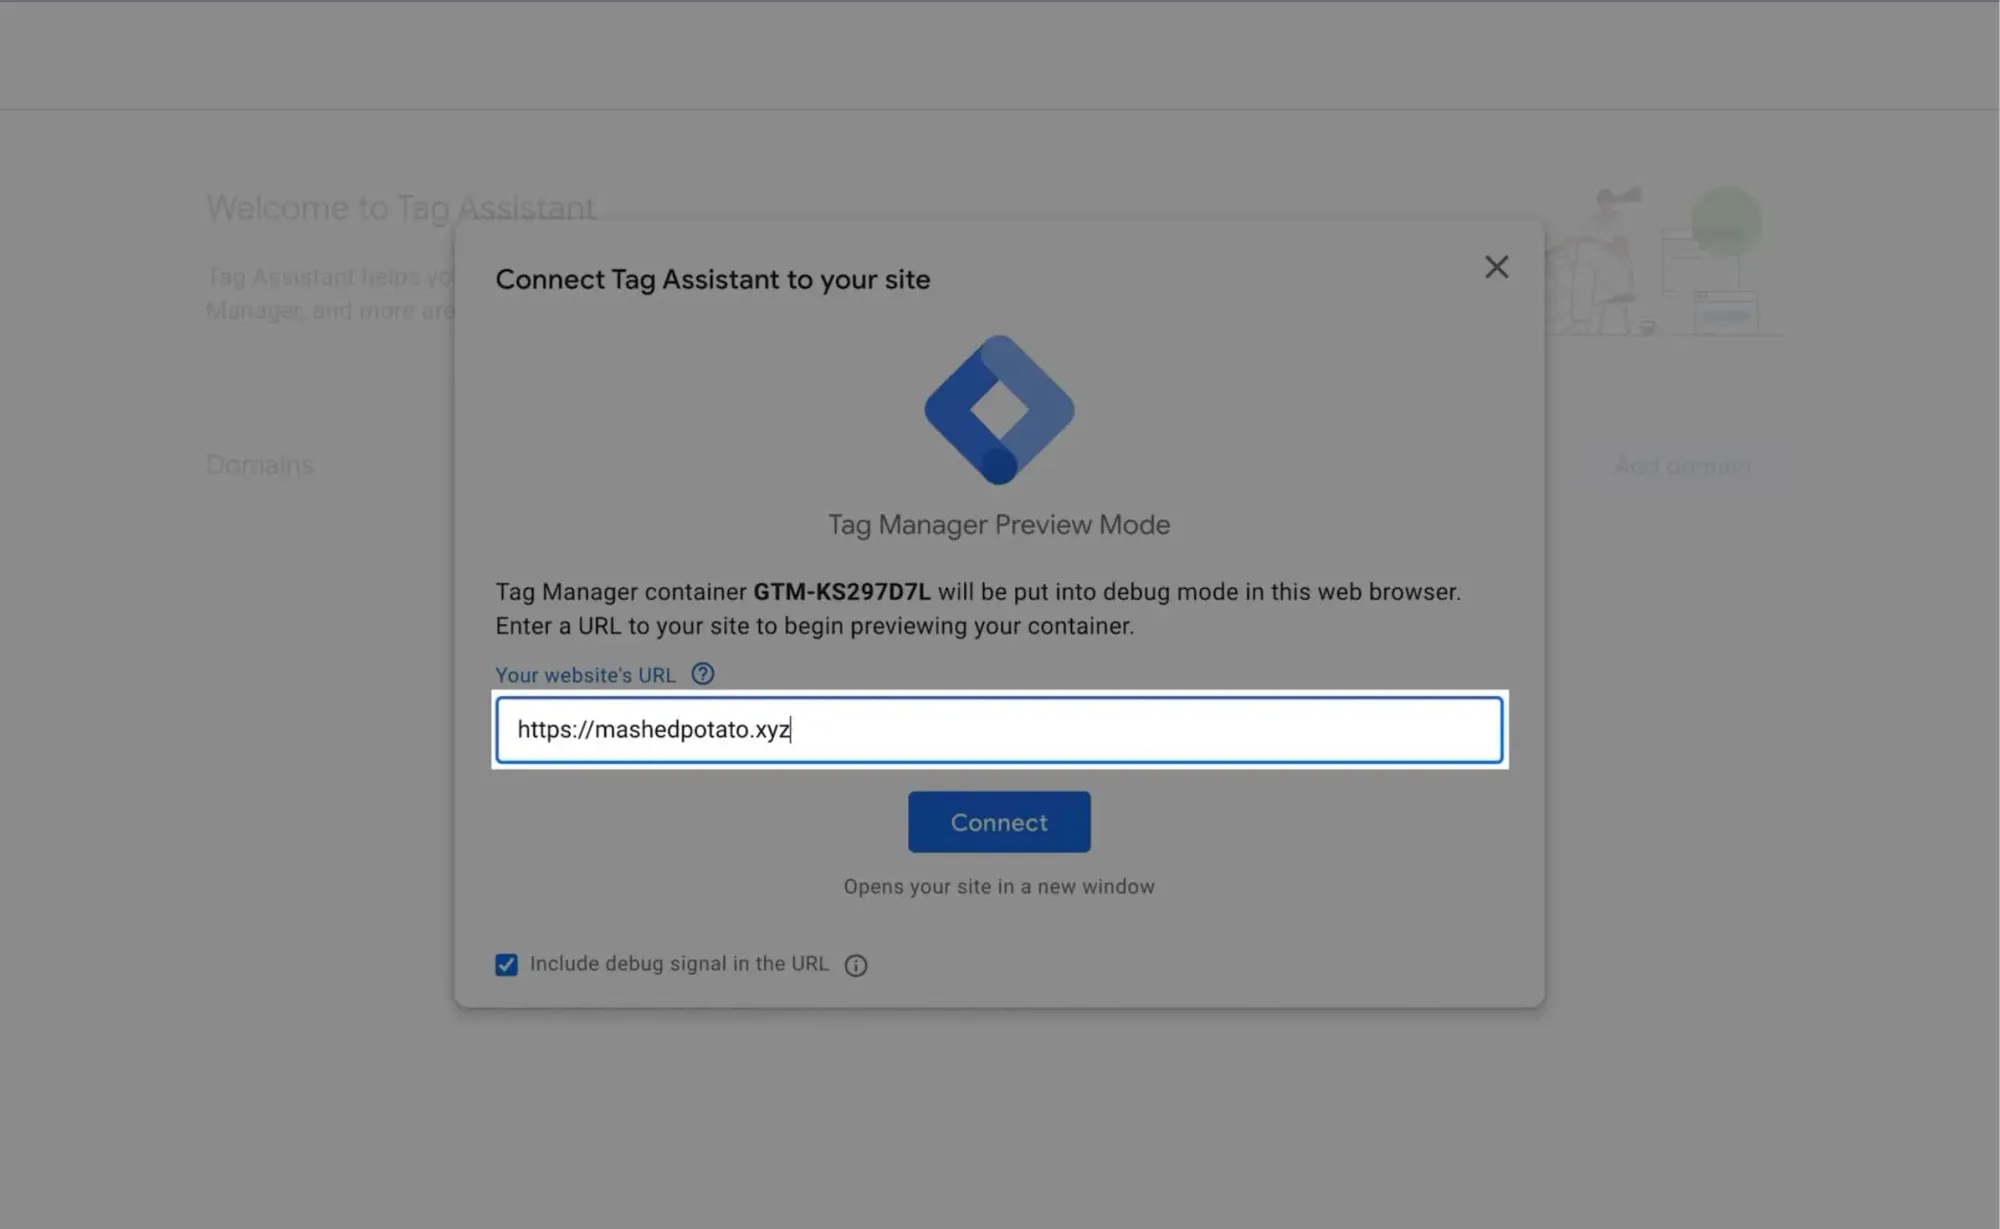
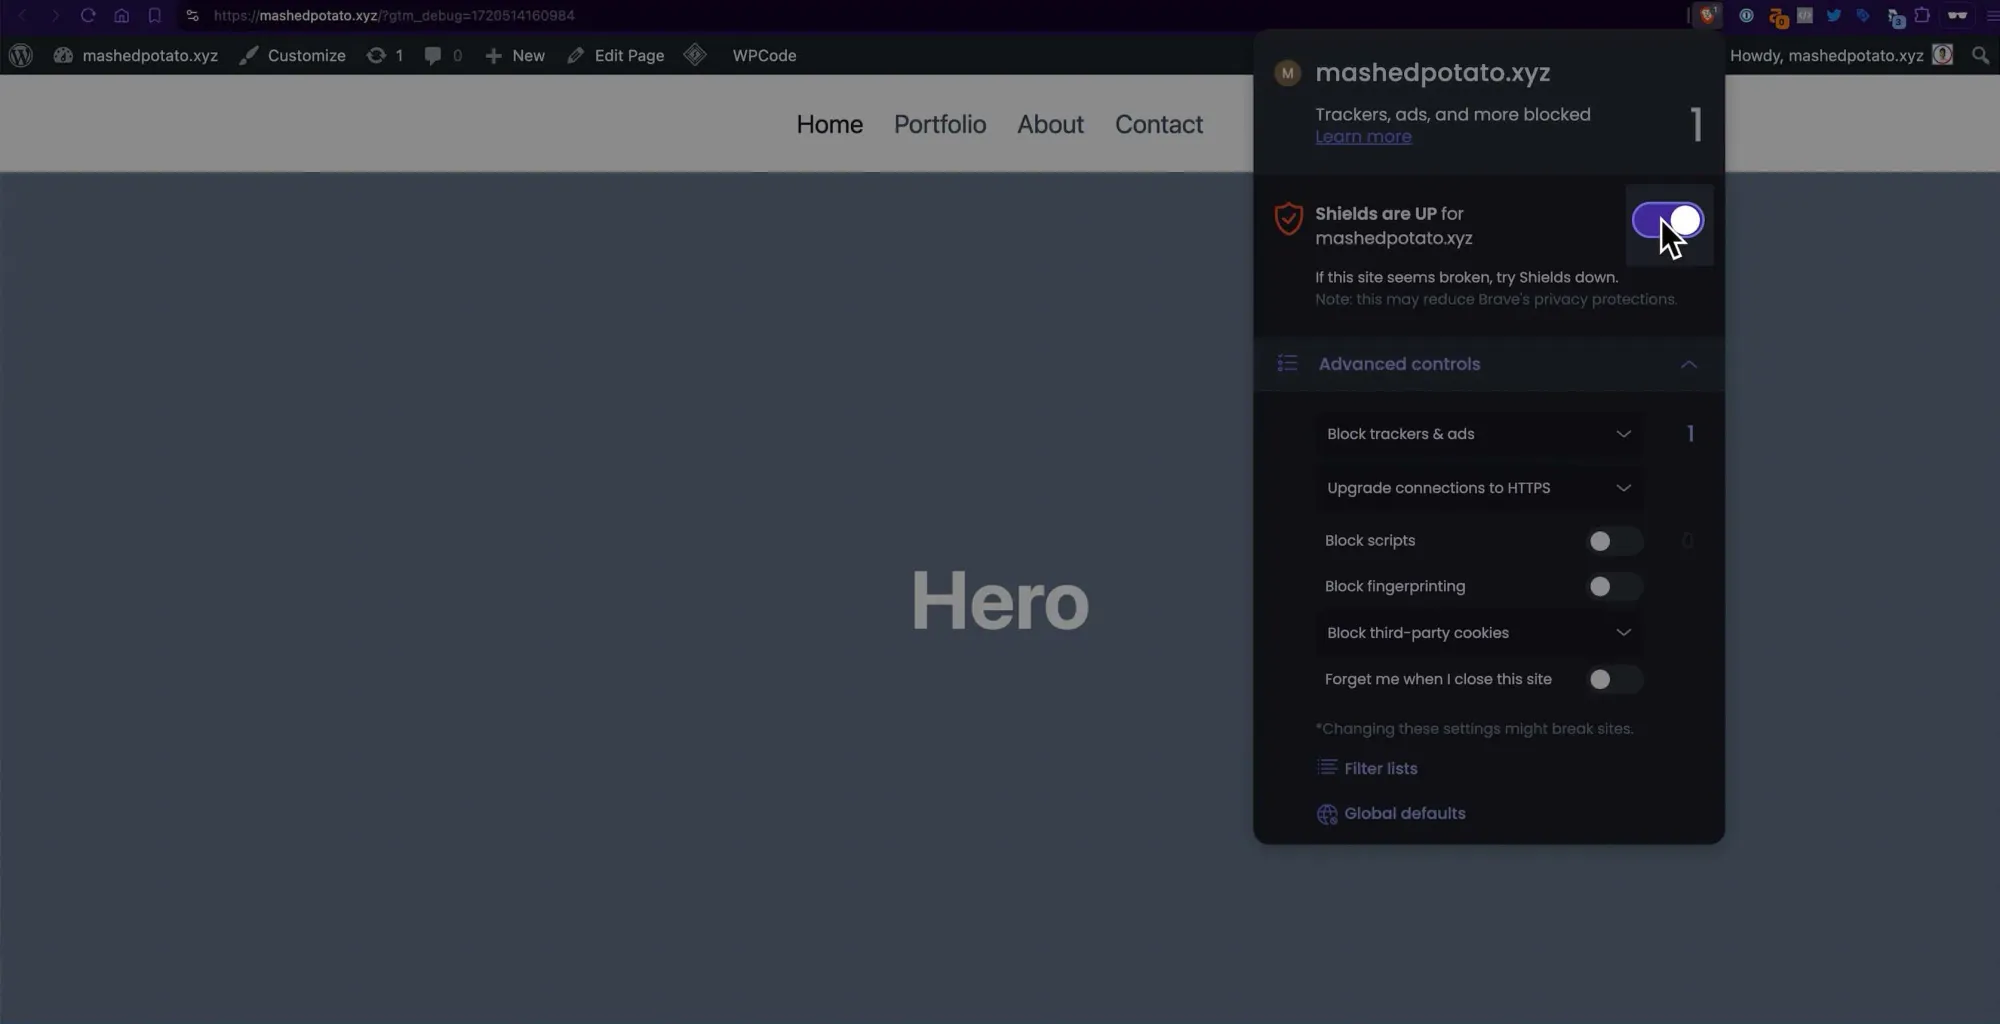
Your website will open in another new tab. If you're using a privacy-focused browser that blocks scripts, be sure to disable the shield for both the GTM site and your own site.
I use Brave browser, so I turn off the shield like this:
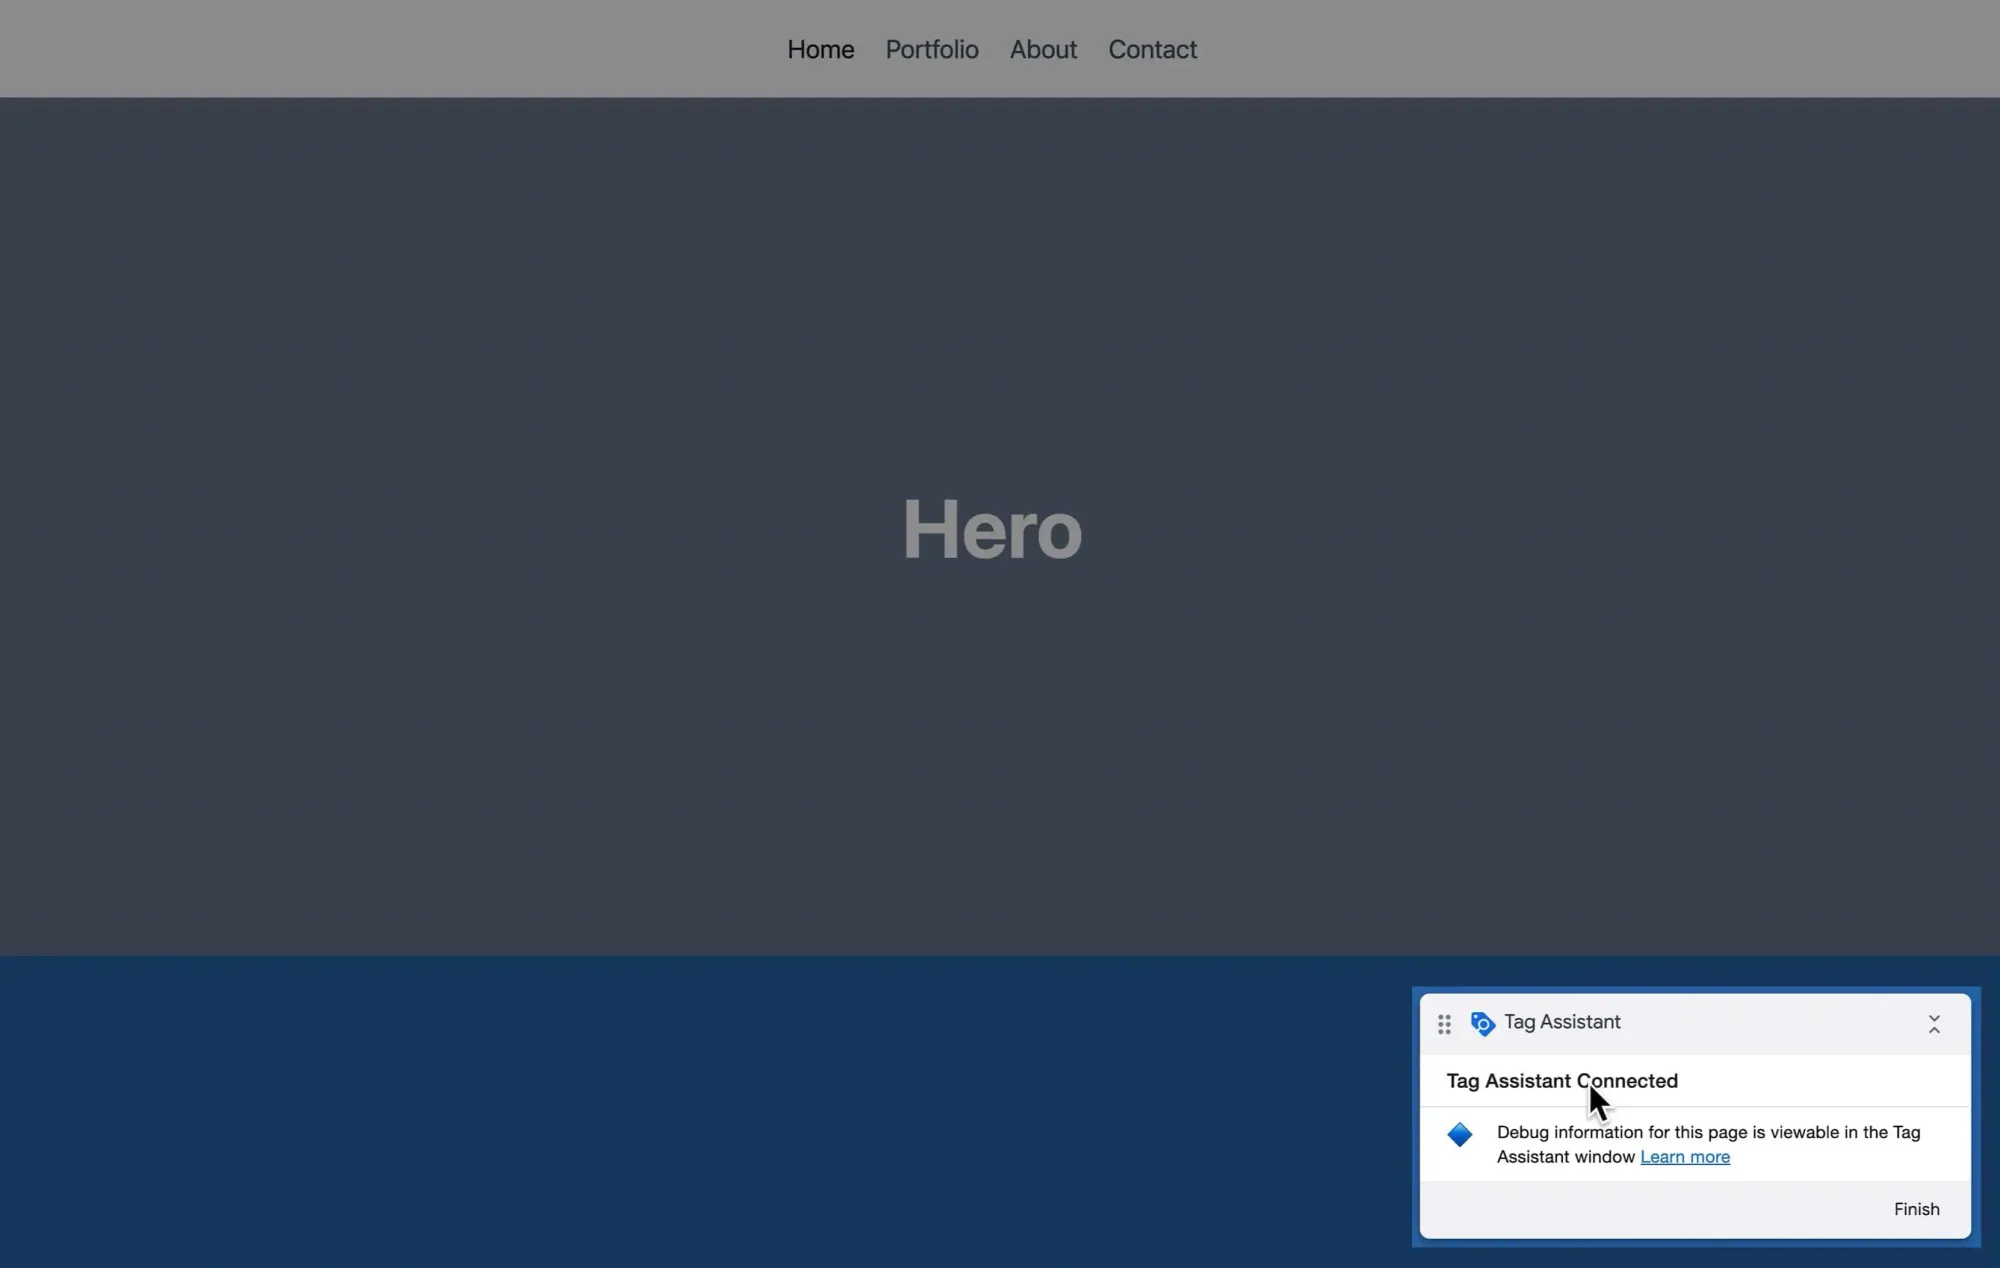
If you see this widget that says Tag Assistant Connected in the bottom right of your screen, it means Tag Assistant is successfully connected:
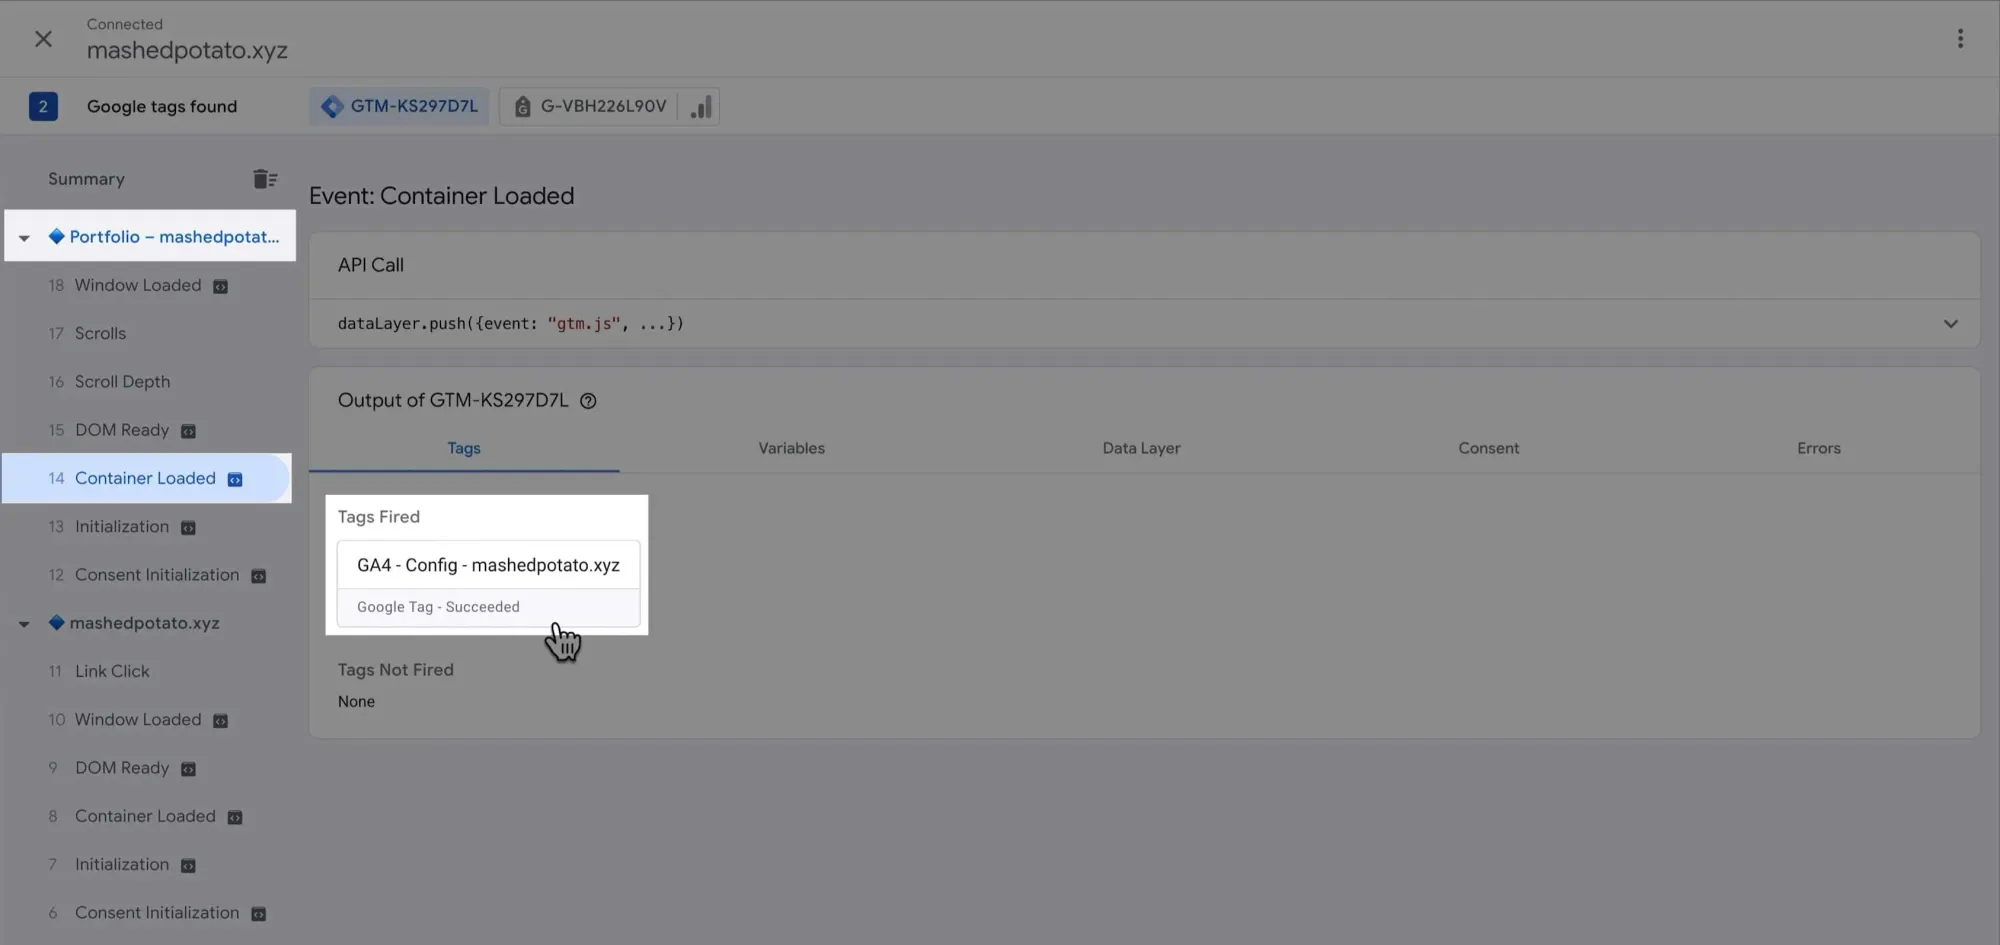
After your website loads in the new tab, we need to verify if the GA4 tag fired. Go back to the Tag Assistant tab and click the Container Loaded tab.
If the tag was fired and succeeded, you're good to go.
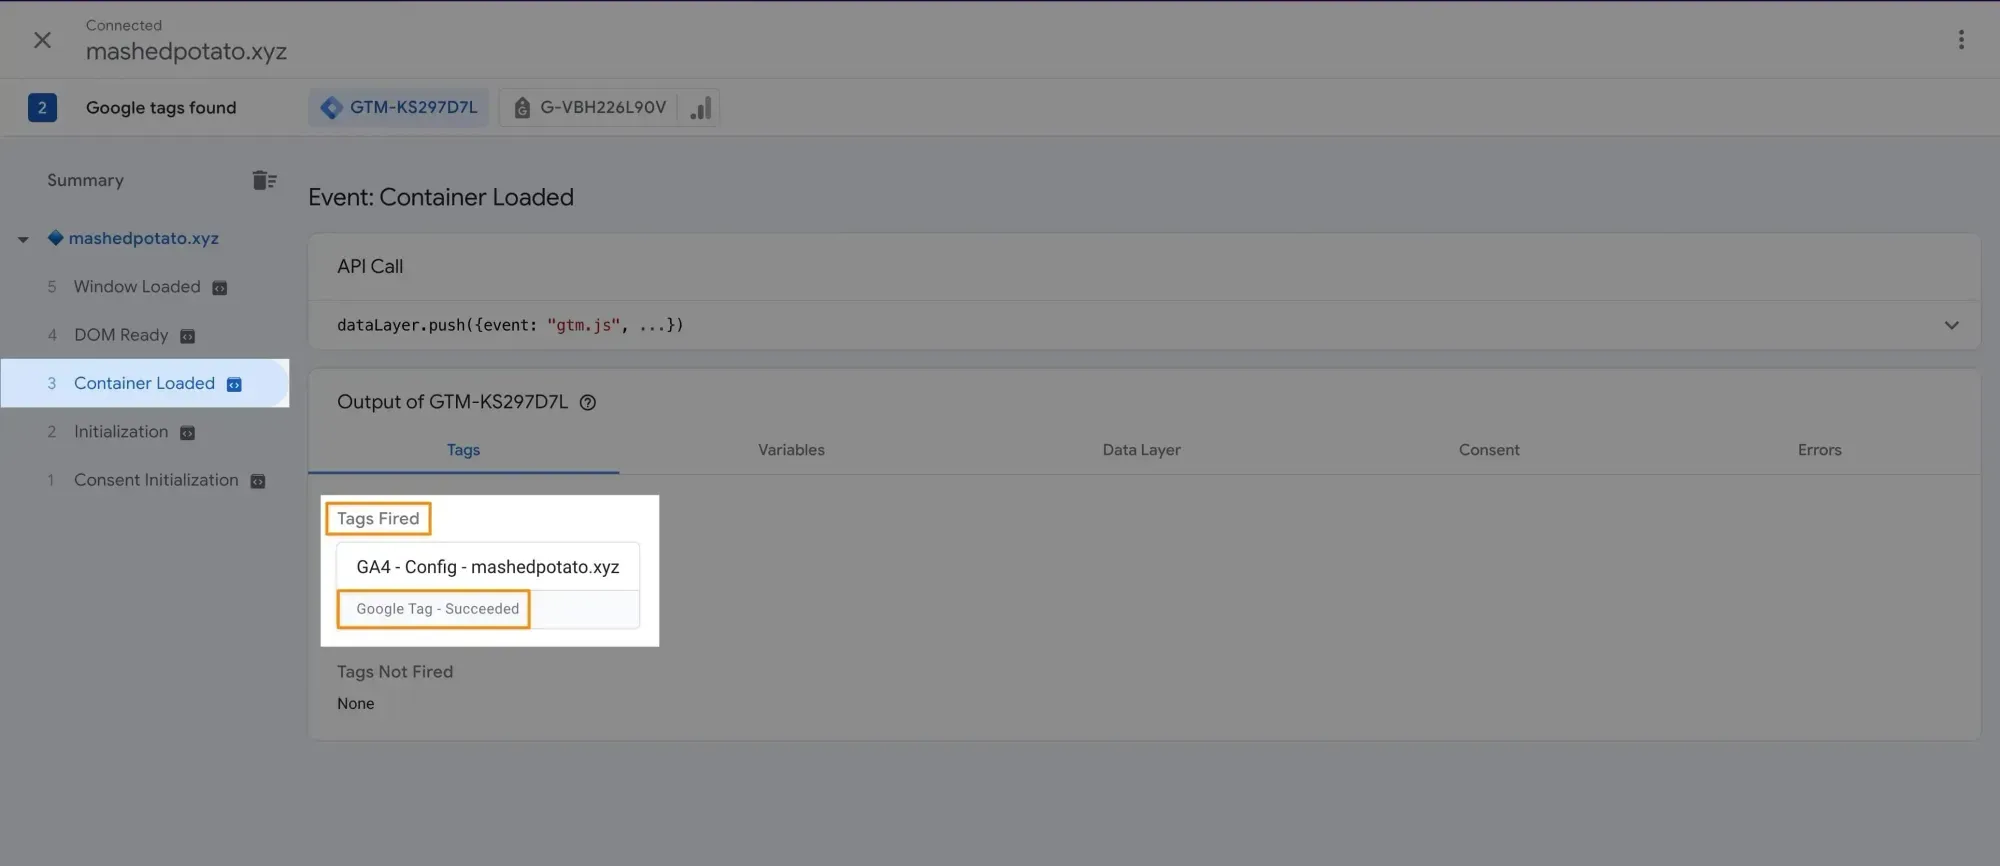
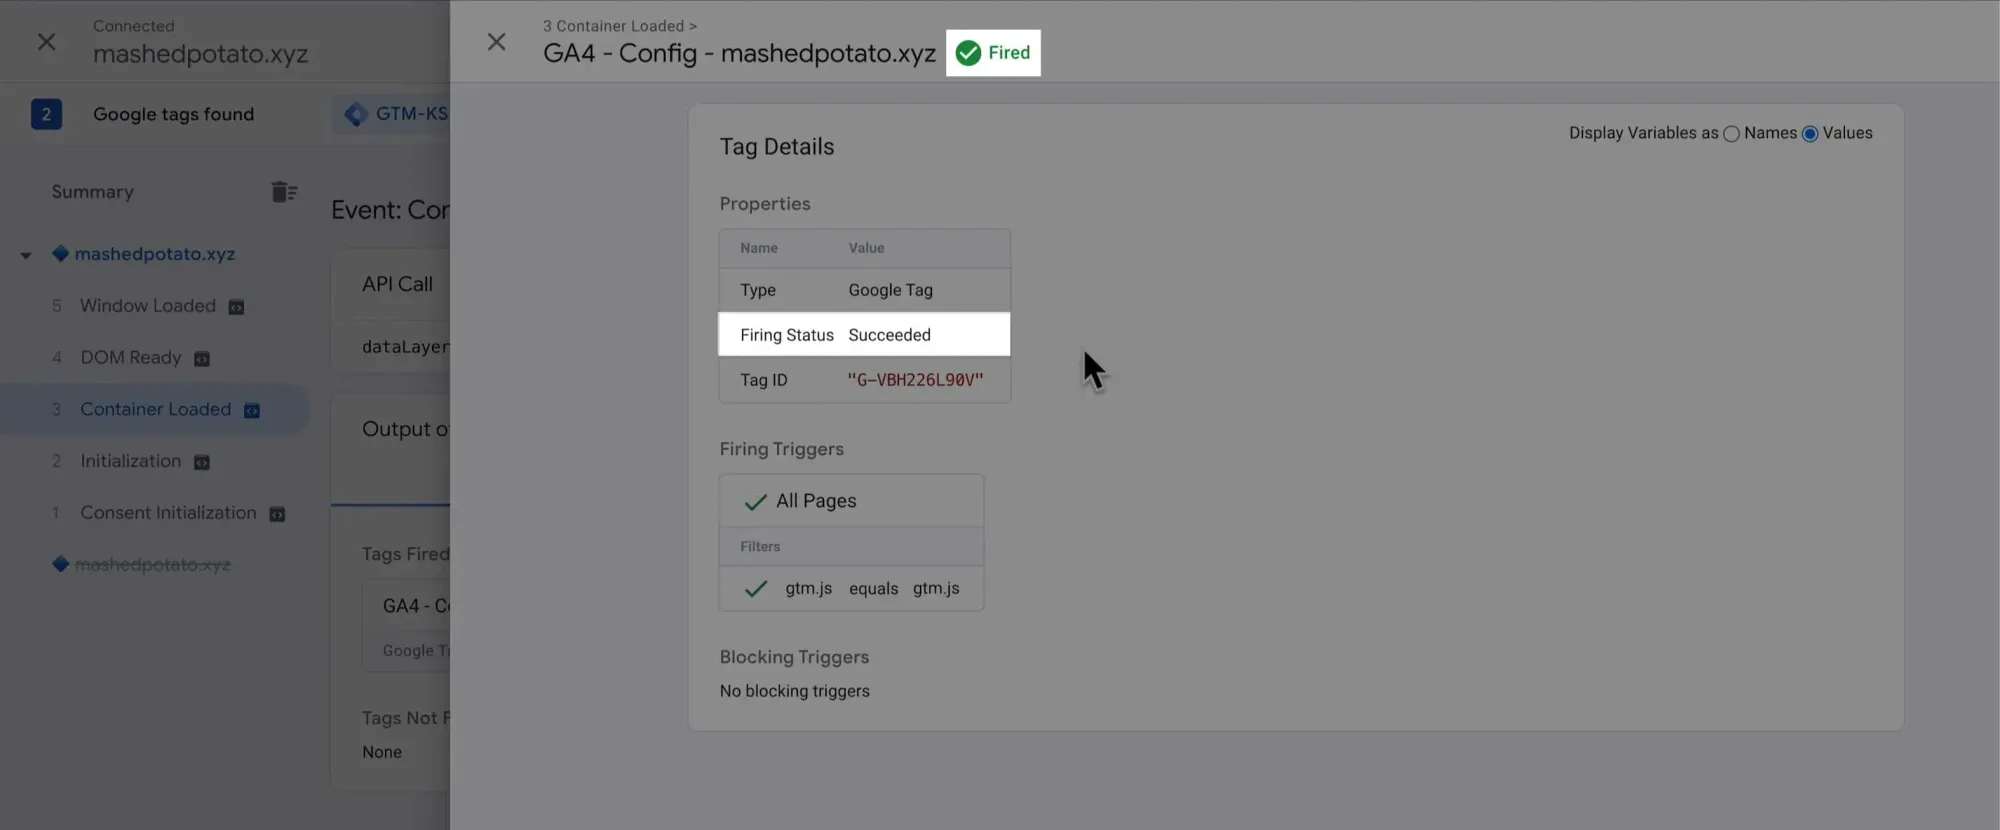
You can also click the tag to reveal more information:
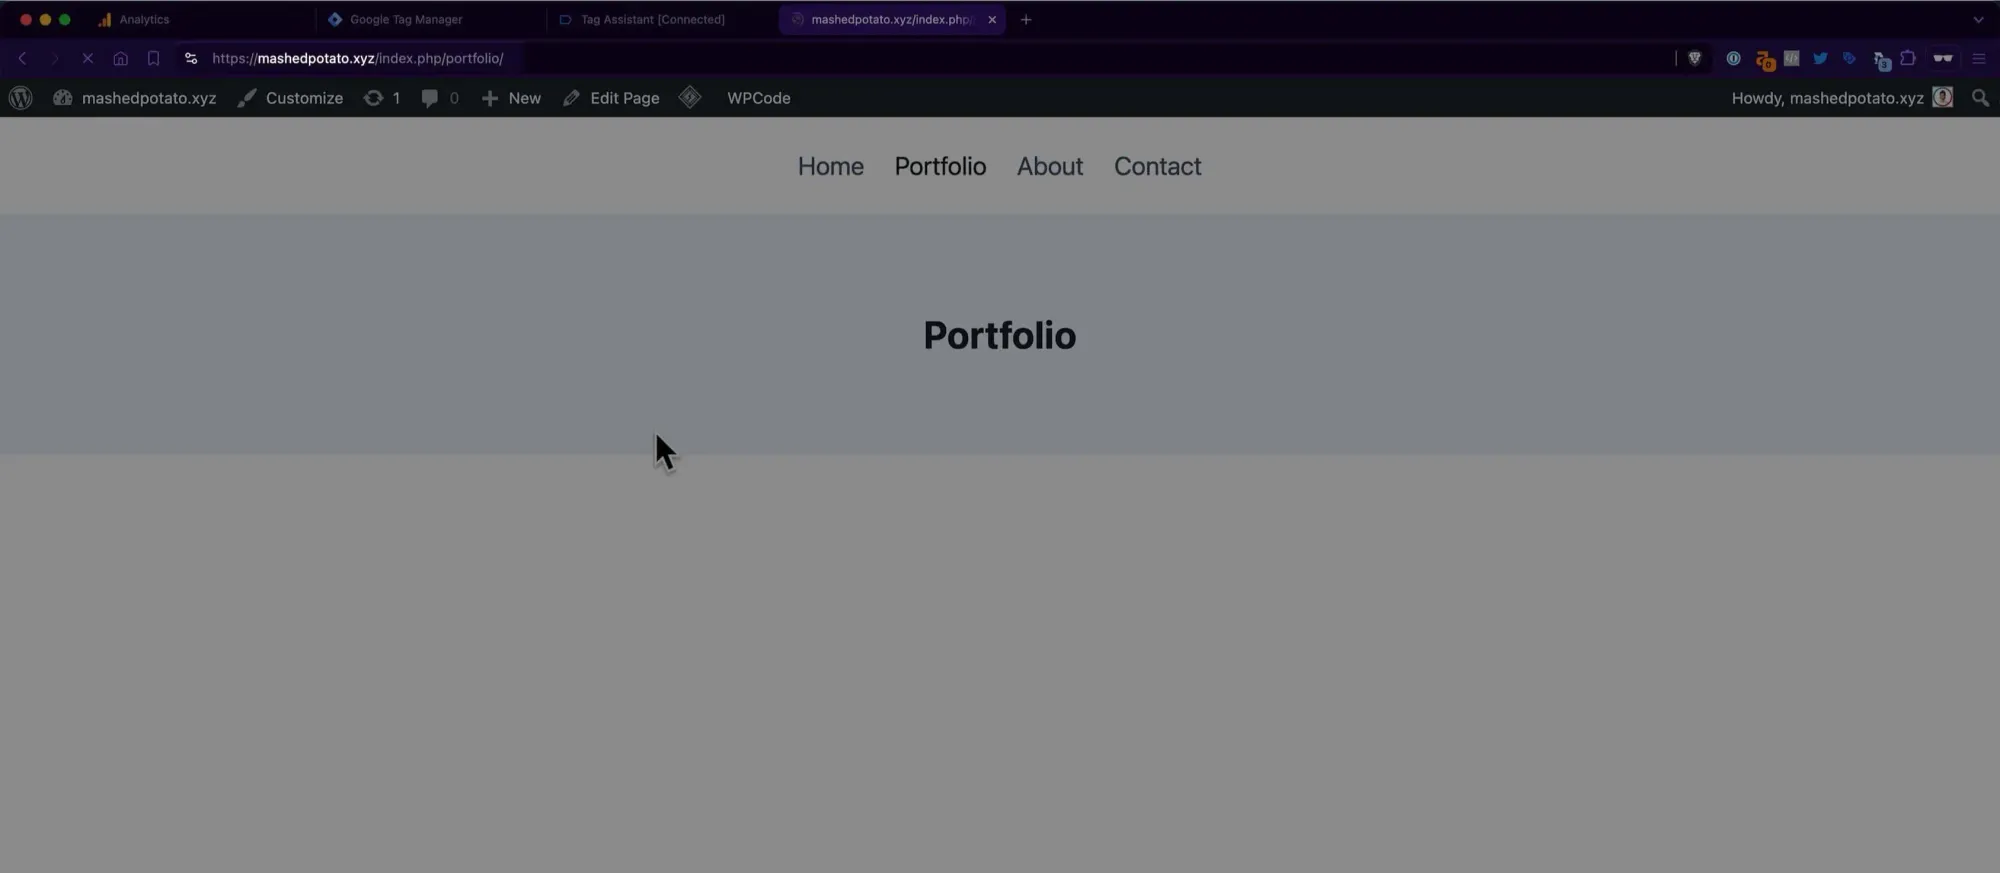
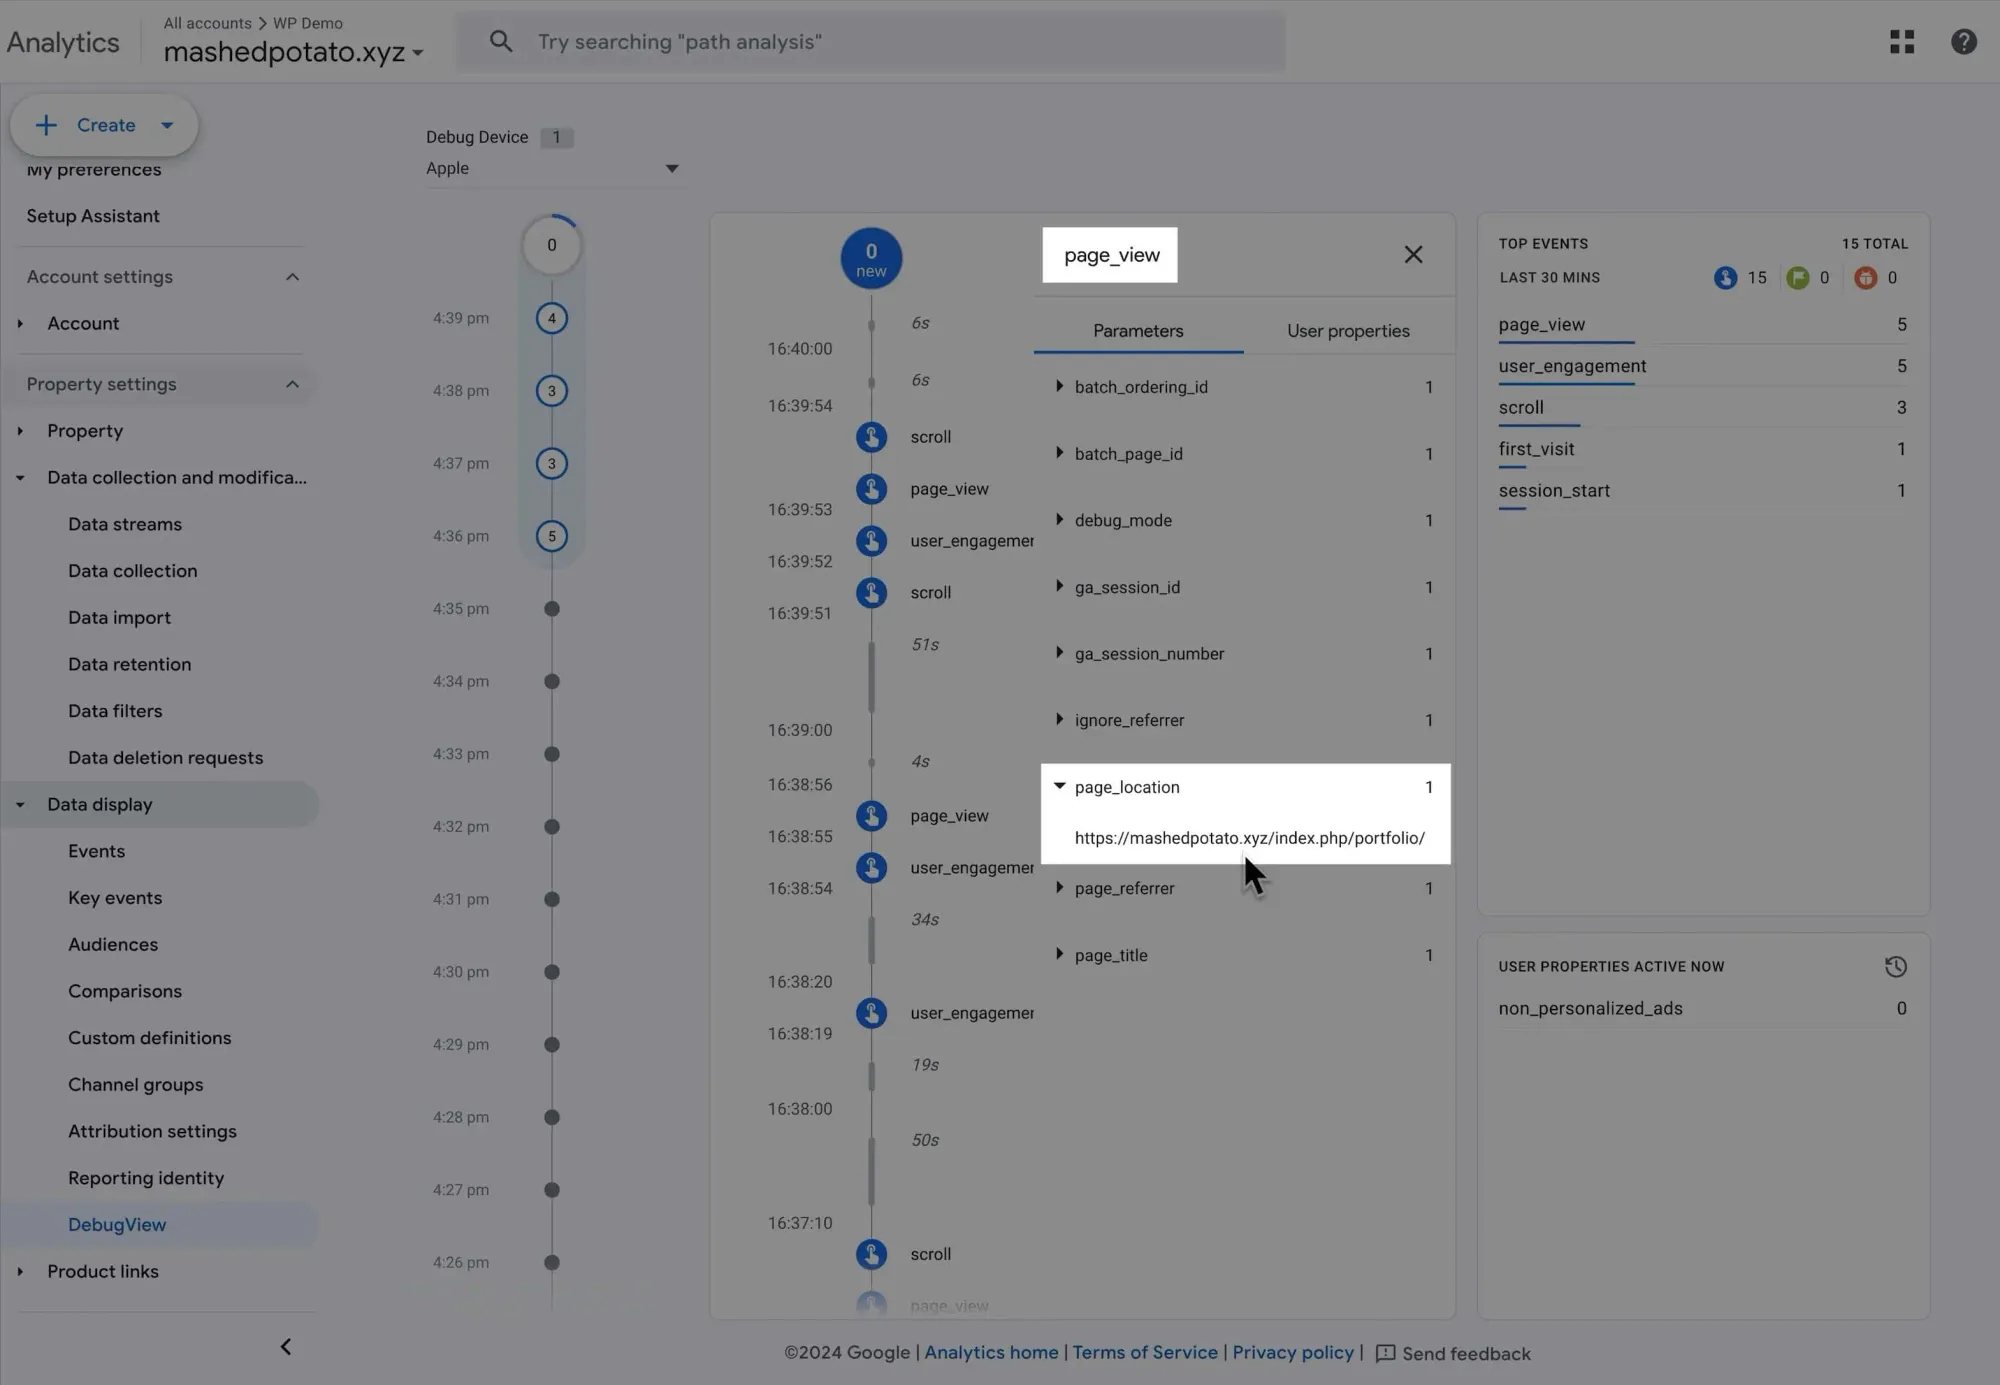
Now, on your website, navigate to another page to see if the tag fires again. In this example, I navigate to the Portfolio page:
Going back to the Tag Assistant tab, we can see under the Portfolio page then Container Loaded, the tag fired and succeeded.
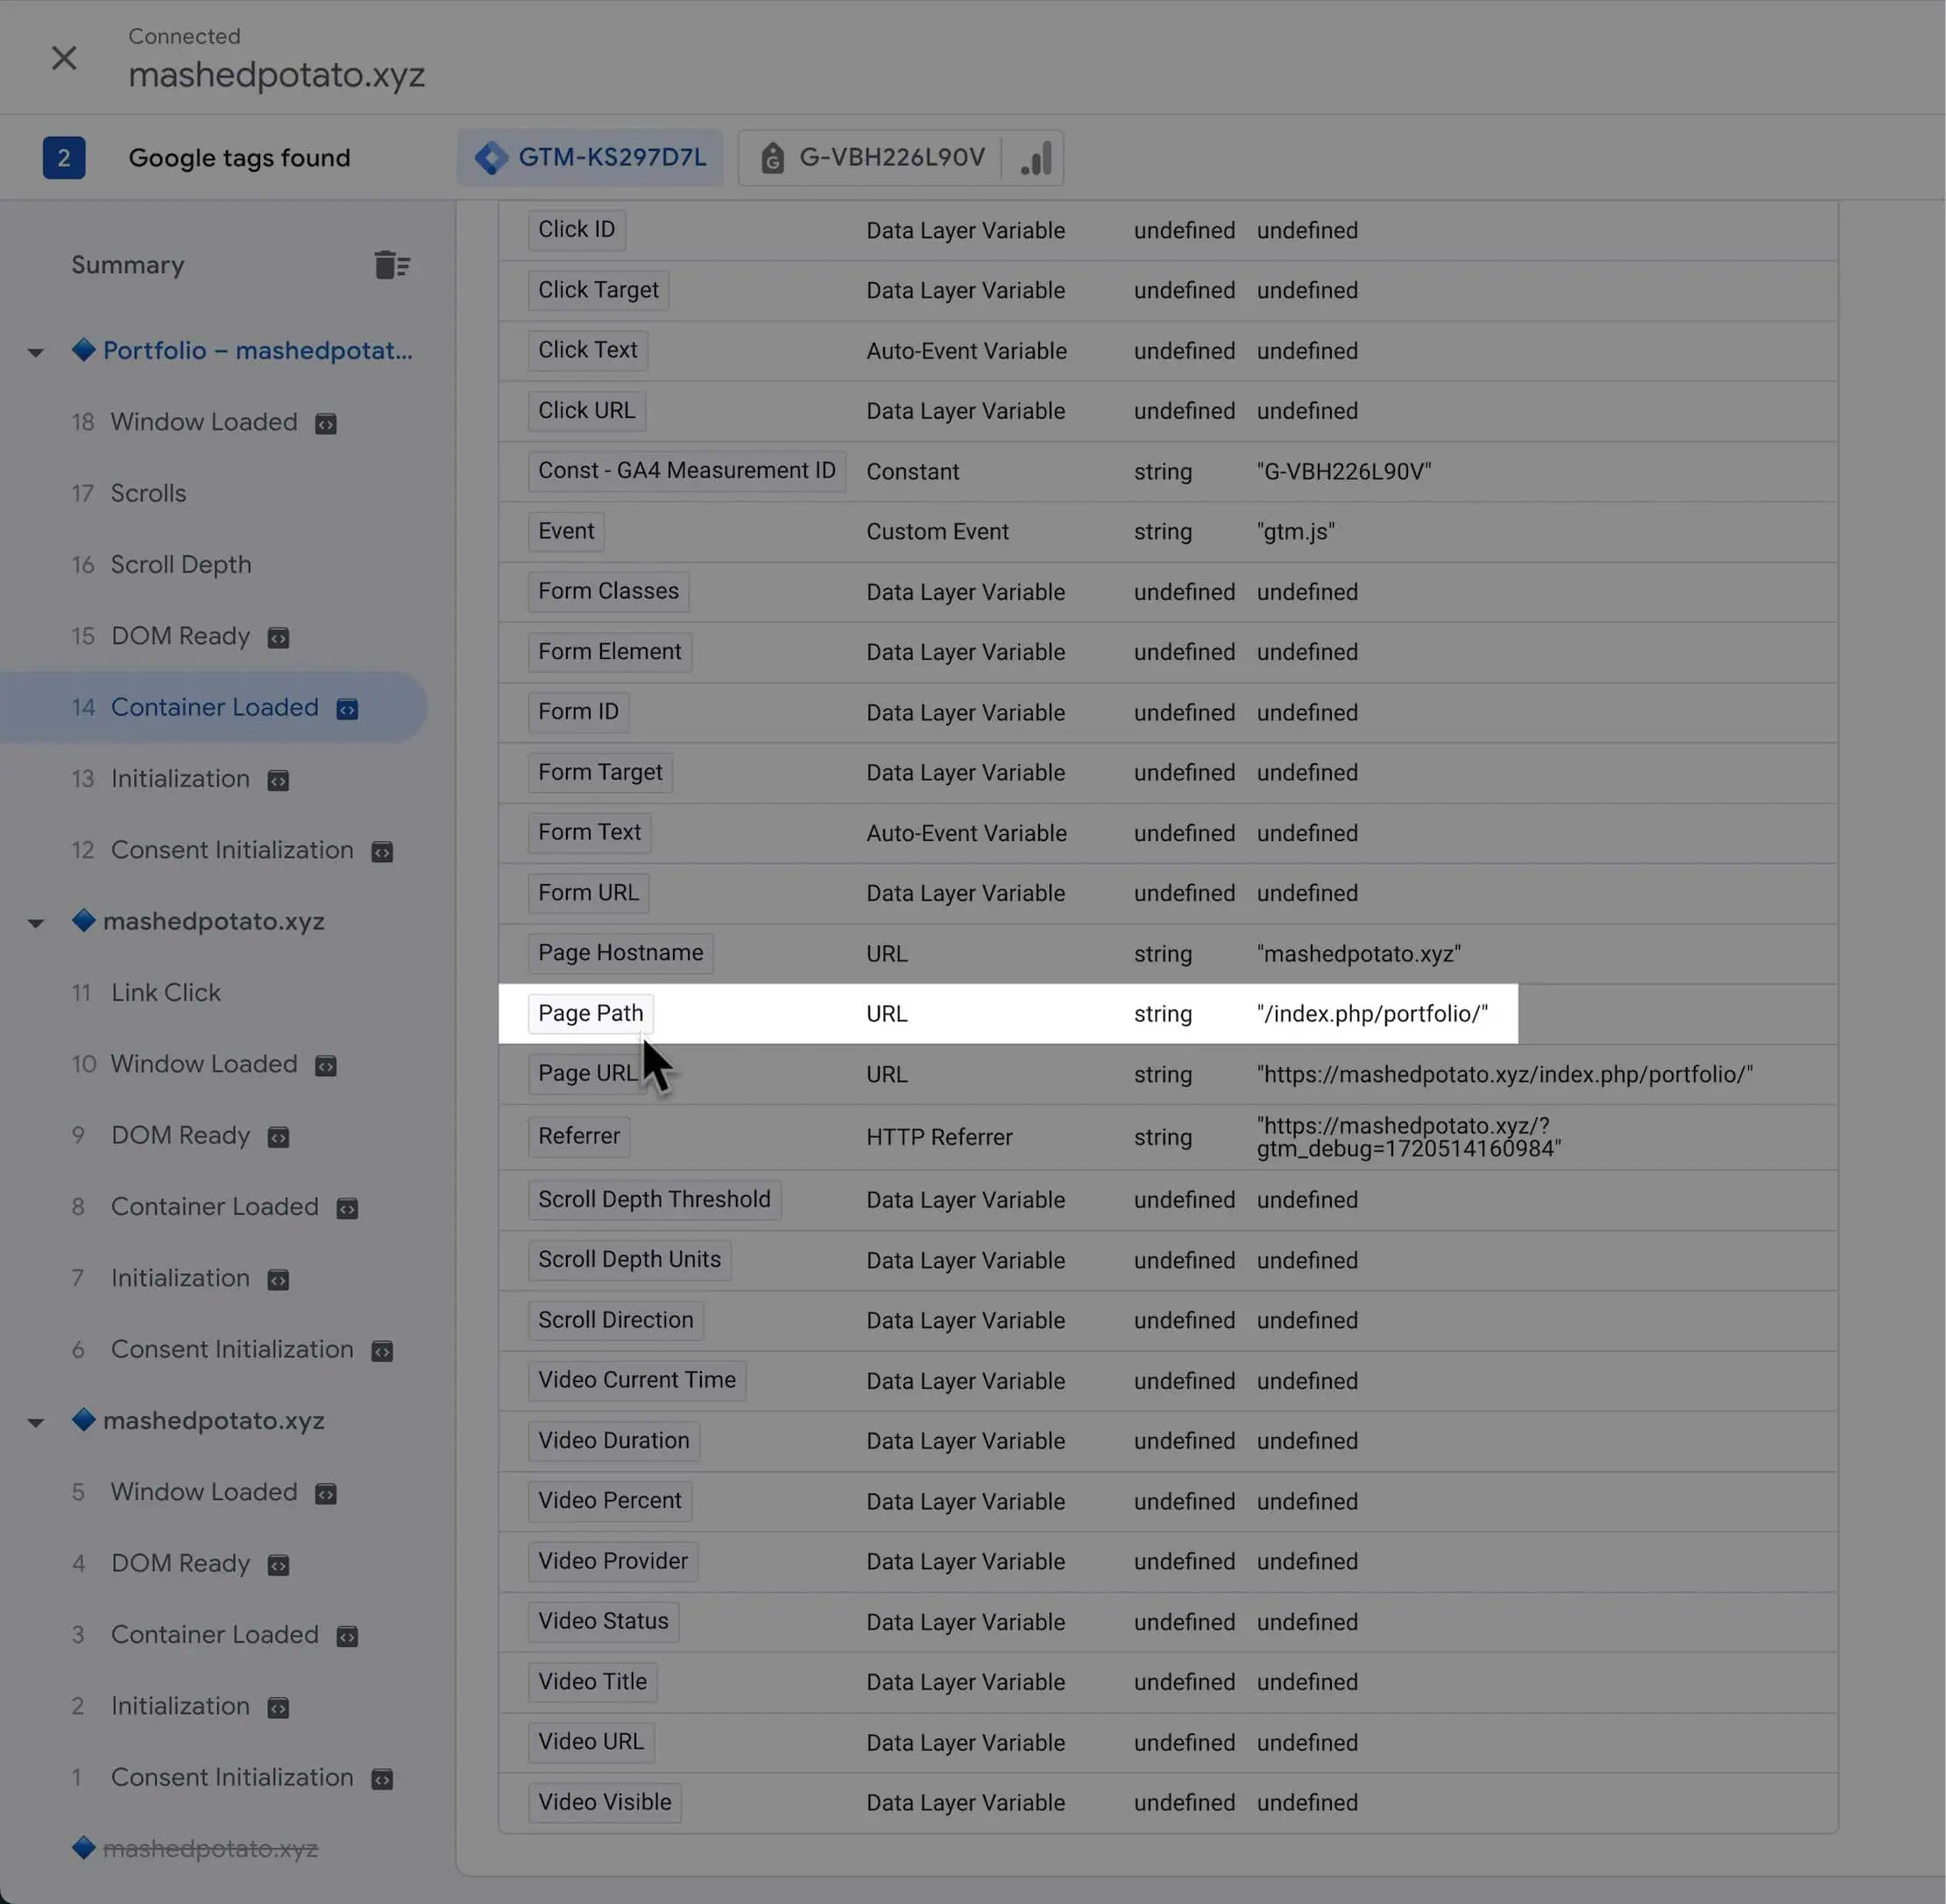
If we go to the Variables tab, we can see the Page Path is /index.php/portfolio/:
Now, the tag has fired on GTM, but how do you know if GA4 has received it?
We'll use GA4's built-in feature, DebugView, to verify it. Go back to GA4 and click the Admin button:
Under Data display, click DebugView:

We can see the first page_view event fired on the homepage:
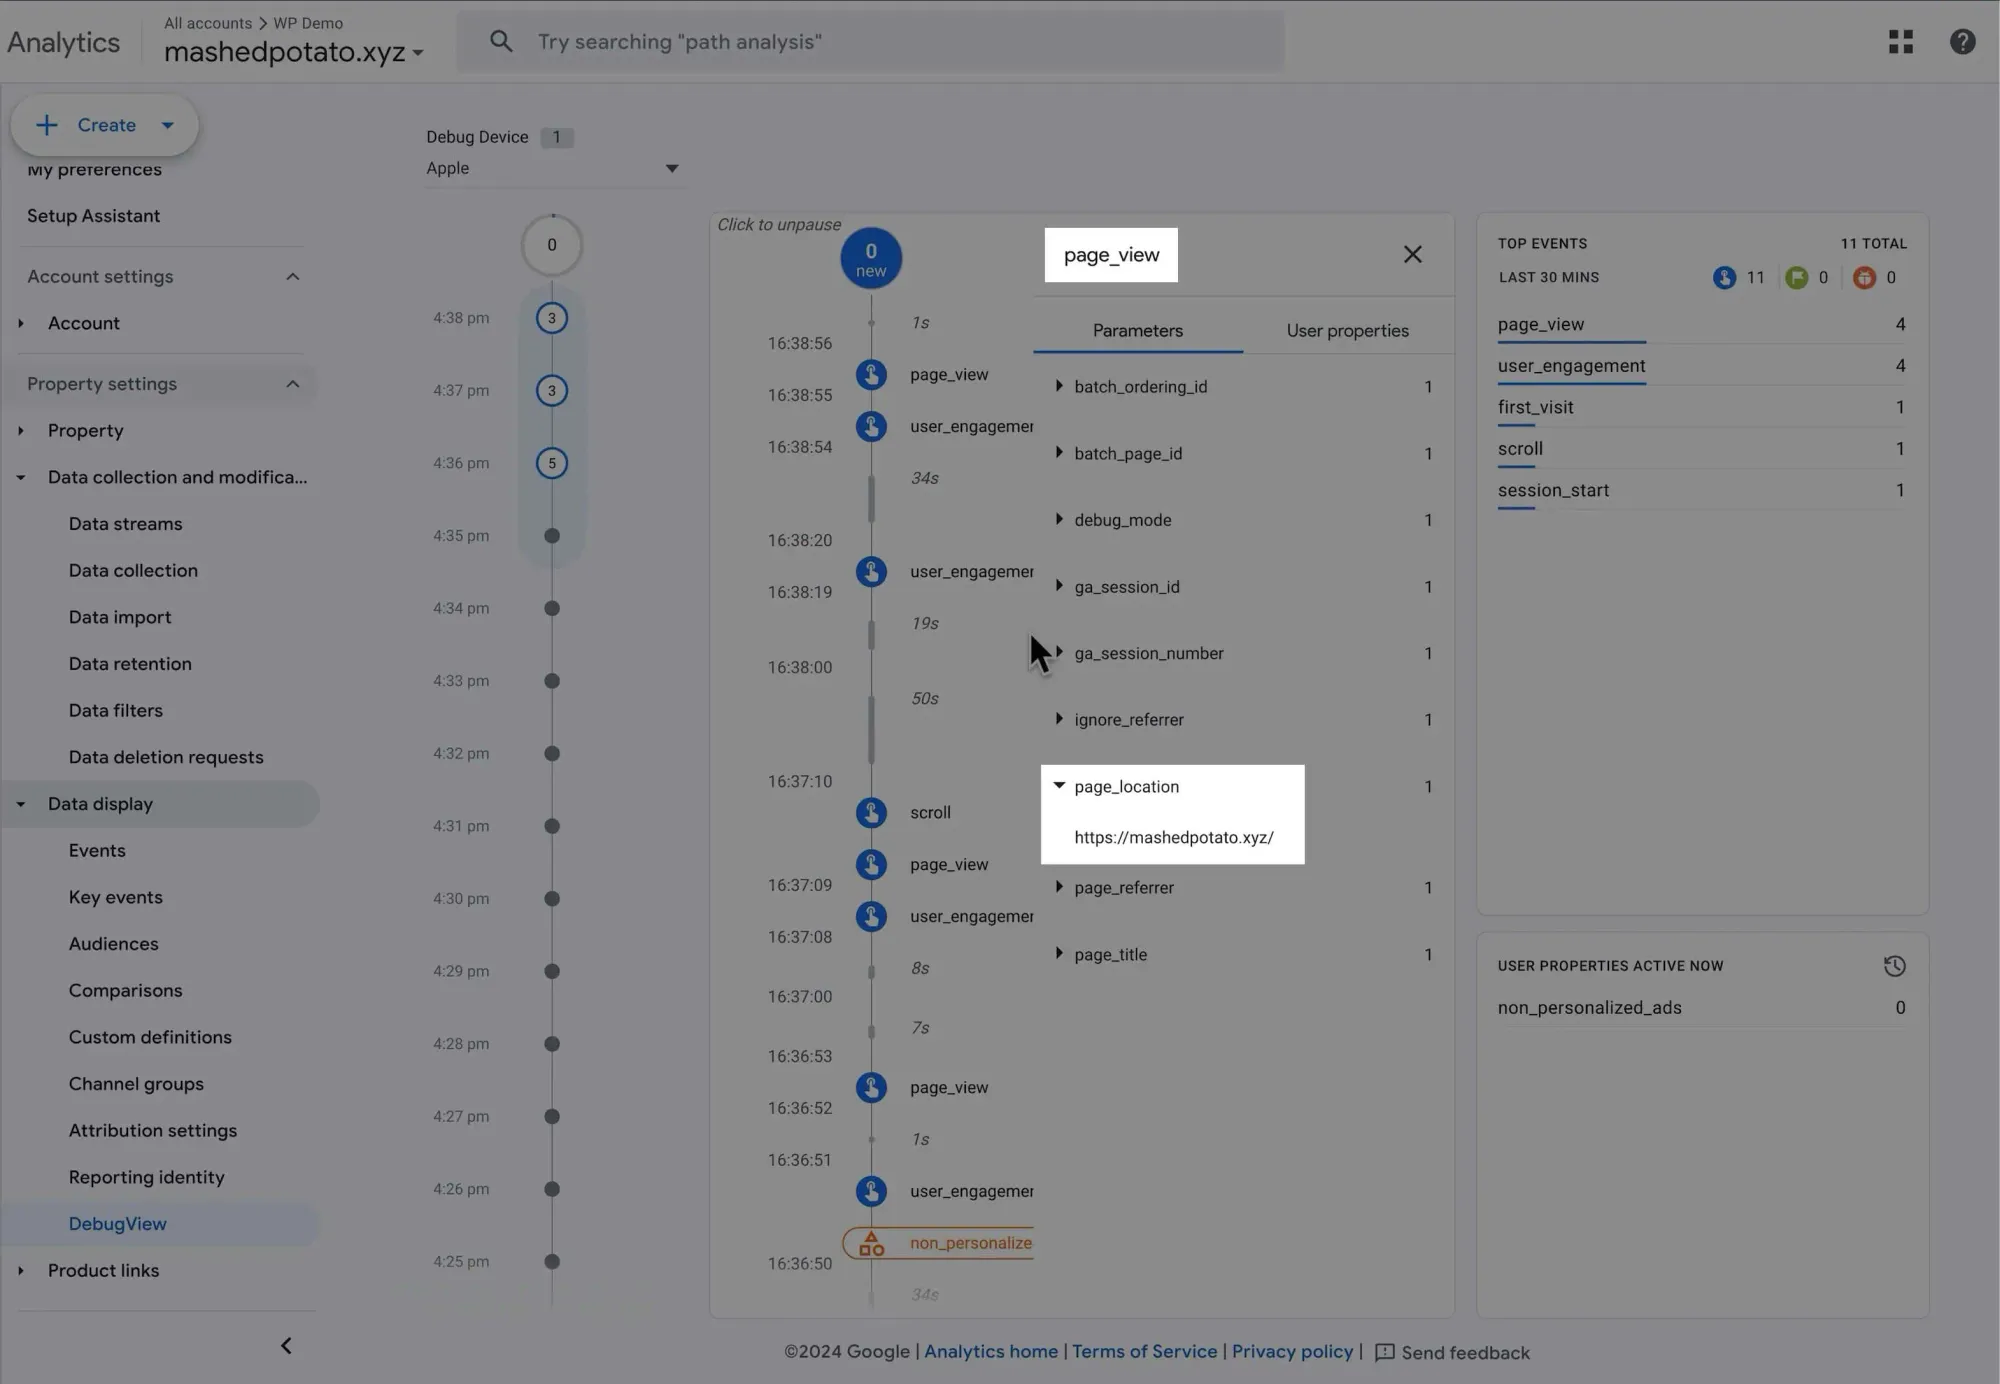
And the second page_view event fired on the Portfolio page:
Cool.
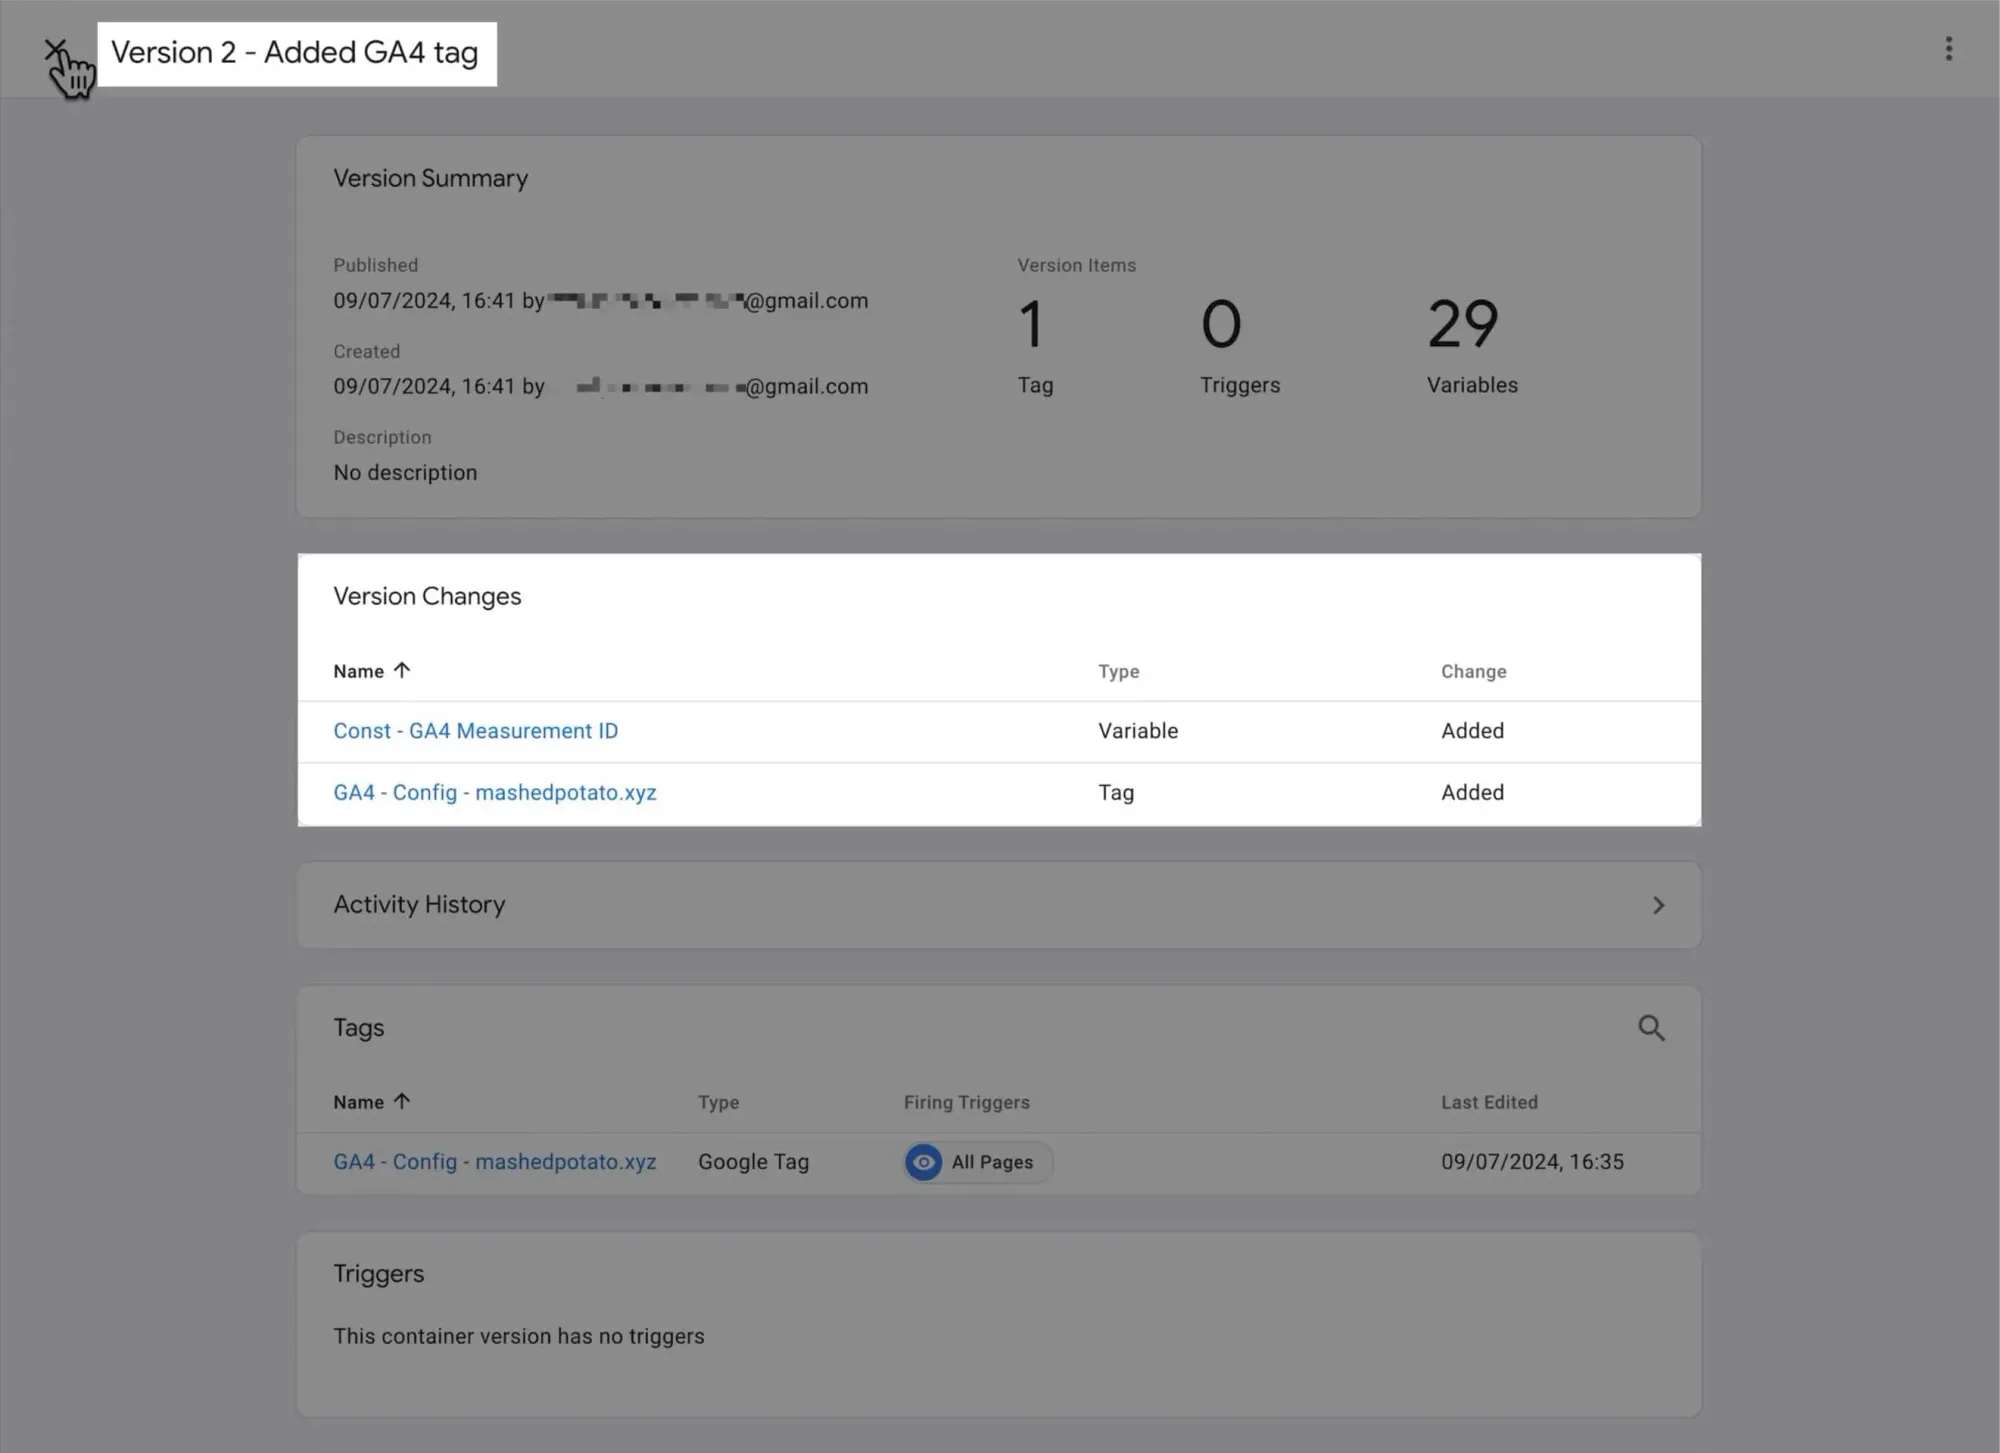
Finally, return to GTM and submit the changes:
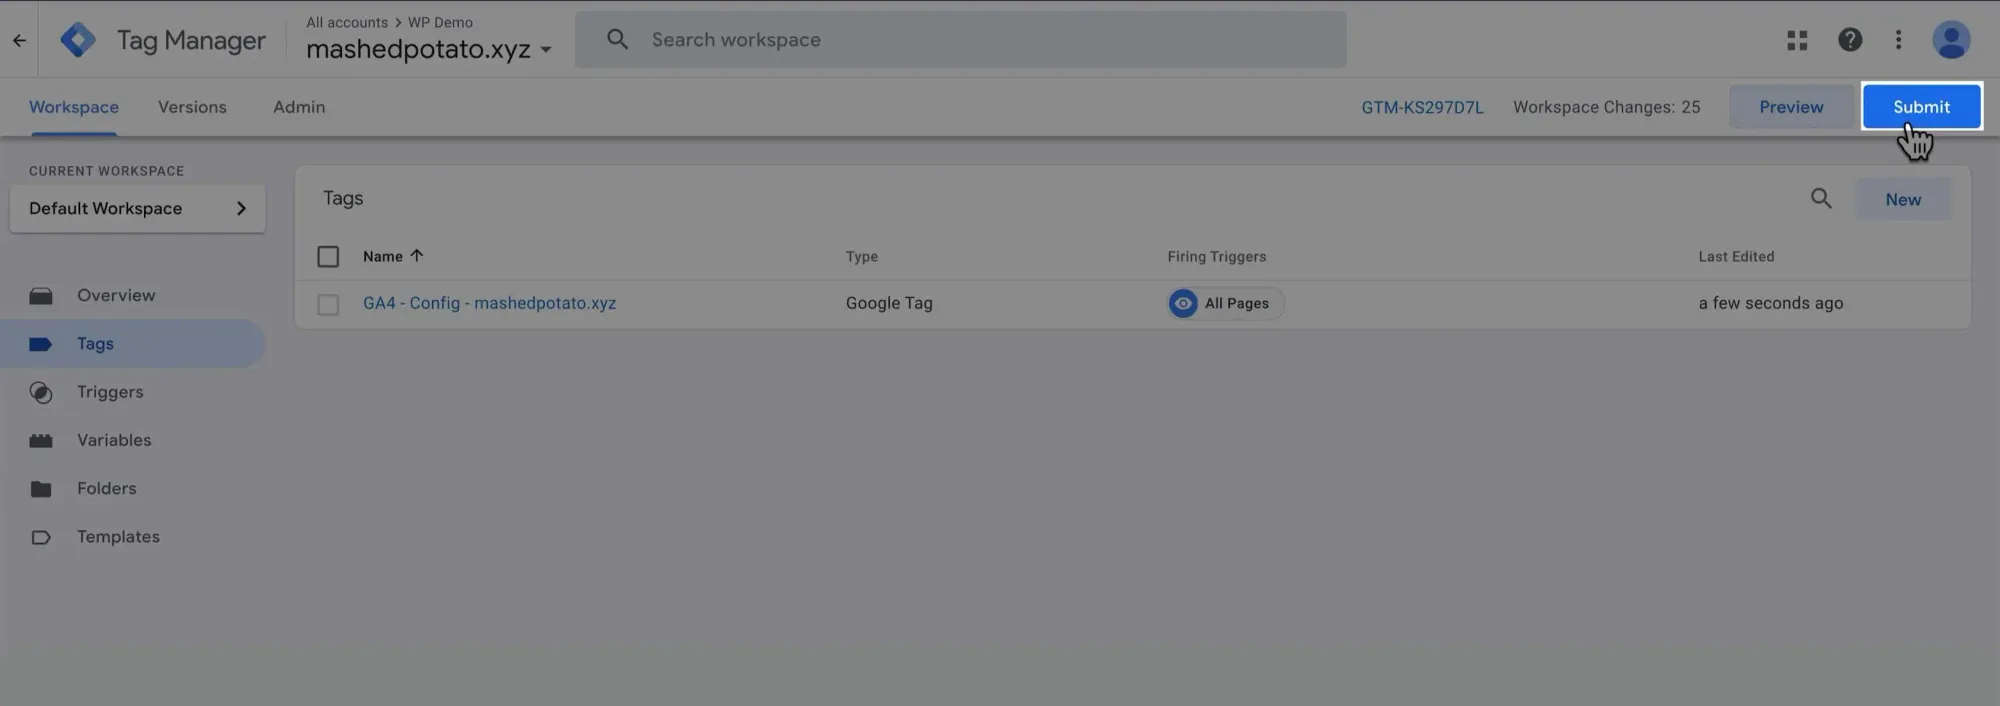
Under Version Name, add a descriptive name to keep a record of all the changes you've made, then click Publish:
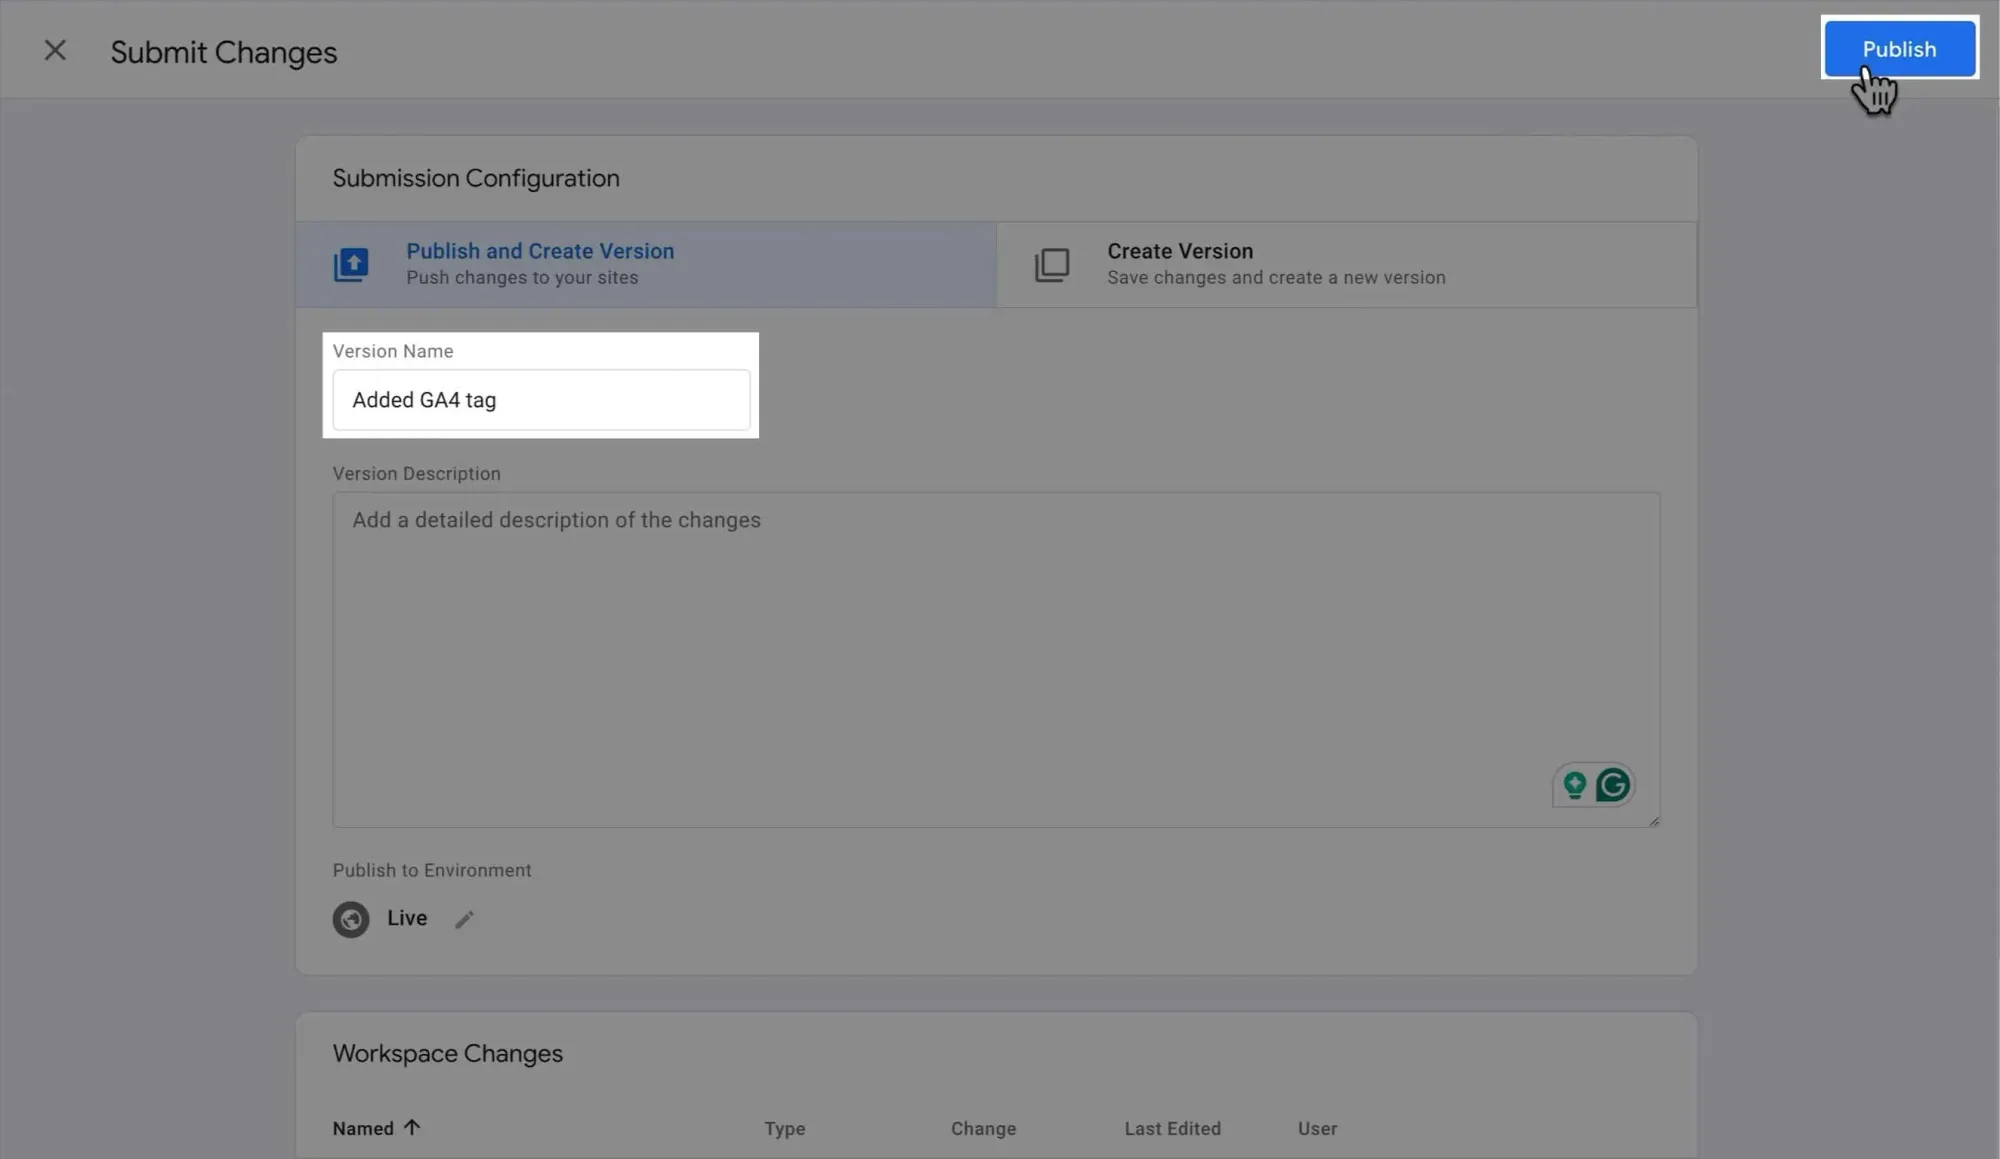
Here you can see the current version number of your GTM container and the version changes you've made:
With that, the basic tracking setup is complete. Well done!
Step 4: Create High-Quality Content
To craft an effective content strategy, you need to understand two key types: informational and transactional content.
Informational vs. Transactional Content
When it comes to affiliate marketing, you need a balance of informational and transactional content.
The golden ratio?
These days, it's looking more like 80:20.
Here's the breakdown:
-
80% Informational Content: This is your value-packed stuff. It builds trust and keeps readers coming back.
Plus, it's generally easier to rank for since it doesn't directly bring in revenue — big sites often won't bother targeting these keywords.
It's also great for building your email list since you're providing massive value in these posts.
-
20% Transactional Content: Here's where you can work in your affiliate offers.
This is the bread and butter of your affiliate blog, bringing in direct revenue. But here's the catch:
Big sites are fiercely competing for these keywords, especially in ultra-competitive niches like finance, business, marketing, etc.
This ratio hasn't always been this skewed. But things have changed, especially after the recent Helpful Content Update (HCU).
And here's the deal:
SEO is getting tougher.
Ranking for transactional keywords in 2024 (and beyond) is more challenging than ever.
So, we're adapting. By creating more informational content, we're increasing our odds of ranking.
Then, we use internal linking to guide traffic to our transactional content (aka money pages).
It's not just about hoping to rank for those competitive keywords anymore. It's about playing the long game and building a solid foundation of helpful content.
However, this 80:20 split isn't set in stone. It's a guideline.
Some niches might need more informational content, others less.
The key?
Always prioritize value, even in your transactional content.
Different Types of Informational Content
Informational content comes in various flavors, each with its own strengths:
-
How-To Guides: These are your step-by-step instructions. They're great for building authority and solving specific problems.
Think "How to Set Up a Home Office" or "How to Train for a 5K".
-
Comprehensive Guides: These are your deep dives. They cover a topic from A to Z and position you as an expert.
For example, "The Ultimate Guide to Doggy Nutrition" or "Cryptocurrency Explained: A Beginner's Handbook".
-
Listicles: Easy to read and share, these are perfect for skimmers.
"10 Ways to Boost Your Productivity" or "15 Must-Visit Destinations in Europe" are classic examples.
-
Comparison Articles: While not pushing a sale, these inform readers about the differences between products or concepts.
"Keto vs. Paleo: Which Diet is Right for You?" is a good example.
There are other formats of informational content, but these few are what I’d recommend for a creator affiliate marketing blog.
Now:
Variety keeps your content fresh and caters to different reader preferences.
So mix it up — don't just stick to one type.
Different Types of Transactional Content
There are several types of transaction content:
-
Roundup Posts (aka "Best of" Lists): Rounding up a list of products.
- "10 Best Budget Laptops for Students"
- "5 Top-Rated Blenders for Smoothie Lovers"
-
Single Product Reviews: Deep dives into specific products.
- “M3 iPad Pro 2024 Review: Things You Need to Know”
- “vidIQ Review: Best Tool for YouTubers?”
-
Comparison Posts: Pitting two or more products against each other.
- “ChatGPT vs. Claude: What’s the Difference?”
- “MacBook Air vs. MacBook Pro: Which One to Get?”
In this article, we’re gonna zero in on roundup posts.
Here’s why:
- They cater to different budgets and needs
- They're the ideal first step in a buyer's journey, helping readers understand their options
- They offer multiple affiliate opportunities in one post
- While more competitive, they have higher search intent and volume, meaning bigger payoffs if you rank
Roundup posts are tougher to rank for. But if you can get them to the top, they’re money in the bank.
When someone’s ready to buy, they often start with a roundup.
It helps them narrow down their choices before diving into specific products.
Crafting Informational Content That Helps
Crafting helpful, relatable informational content starts with knowing your audience:
- What keeps them up at night?
- What problems are they itching to solve?
Your content should scratch that itch.
In this case, I know you're looking to create a successful affiliate marketing blog.
Here are some key tips to make your content shine, with some (imperfect) examples from this very article you’re reading:
-
Choose topics wisely. Go for subjects that provide real value to your readers. The goal is to address issues your audience is actively searching for.
For example, this entire guide is based on a common need: how to build an affiliate marketing blog from scratch.
-
Start strong. Your intro should clearly state what readers will gain.
Think of it as a mini sales pitch for the rest of your article.
For example, I laid out exactly what you'll learn and why it matters. -
Structure for readability. Use short paragraphs — no more than 3-4 lines each. Break up your content with section subheadings.
This makes your content scannable and less intimidating. For example, I use numbered lists, bullet points and subheadings to make this article easier to navigate.
-
Use the active voice. Instead of "The article was written," say, "I wrote the article" or "let's dive into it."
Active voice is more engaging and direct. It keeps your writing crisp and your readers awake.
-
Make it visually appealing. Use a readable font size and plenty of white space.
-
Incorporate lots of visuals to break up text and illustrate your points more effectively.
For example, I use the 18-20px font and include images, screenshots, and embedded videos throughout the article.
-
Write as you talk. Inject your personality into your writing. Share personal experiences or opinions where relevant.
This builds trust and sets you apart from AI-generated content.
For example, I use phrases like "Alright, let's dive in" and "Here's the deal" to keep the tone conversational and relatable.
-
Provide actionable insights. Don't just share information — give readers clear steps they can take.
Include specific tips, tools, or techniques they can implement immediately.
For example, I don’t just tell you to structure for readability — I show you how I’m doing it (hopefully decently) in this article.
Crafting Transactional Content That Converts
Earlier, we talked about why roundup posts are the best transactional content for affiliate marketing.
But here’s a reminder:
Roundup posts are powerful because they cater to readers who are already considering a purchase.
They’re comparing options, which means they’re closer to making a buying decision.
Here are some key tips for creating roundup posts that convert:
-
Choose products wisely. Select items that are relevant to your niche, offer good commissions, and provide real value to your readers.
Ideally, choose products you've used yourself.
-
Structure for clarity. Start with a concise introduction that sets the context, then review each product individually.
Include a comparison table for easy reference, and end with a buying guide and conclusion.
-
Write persuasive product descriptions. Highlight key features and benefits, but don't shy away from mentioning cons.
Use descriptive language, but avoid hype. Your goal is to inform, not just sell.
-
Incorporate affiliate links strategically. Place them in product names,
Check Pricebuttons, and your comparison table.But don't overdo it — too many links can make your content feel spammy.
-
Maintain trust and transparency. Always disclose your affiliate relationships. It's not just legally required in many places, it also builds trust with your readers.
A simple disclosure like this will do:
Disclosure: This post contains affiliate links, which means I get a kickback if you purchase through my links. It doesn't cost you extra, and it helps keep this content free 🫡
-
Keep your roundups fresh. Regularly update your posts to ensure the information remains current.
Products change, new ones enter the market, and prices fluctuate.
-
Focus on helping, not just selling. Your primary goal should be to help readers make informed decisions.
If you do this well, the affiliate commissions will follow naturally.
Step 5: Drive Traffic and Scale
When you're just starting out, it's tempting to try every traffic strategy under the sun.
Don't.
Pick one traffic source and master it.
Picking Your Shit Sandwich
For most affiliate bloggers, that’s SEO.
(Yep, even all the HCU chaos.)
I mean, it's free and can bring in consistent traffic over time if you rank.
Having said that, depending on your niche, it might make more sense to utilize other platforms like Pinterest to get early traction.
There’s no right or wrong answer here — it’s really a matter of picking your shit sandwich and sticking with it for a long time.
All the creators who are crushing it either got in super early, got super lucky, or stuck around long enough to witness the results.
This advice is as much for you as it is for me, but I really believe there’s no other way around it.
Diversifying Your Traffic
Once you start gaining traction, then you can think about diversifying.
Because as the old saying goes:
Don't put all your eggs in one basket.
Sure, Google's recent HCUs have decimated many sites, but the same can be said for other platforms.
Every time a platform changes its algorithm (trust me, it happens more often than you think), it affects your organic reach in some way.
That's why diversification is key for long-term success.
Which brings us to the next point.
Building Your Email List from Day One
Your email list is the only real asset you own and control.
What about the articles on your own blog, you ask?
Well, sure, you do own your website — but you’re still relying on search engines to bring you traffic, aren’t you?
Email list is different.
You get to choose when and how often to email your list — without spamming, of course.
And unlike social media followers or search rankings, no algorithm change can take it away from you.
Plus, email subscribers are often your most engaged audience.
Believe it or not, most creators make the vast majority of their money selling to their email lists.
So, how do you start?
First, choose an email marketing software. Most are beginner-friendly these days, but Kit (prev. ConvertKit) is my favorite.
Because it’s FREE for up to 10,000 subscribers. And it’s designed specifically for creators.
And just like the web hosting provider and domain registrar, I prefer to pick the right one from the start to avoid hassles down the road.
Get ConvertKit for FREE →Next, create a compelling lead magnet. This could be:
- A helpful PDF guide
- A mini-course
- A checklist or template
Make sure it's valuable and relevant to your niche.
Place email sign-up forms strategically on your site. Consider:
- Your homepage
- The end of blog posts
- A pop-up (use it sparingly to avoid annoying visitors)
Don't just ask for emails. Explain the value they'll get by subscribing.
And once people subscribe? Deliver on your promises. Send regular, valuable content to keep them engaged.
Once a list is dead, it’s extremely difficult to revive it.
That’s why I haven’t started building my own list yet. I want to nail down my content publishing first.
However, I do have email signup forms across the site. So if you aren’t ready to build a list yet, at least set up a signup form on your homepage.
Every creator has their own traffic strategies that work for them.
Once you figure out one that works for them, double down on it and try to scale as much as you can.
The biggest mistake I made in 2016 was getting complacent with what I was able to achieve and not leveraging it to achieve more.
Learn from my mistakes.
Step 6: Master Affiliate Marketing Basics
You've got your blog set up and traffic coming in.
Now it's time to dive into the nuts and bolts of affiliate marketing.
Joining Affiliate Networks
Not all affiliate networks are created equal.
Depending on your niche, you should pick the ones that make the most sense to you.
If your niche is monetized via physical products, Amazon Associates is a good starting point. It's easy to join and has a vast product range.
But don't stop there. Look into networks like Impact, ShareASale, CJ Affiliate, or Awin too.
Conversely, if your niche is mainly software-based, PartnerStack and Impact are some of the best networks to work with.
Choosing Affiliate Offers
When choosing affiliate offers, consider:
- Commission rates (higher is better, obviously)
- Cookie duration (longer means more chance to earn)
- Payment terms (how often and how you'll get paid)
- Product relevance (stick to your niche)
But don’t overthink this — sign up for offers that you want to promote and monitor the performance.
Then you can sign up for the same offer on other networks and split your traffic to see which one works better.
When you’re driving a decent amount of conversions on a particular offer, you can reach out to your affiliate manager to ask for a bump in payout.
Add Affiliate Links Effectively
When adding affiliate links to your content, be strategic. Don't just drop links everywhere.
Good places for affiliate links include:
- Product mentions within your content
Buy NoworCheck Pricebuttons- Comparison tables in review posts
- Image captions for product photos
- Resource pages with recommended tools
But placement is just the start. Here are some tips to make your links more effective:
- Use descriptive anchor text. "This great camera" is less effective than "Sony A7III mirrorless camera."
- Consider using link-cloaking tools like Pretty Links. It makes ugly affiliate URLs look cleaner and more trustworthy.
- Test different call-to-action phrases.
Check Price on Amazonmight work better thanBuy Now. - Don't overdo it. Too many links can make your content feel spammy. Quality over quantity.
- Make sure your links open in a new tab. You don't want readers to leave your site when they click.
Remember, context is key. Your links should feel like a natural part of your content, not forced additions.
I mentioned this in a previous section, but you should always disclose your affiliate relationships.
It's not just ethical, it's often legally required.
Again, a simple disclosure like this usually does the trick:
Advanced Tracking with GTM
In a previous section, we covered basic tracking with GA4. Now, let's dive into some advanced techniques using GTM.
While it's impossible to cover everything in a short section, I'll show you how to track affiliate link clicks using GTM and send that data to GA4.
This isn't overly complex, but it's an excellent starting point for learning more advanced GTM tracking as a beginner.
We'll use this article to demonstrate affiliate link click tracking.
First, enable Preview mode in GTM and ensure Tag Assistant is connected:
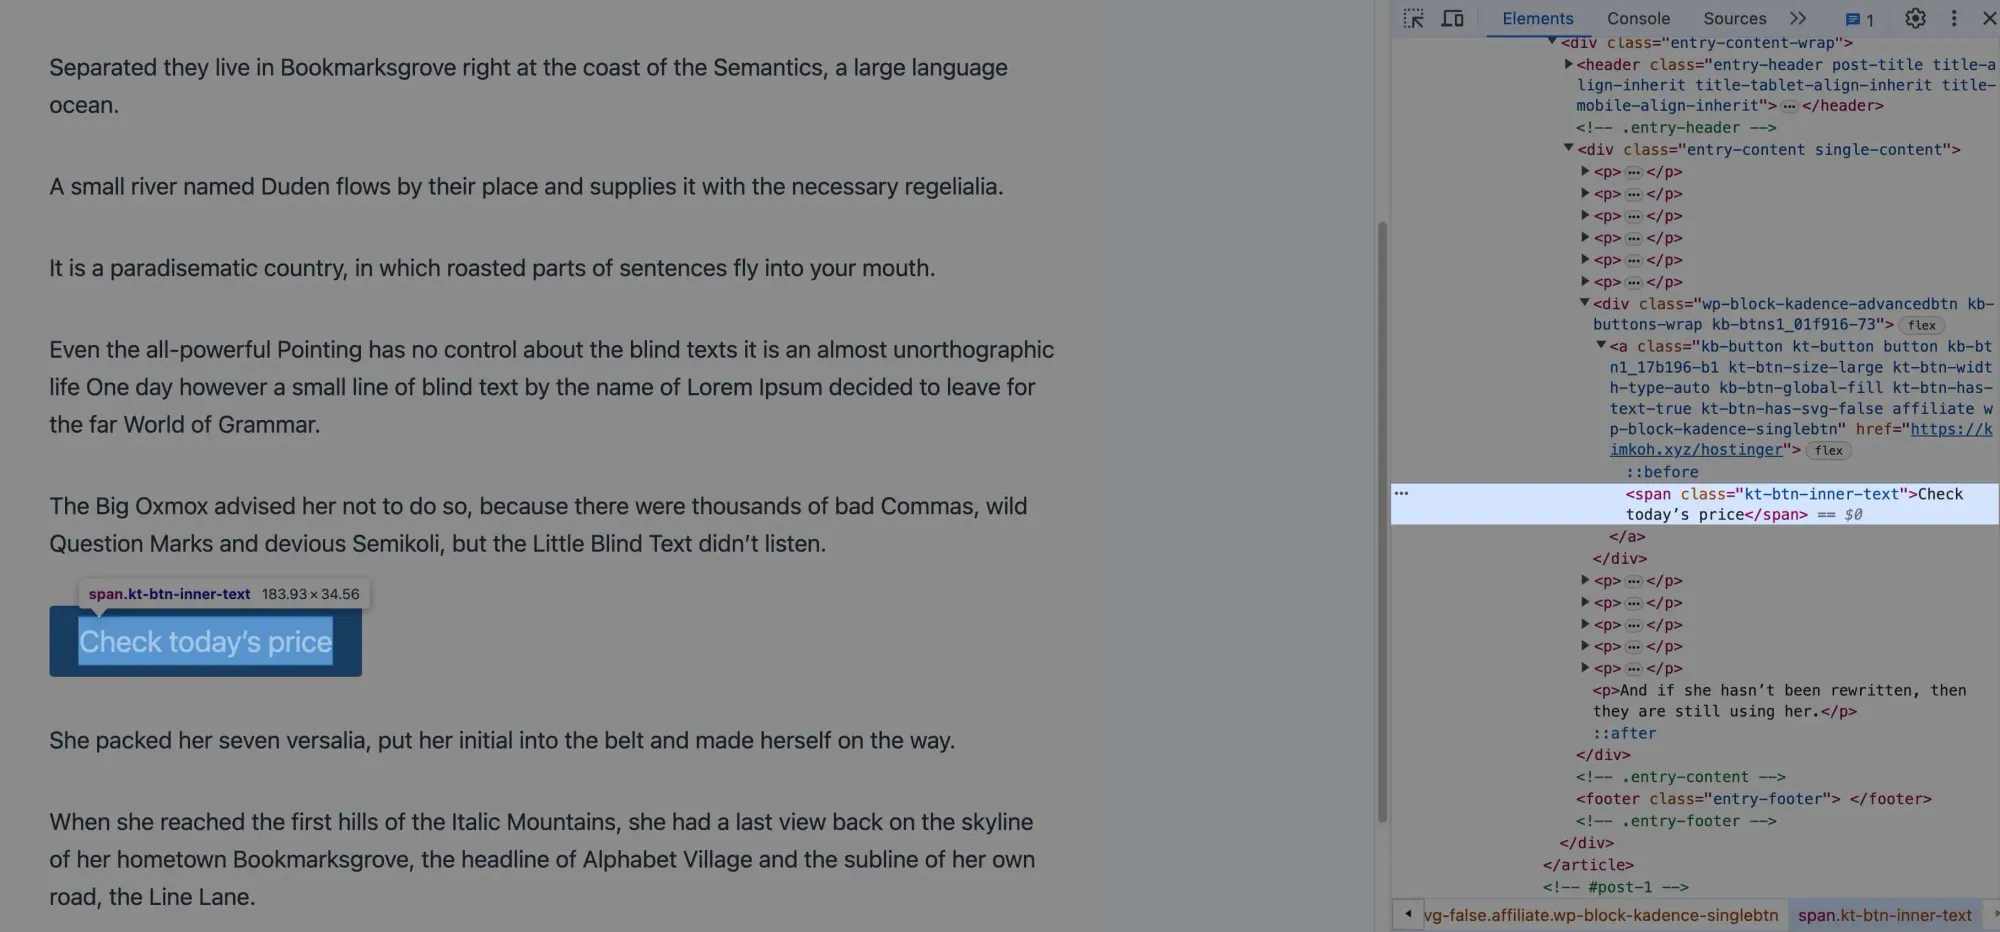
Press F12 or Command + Option + C to inspect elements. Then, click this button (or press Command + Shift + C) to locate the element we want to track on the page:
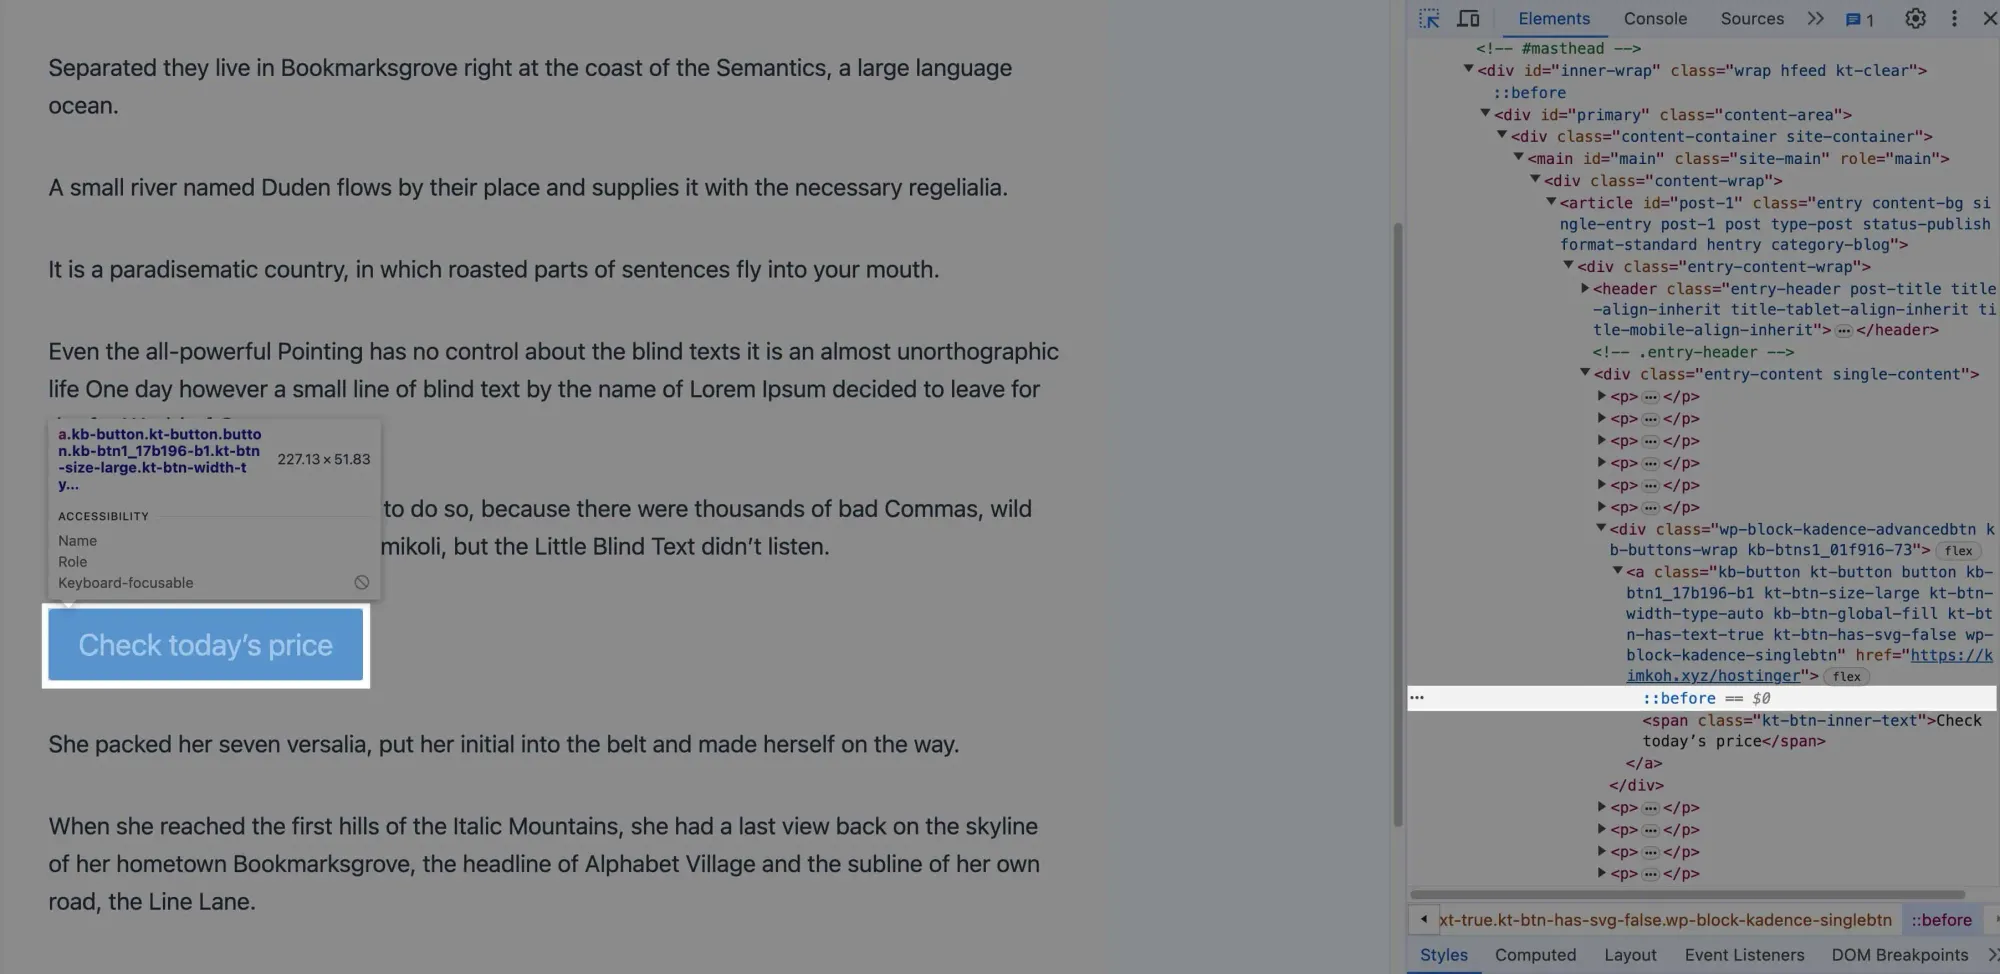
But that's not quite the right element.
Since this is a button, we want to select the <a> element:
The idea is to use one of the CSS classes within the <a> element to trigger the GTM tag.
However, most of the CSS classes here are general ones.
Using them as a trigger would fire the tag every time any button is clicked, which isn't what we want.
Looking closely at the CSS classes within the <a> element, there's a unique class we can use:
.kb-btn1\_17b196-b1This is a unique identifier for buttons created using Kadence Blocks. However, be cautious:
When Kadence Blocks gets a big update, some CSS classes might be renamed, potentially breaking your custom configurations.
(And I'm speaking from a first-hand experience here.)
To avoid this issue, I recommend adding a custom CSS class to the element you want to track.
In your WordPress editor (in this case, the post editor), add a custom CSS class:
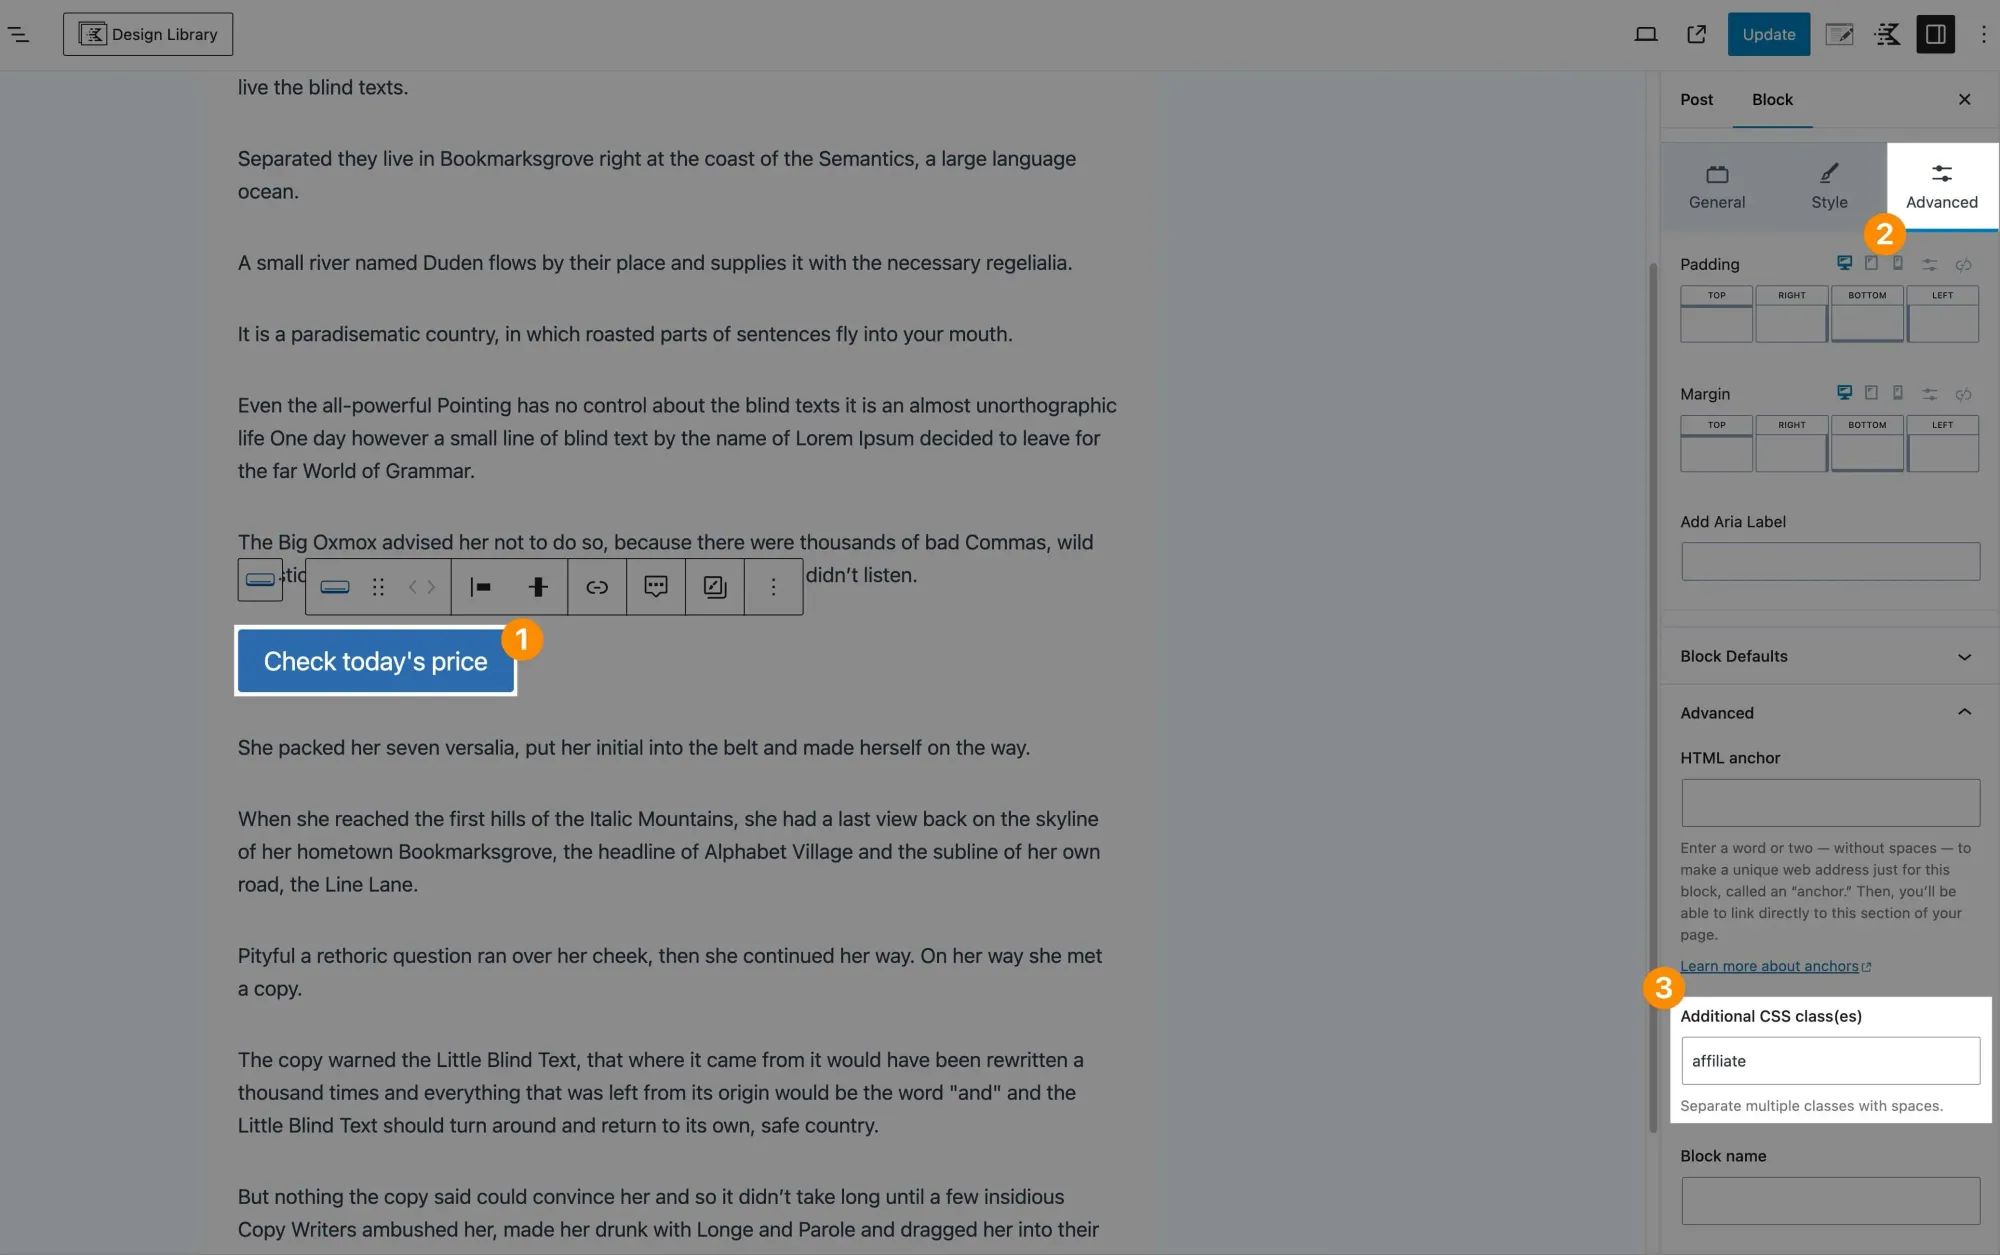
- Select the element you want to add a custom CSS class to.
- Navigate to the
Advancedtab. - Add a descriptive CSS class to
Additional CSS class(es). Updatethe post/page.
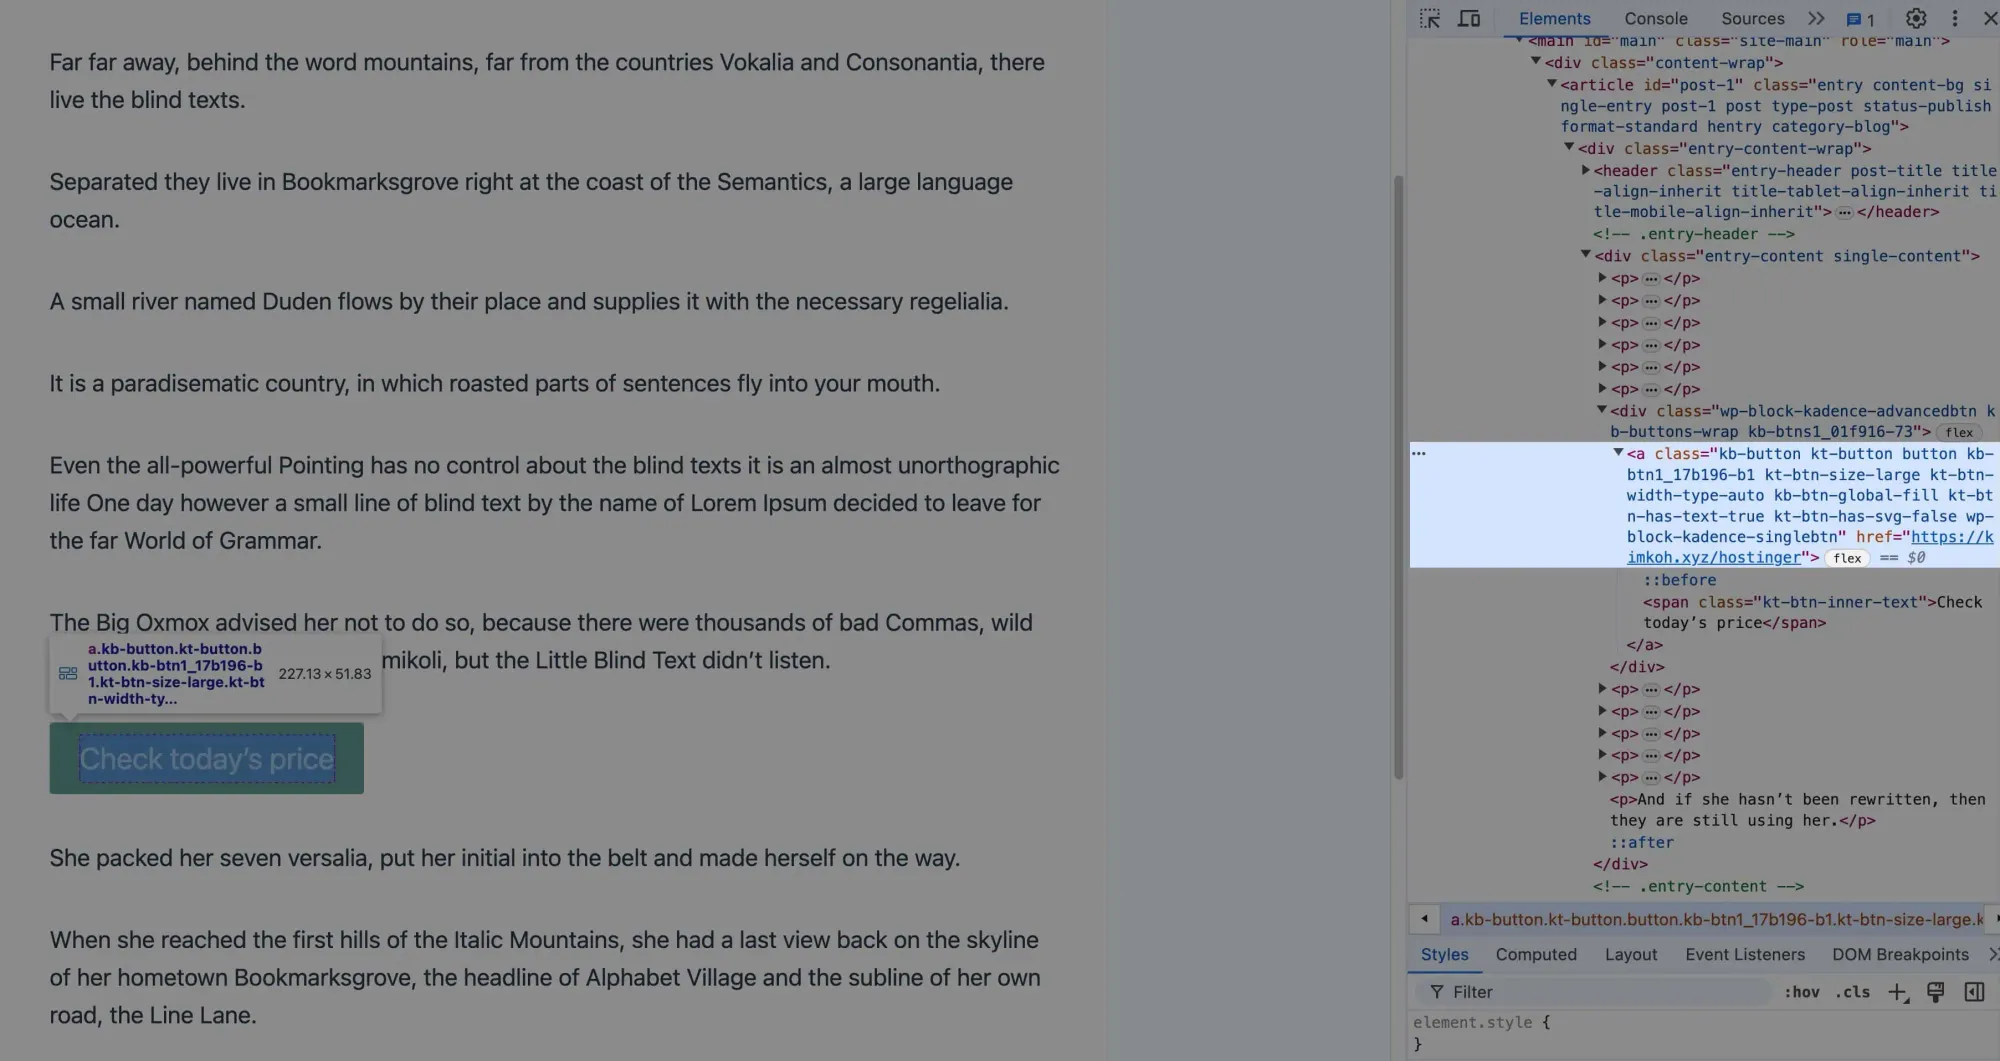
Now, ensure the custom CSS class we just added is within the element we want to track:
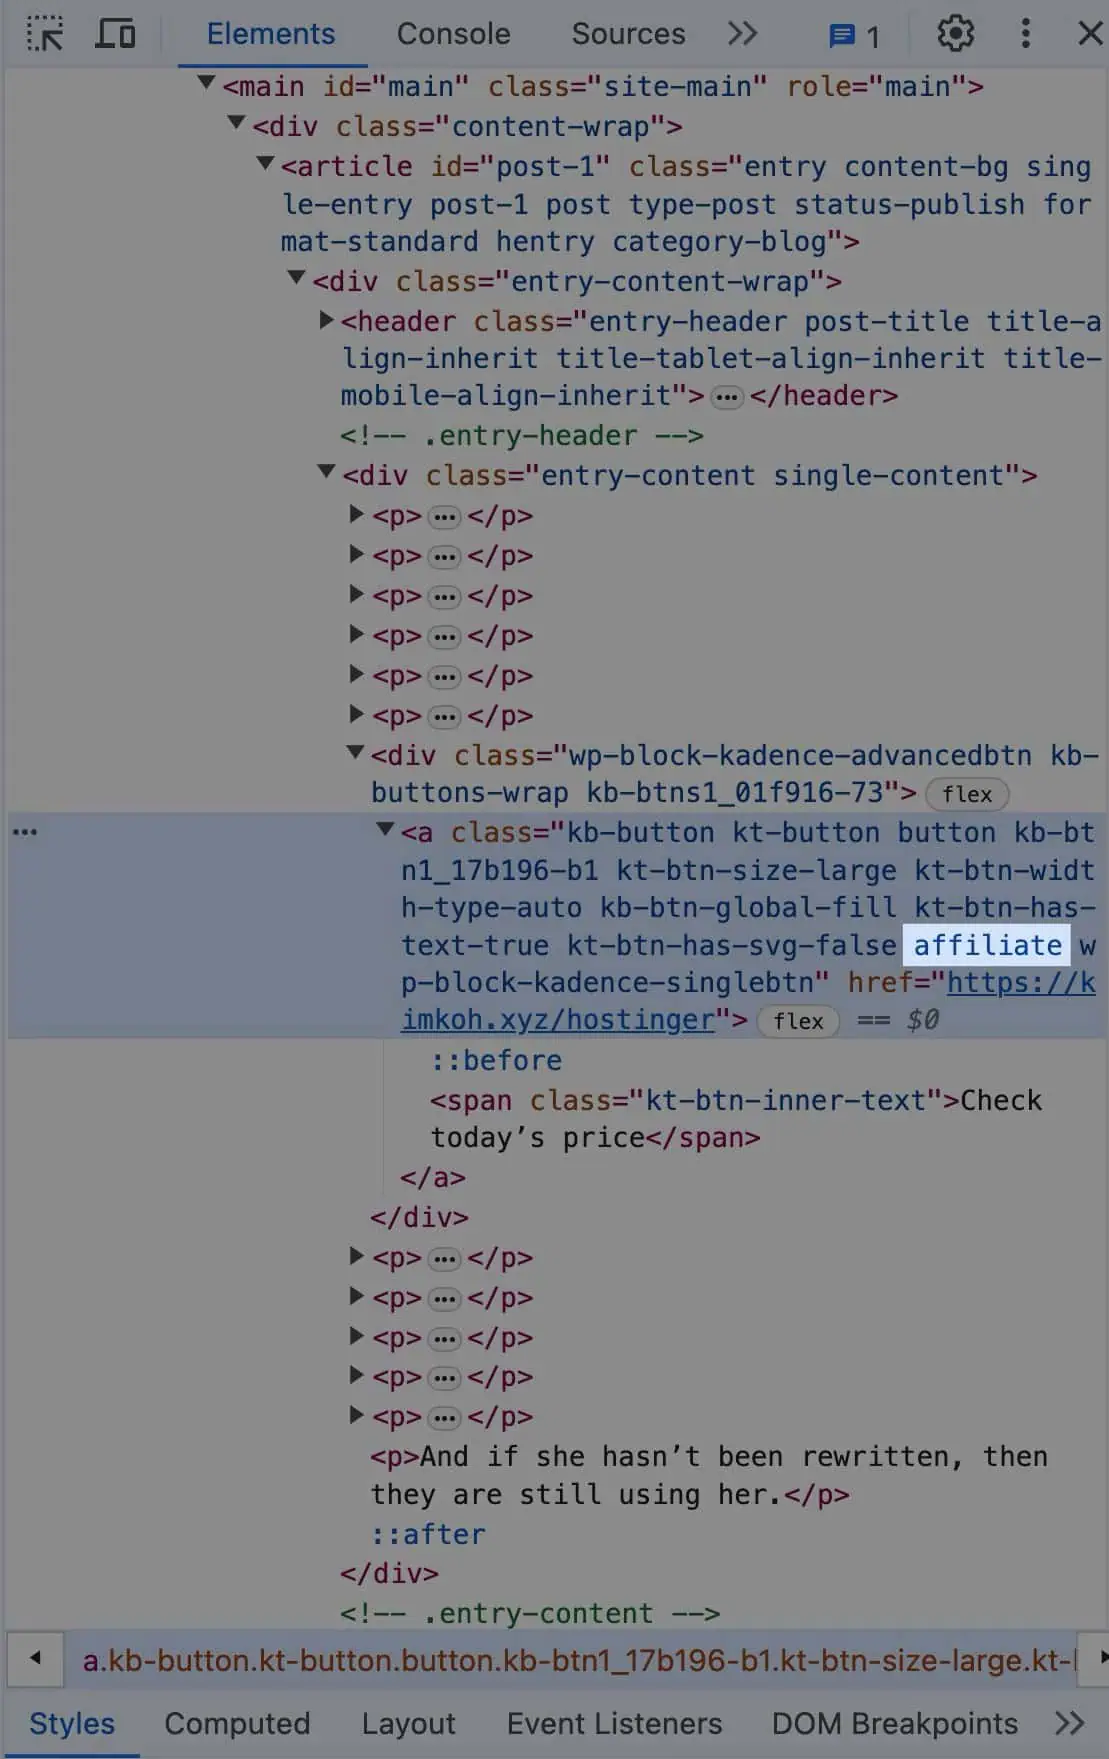
I prefer using the general CSS class relevant to the element type plus the custom CSS class I added.
In this example, the general CSS class for the button element is .kb-button (kb stands for Kadence Blocks), and the custom CSS class is .affiliate.
So, the final CSS class we'll use is .kb-button.affiliate.
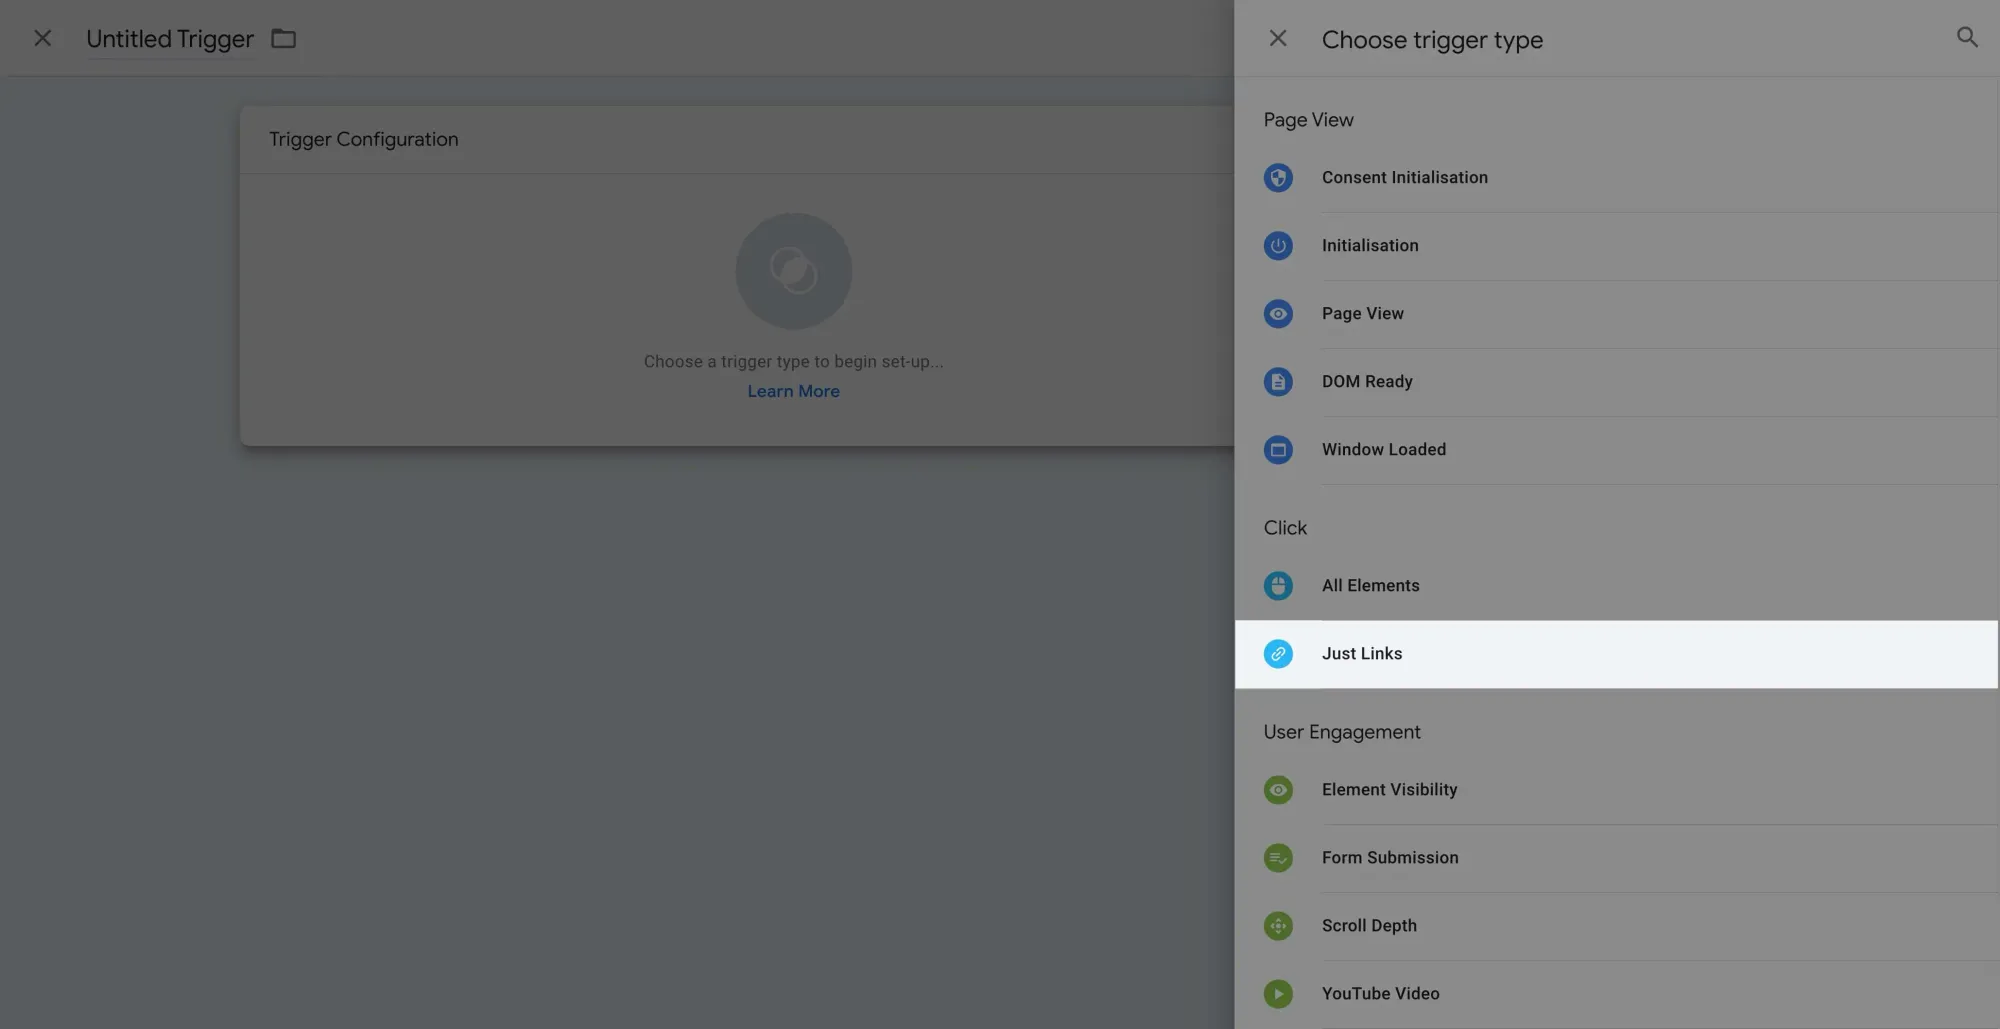
Head over to GTM and create a new trigger:
Click the Trigger Configuration panel and under Clicks, choose All Elements:
Set it to fire on Some Clicks and when Click Element matches the CSS selector — .kb-button.affiliate, .kb-button.affiliate *:
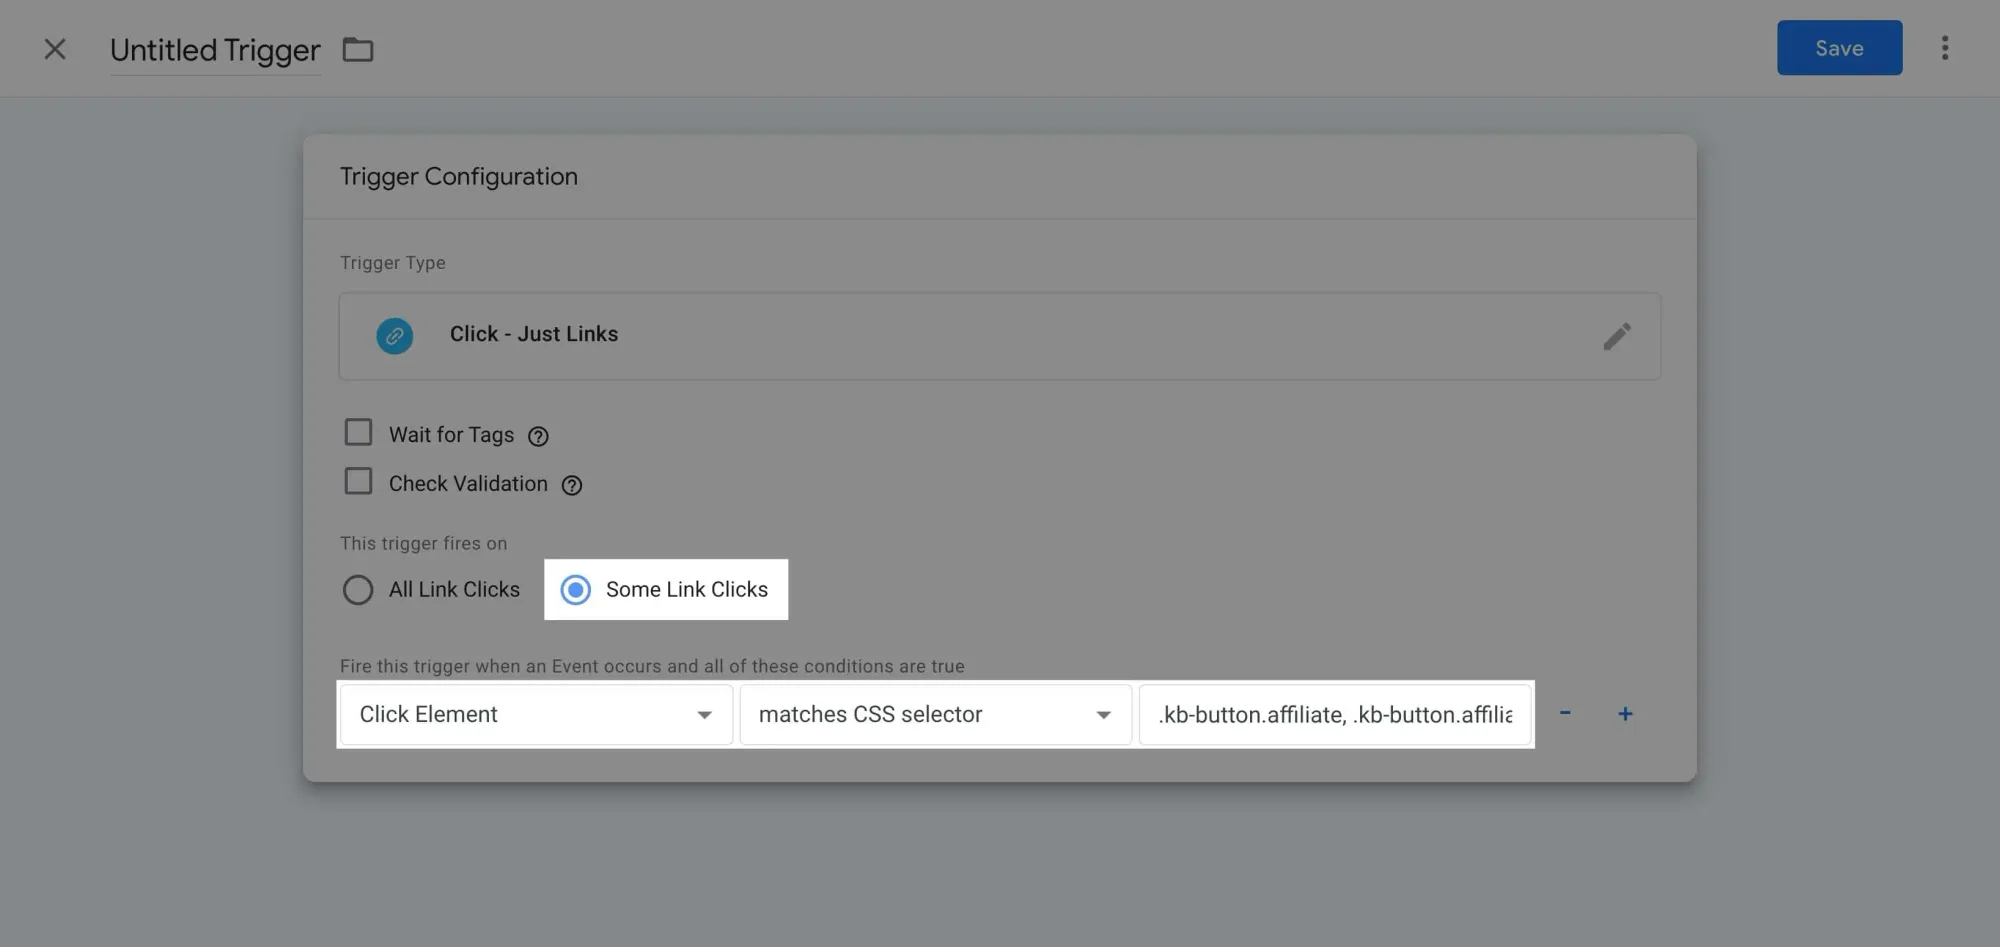
The reason we include .kb-button.affiliate * is to capture click events on both the main element (<a>) and all its descendants, like the <span> element:
Hopefully that makes sense.
Here’s an article by Analytics Mania about Click Element if you want to dive deeper:

Give the trigger a descriptive name and click Save:
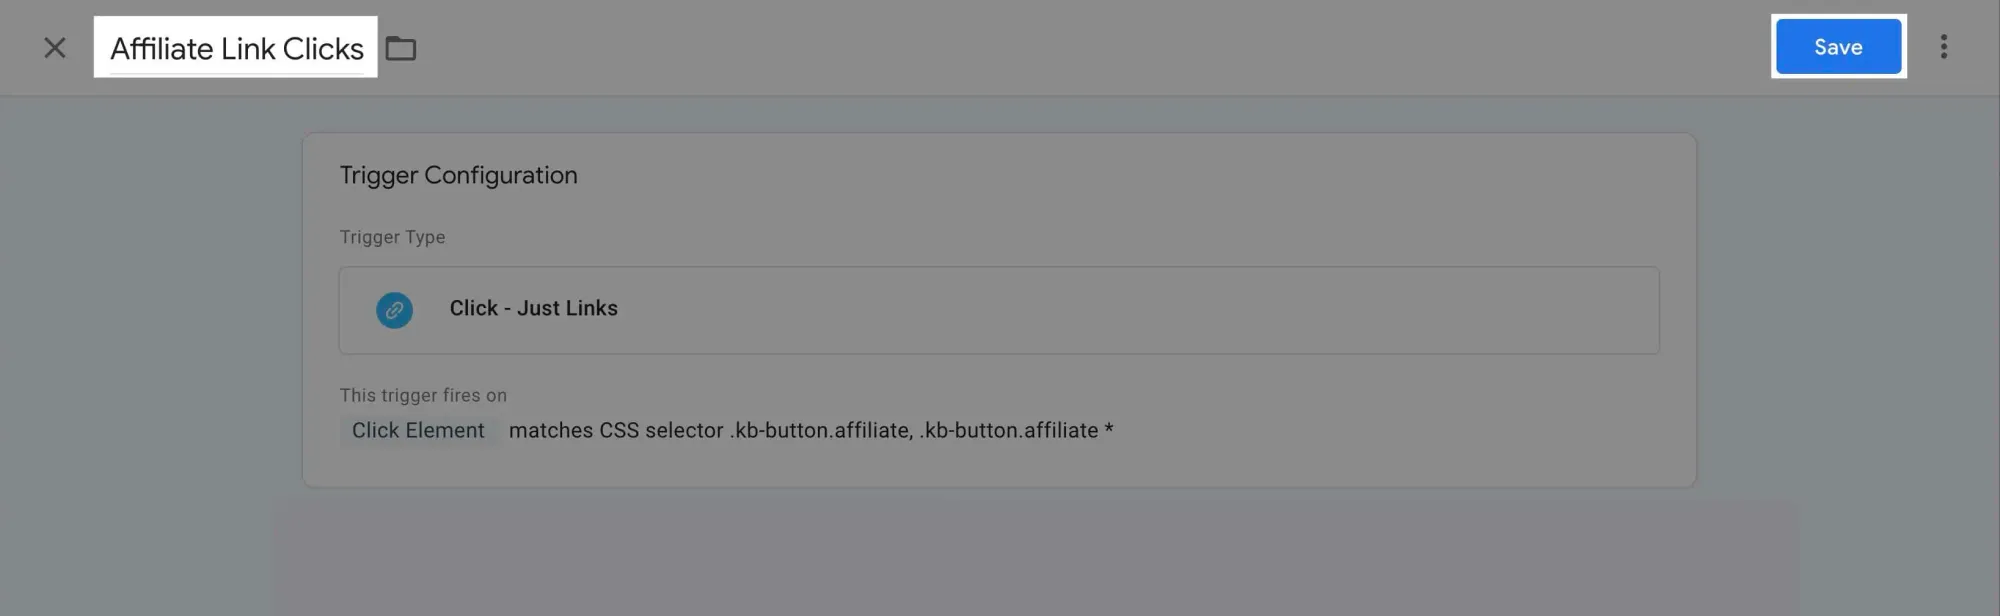
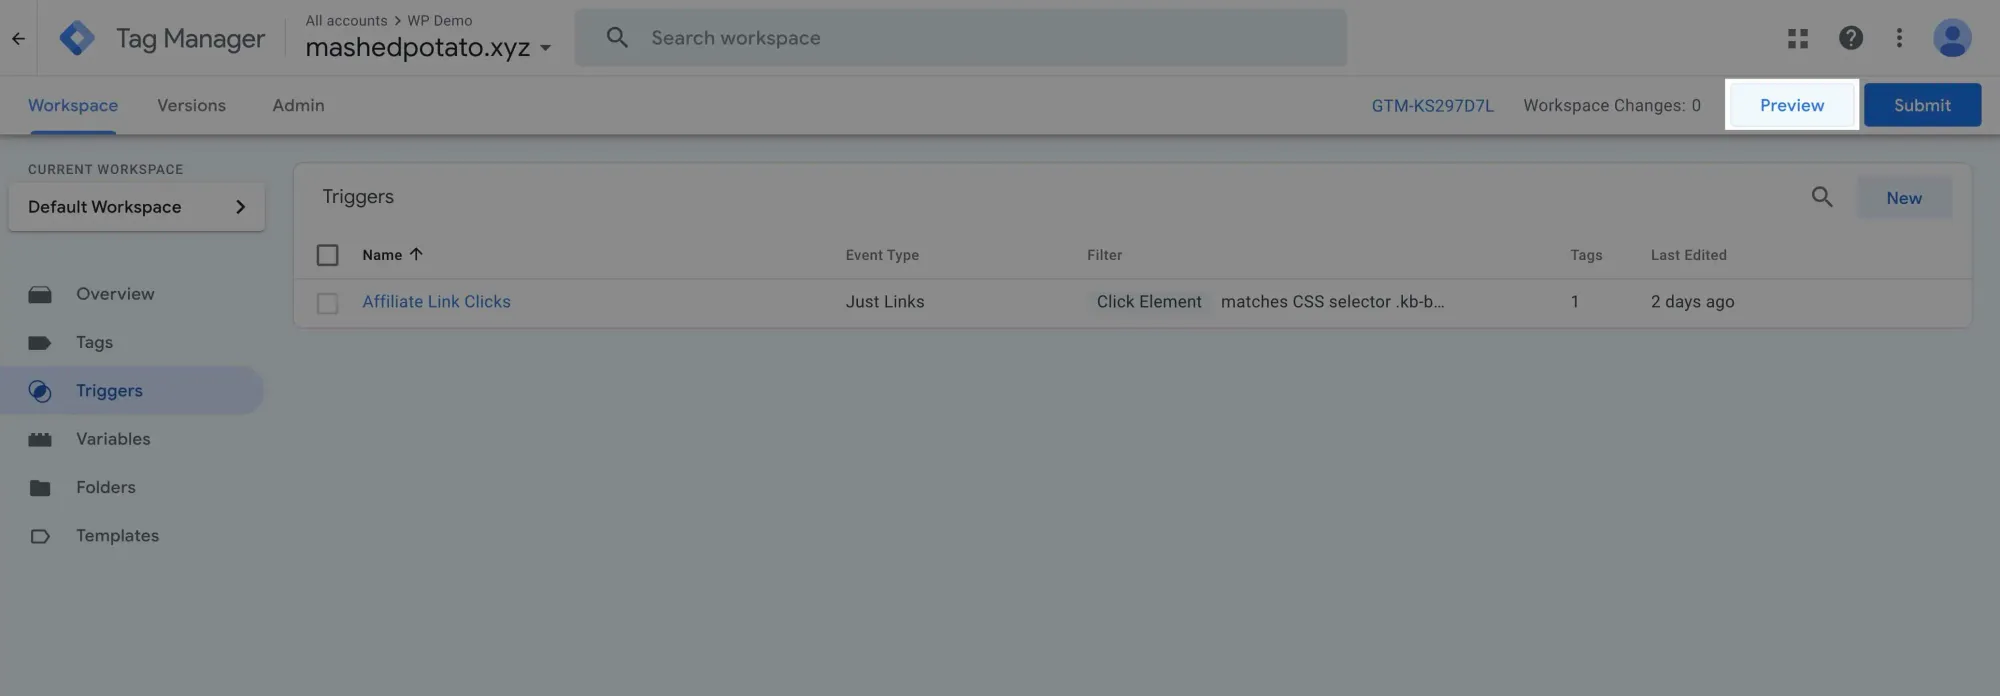
With the new trigger added, click Preview to enter Preview Mode:
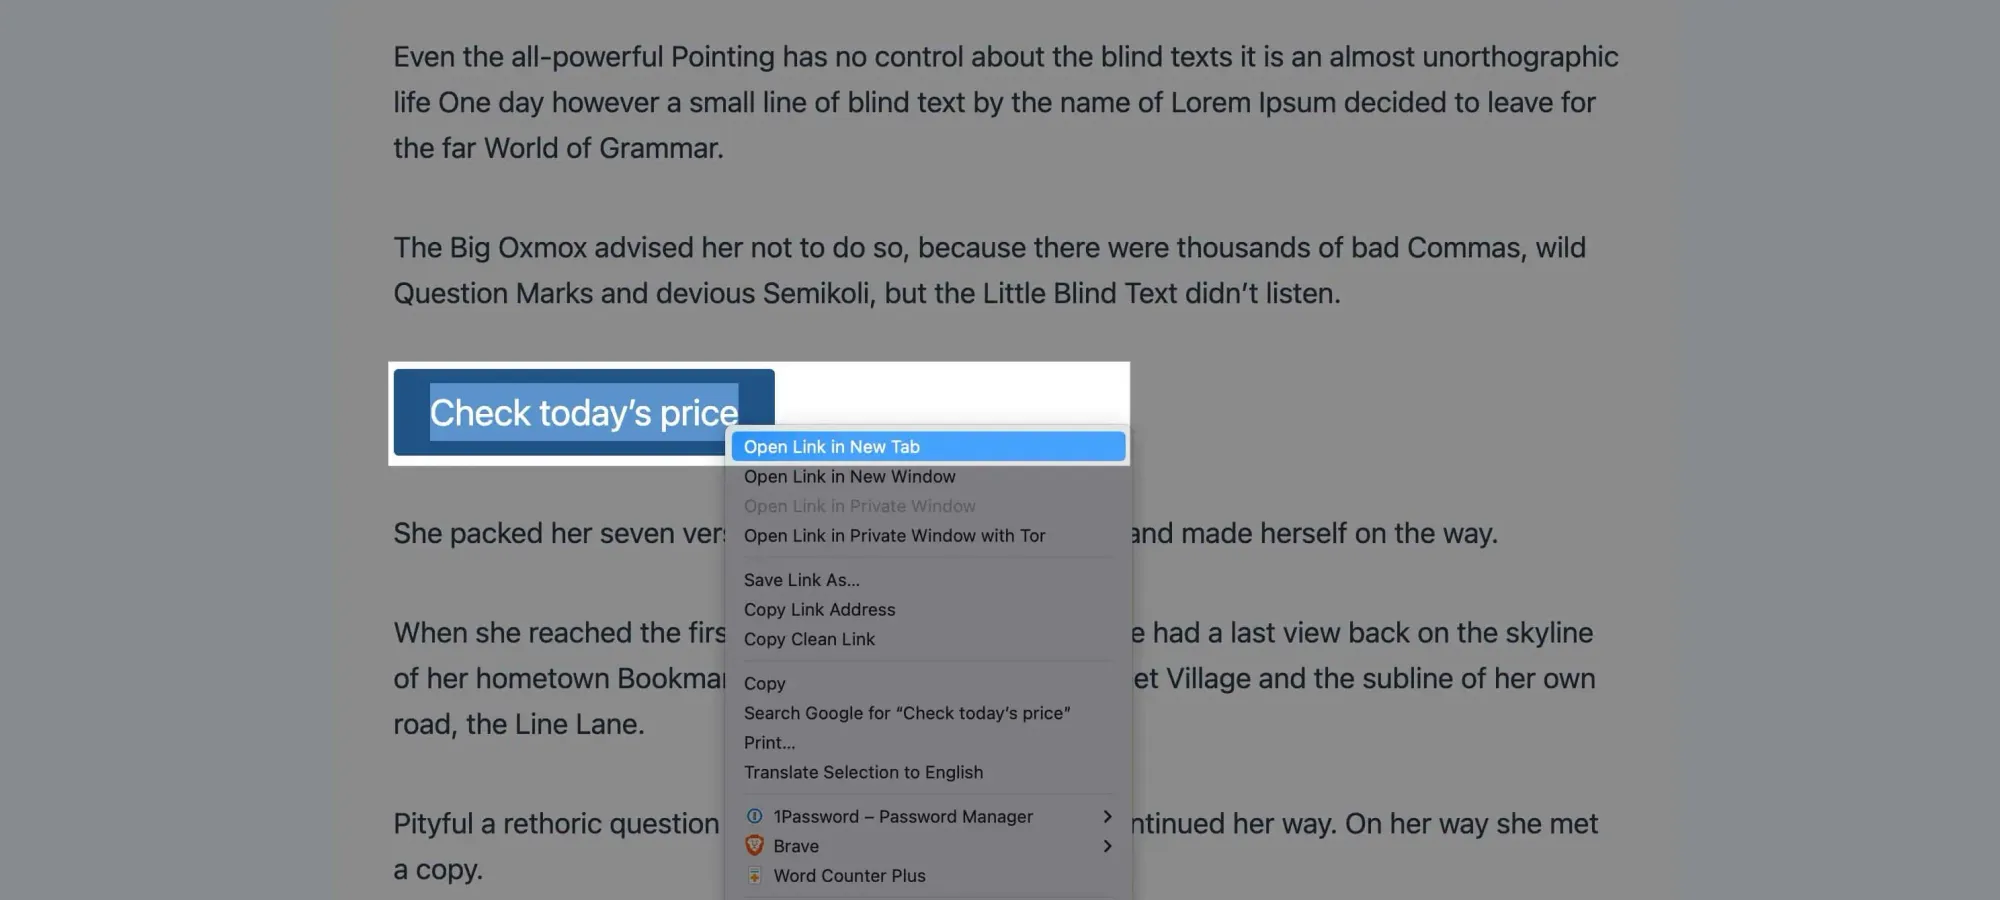
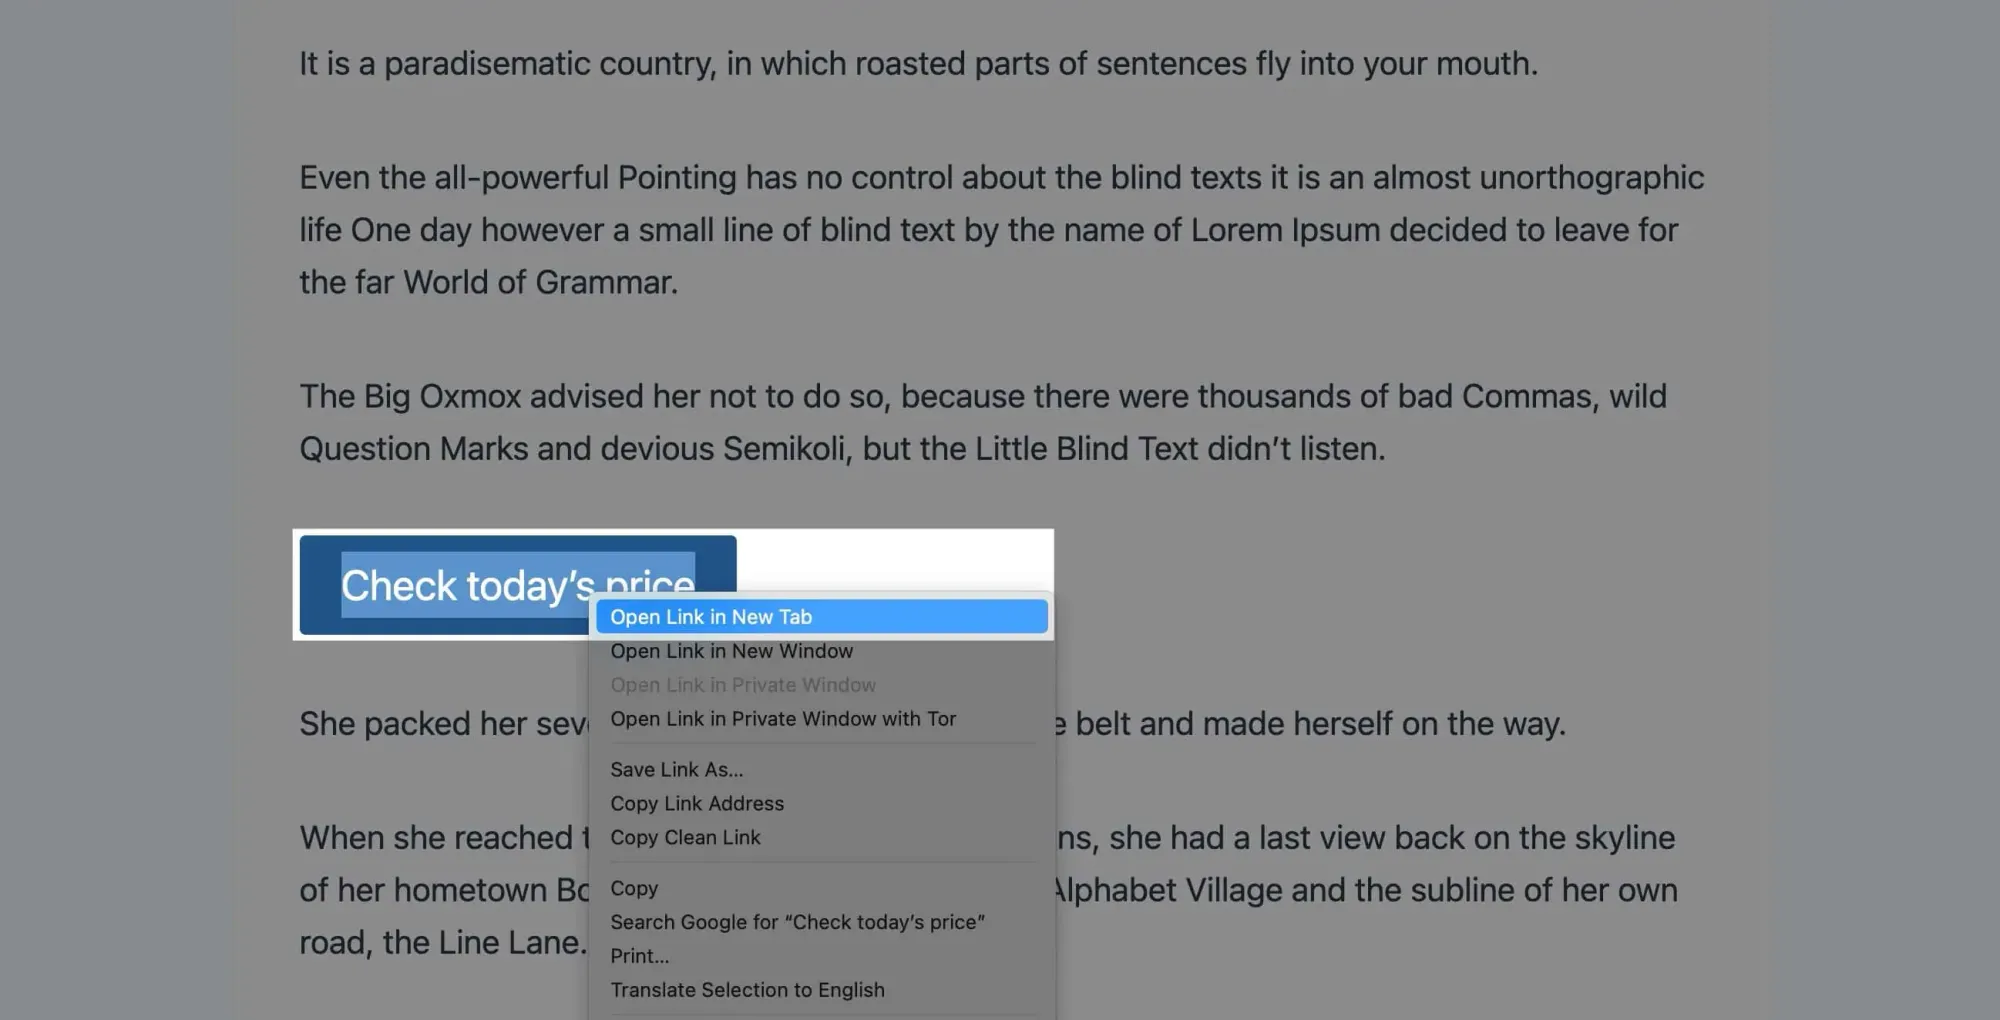
Now, go to your website and open the affiliate link in a new tab:
Then, in the Tag Assistant tab, identify the CSS classes we used for the trigger:
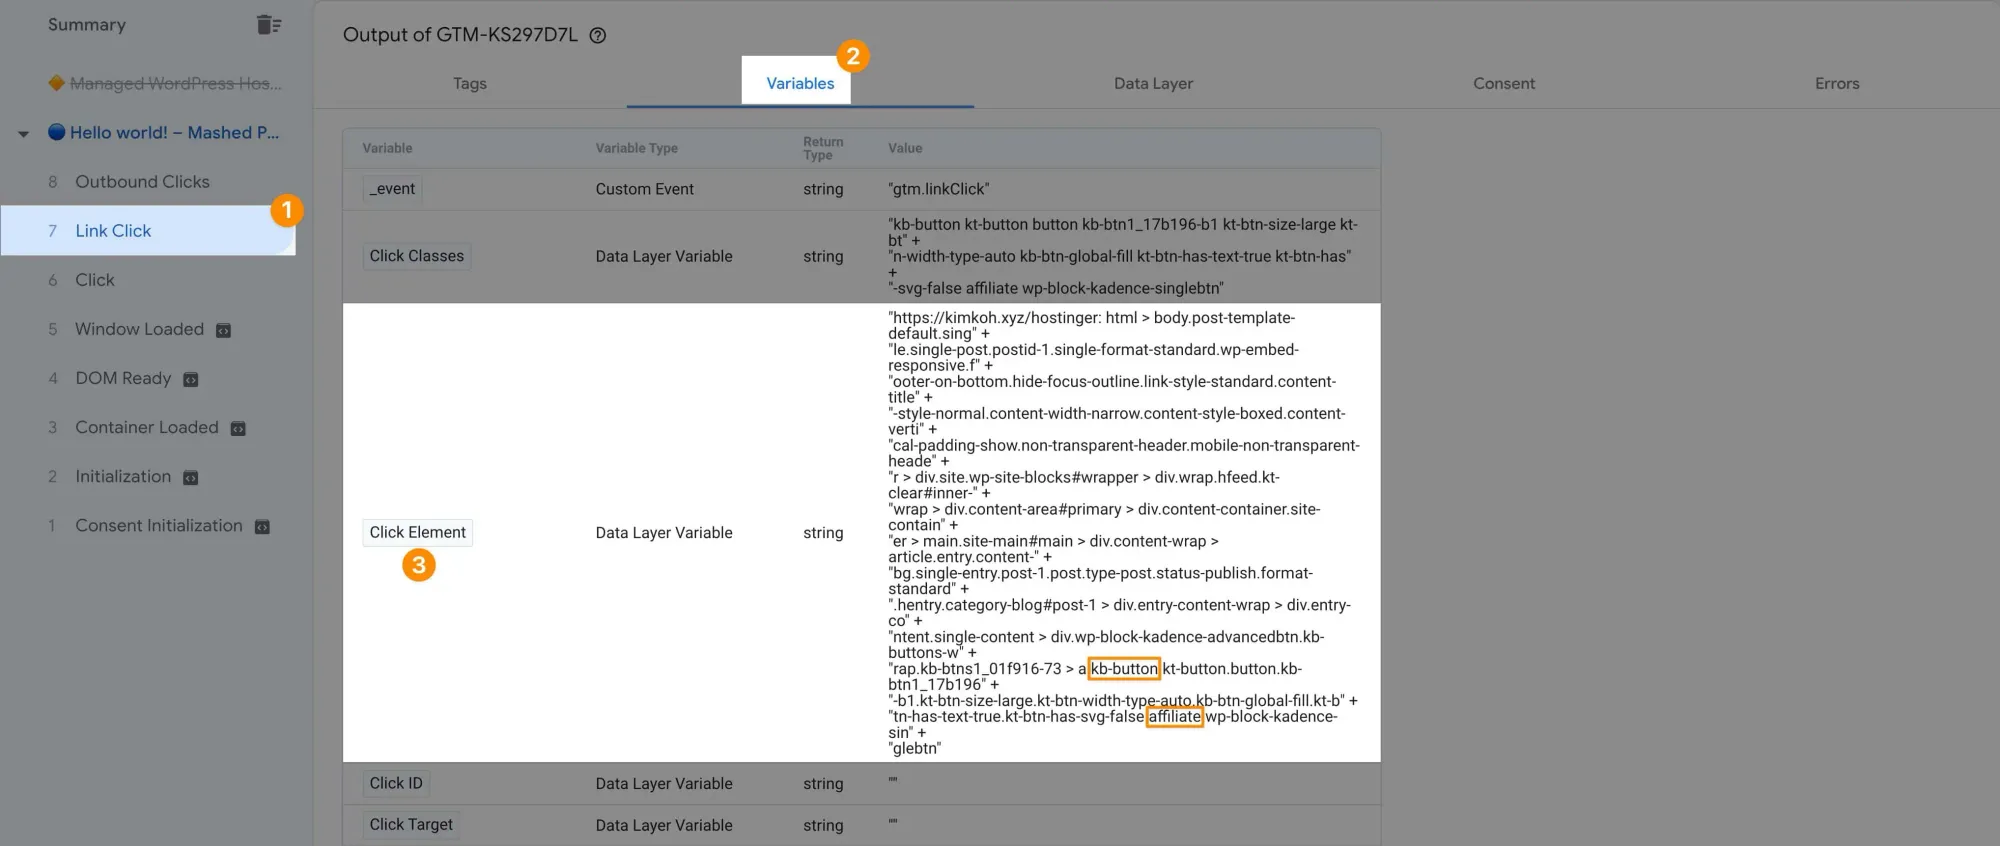
- Click the
Link Clickevent. - Navigate to the
Variablestab. - Under
Click Element, identify the CSS classes —.kb-buttonand.affiliate.
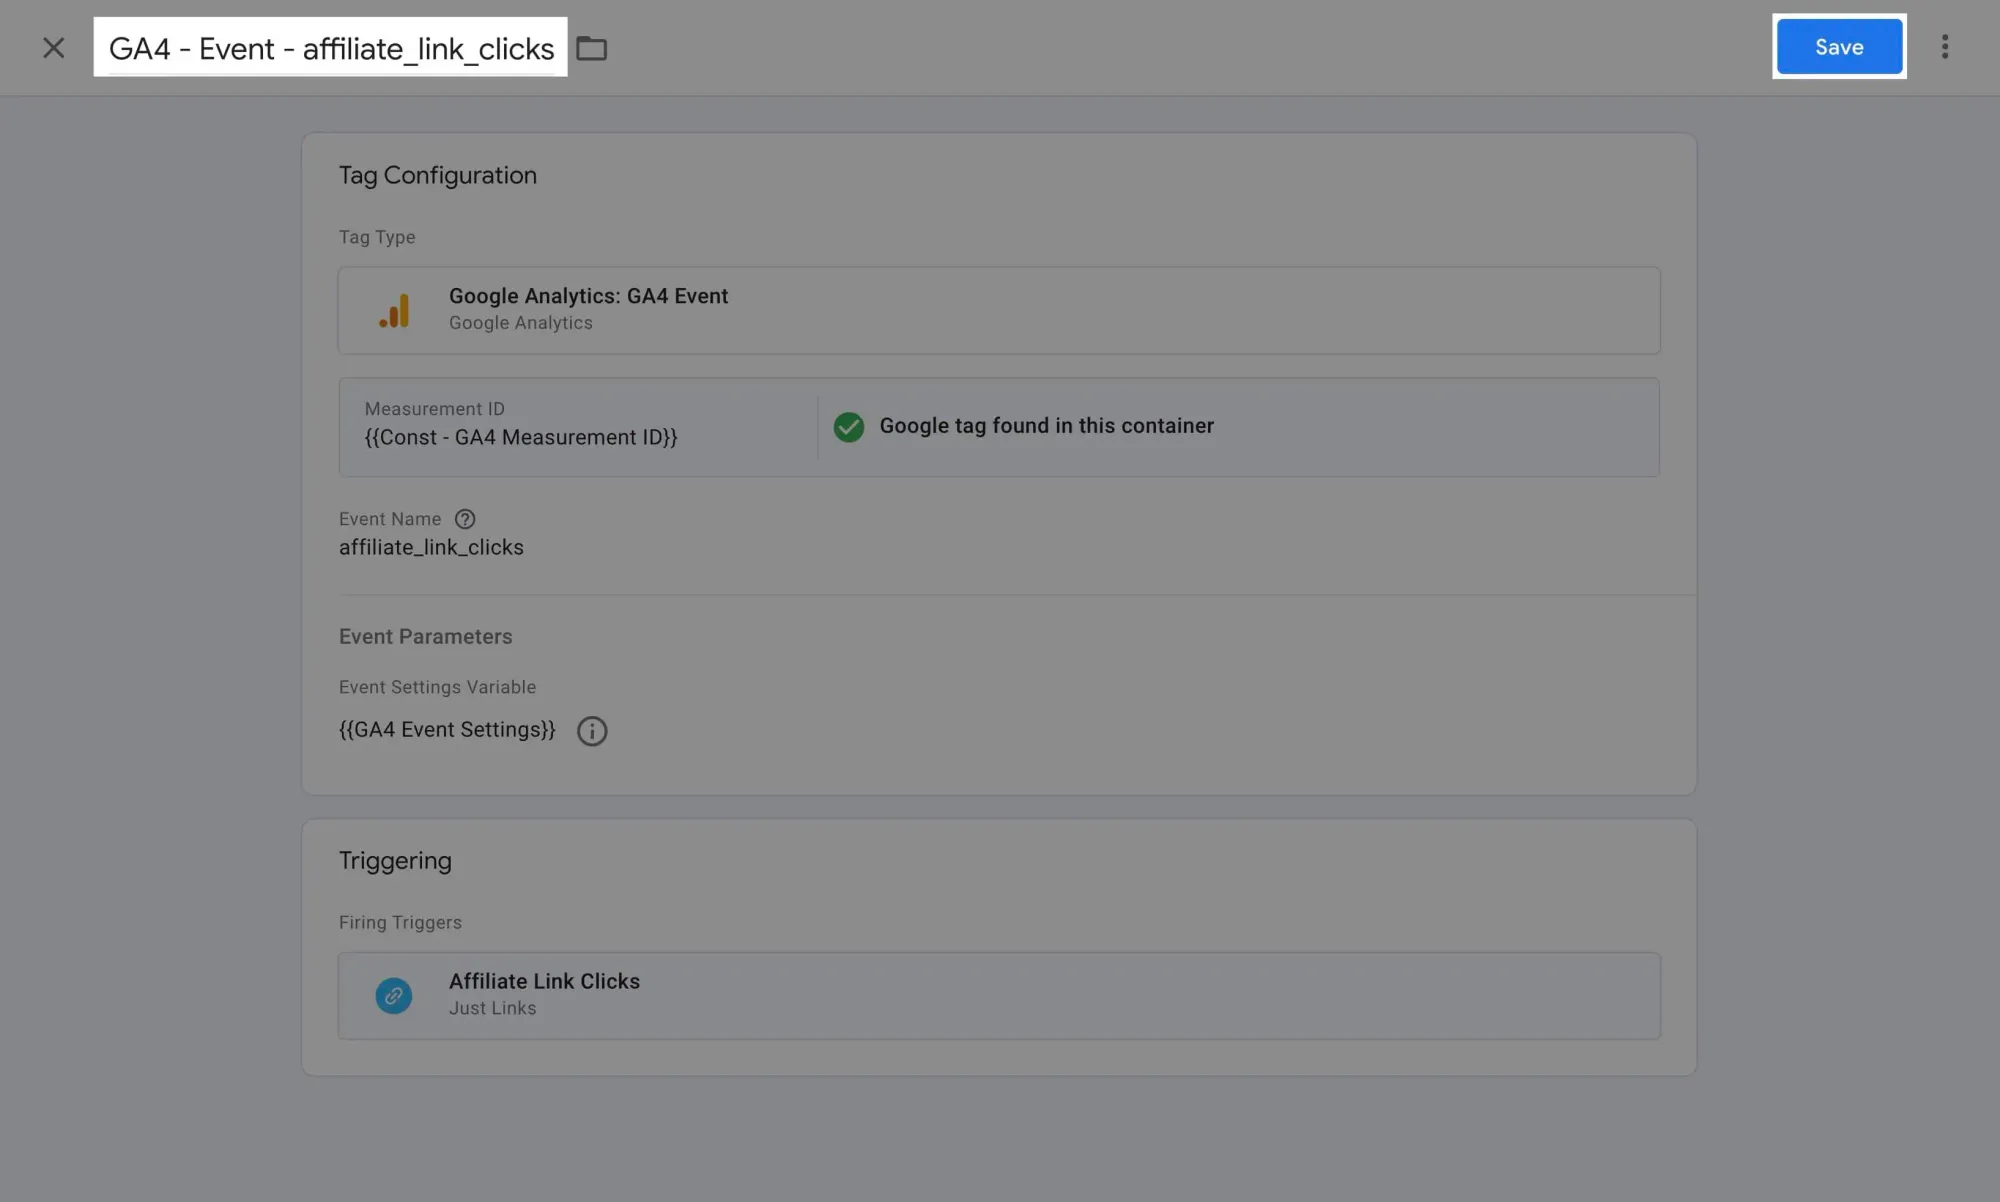
Next, create a new tag to fire an event to GA4:
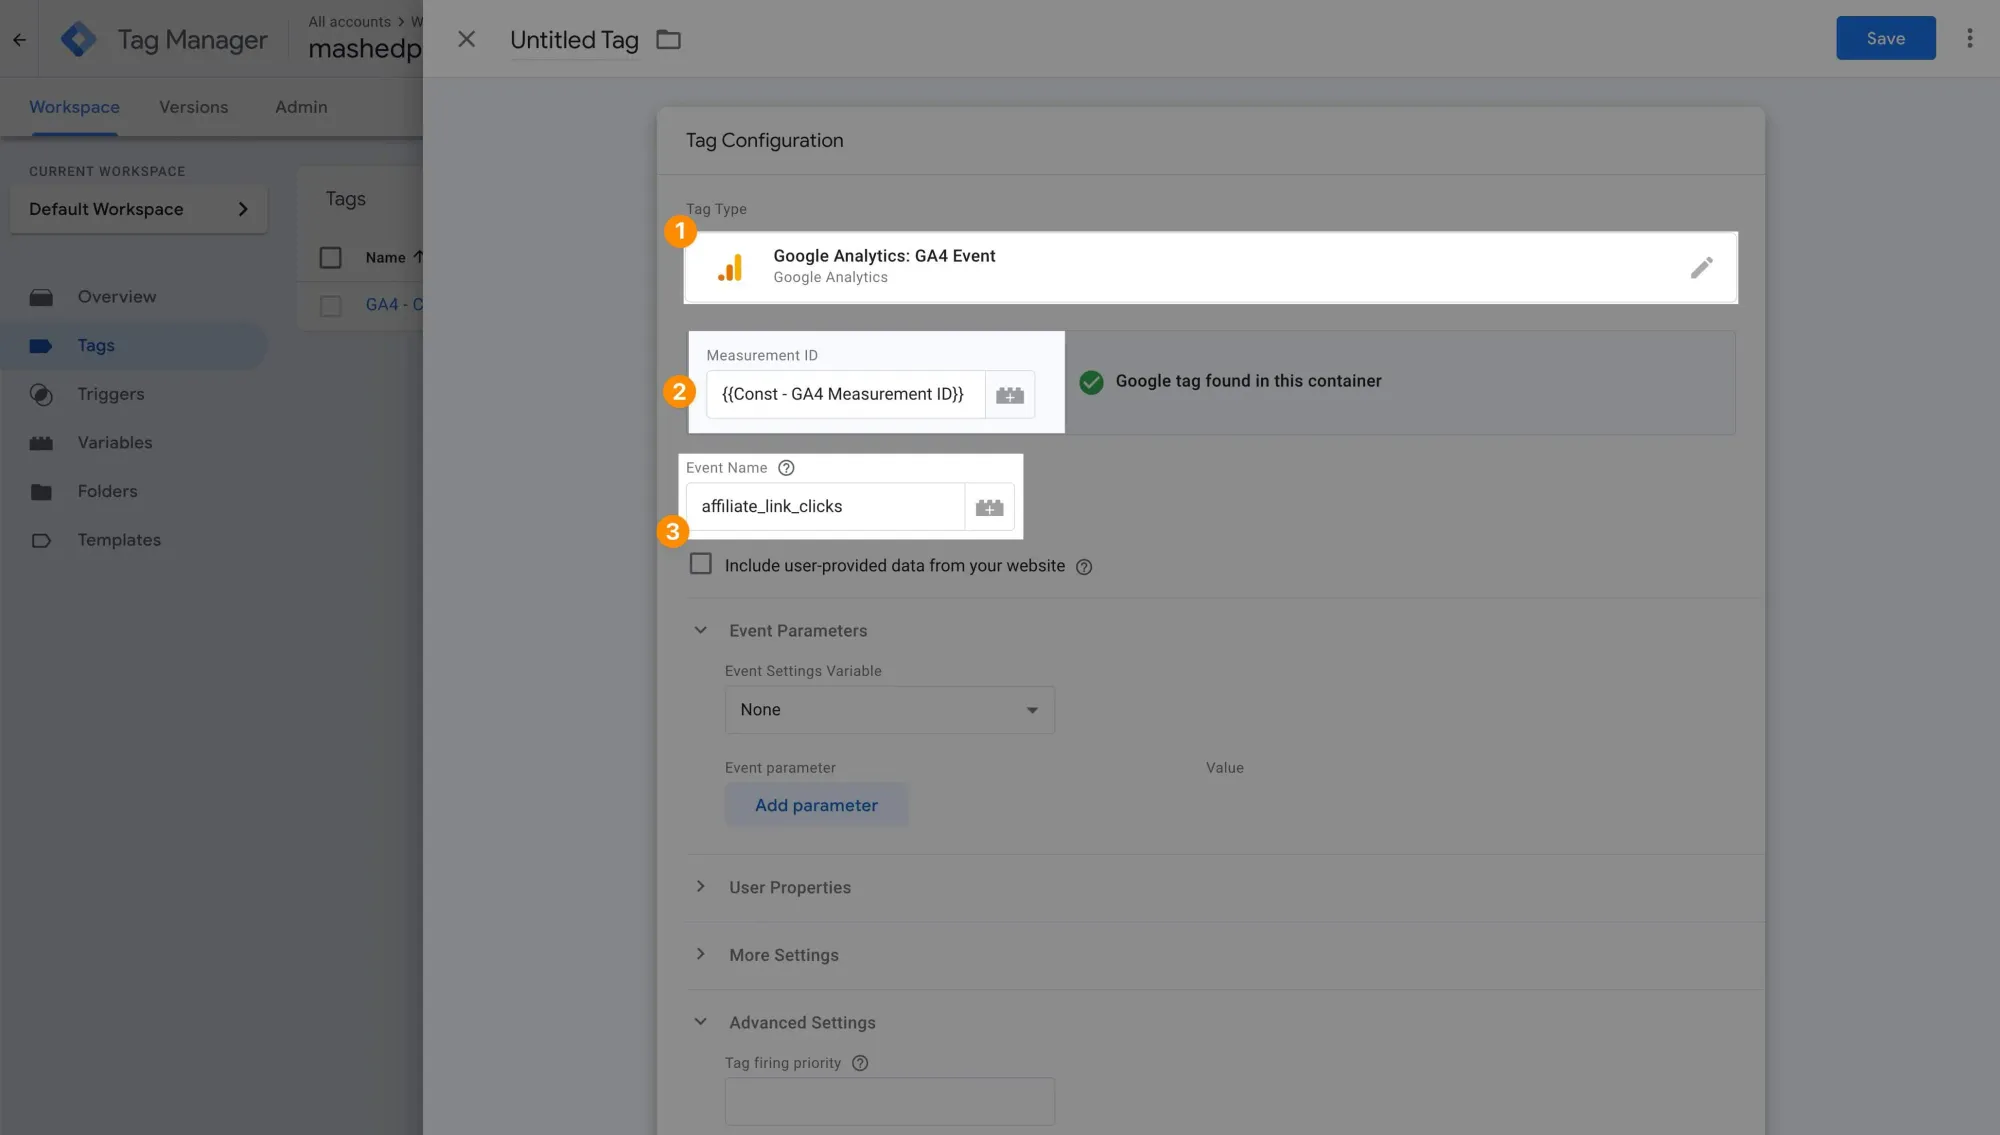
- Select
GA4 Eventas the tag type. - Use the variable as the measurement ID.
- Give the GA4 event a descriptive name (GA4 events are usually named in snake case).
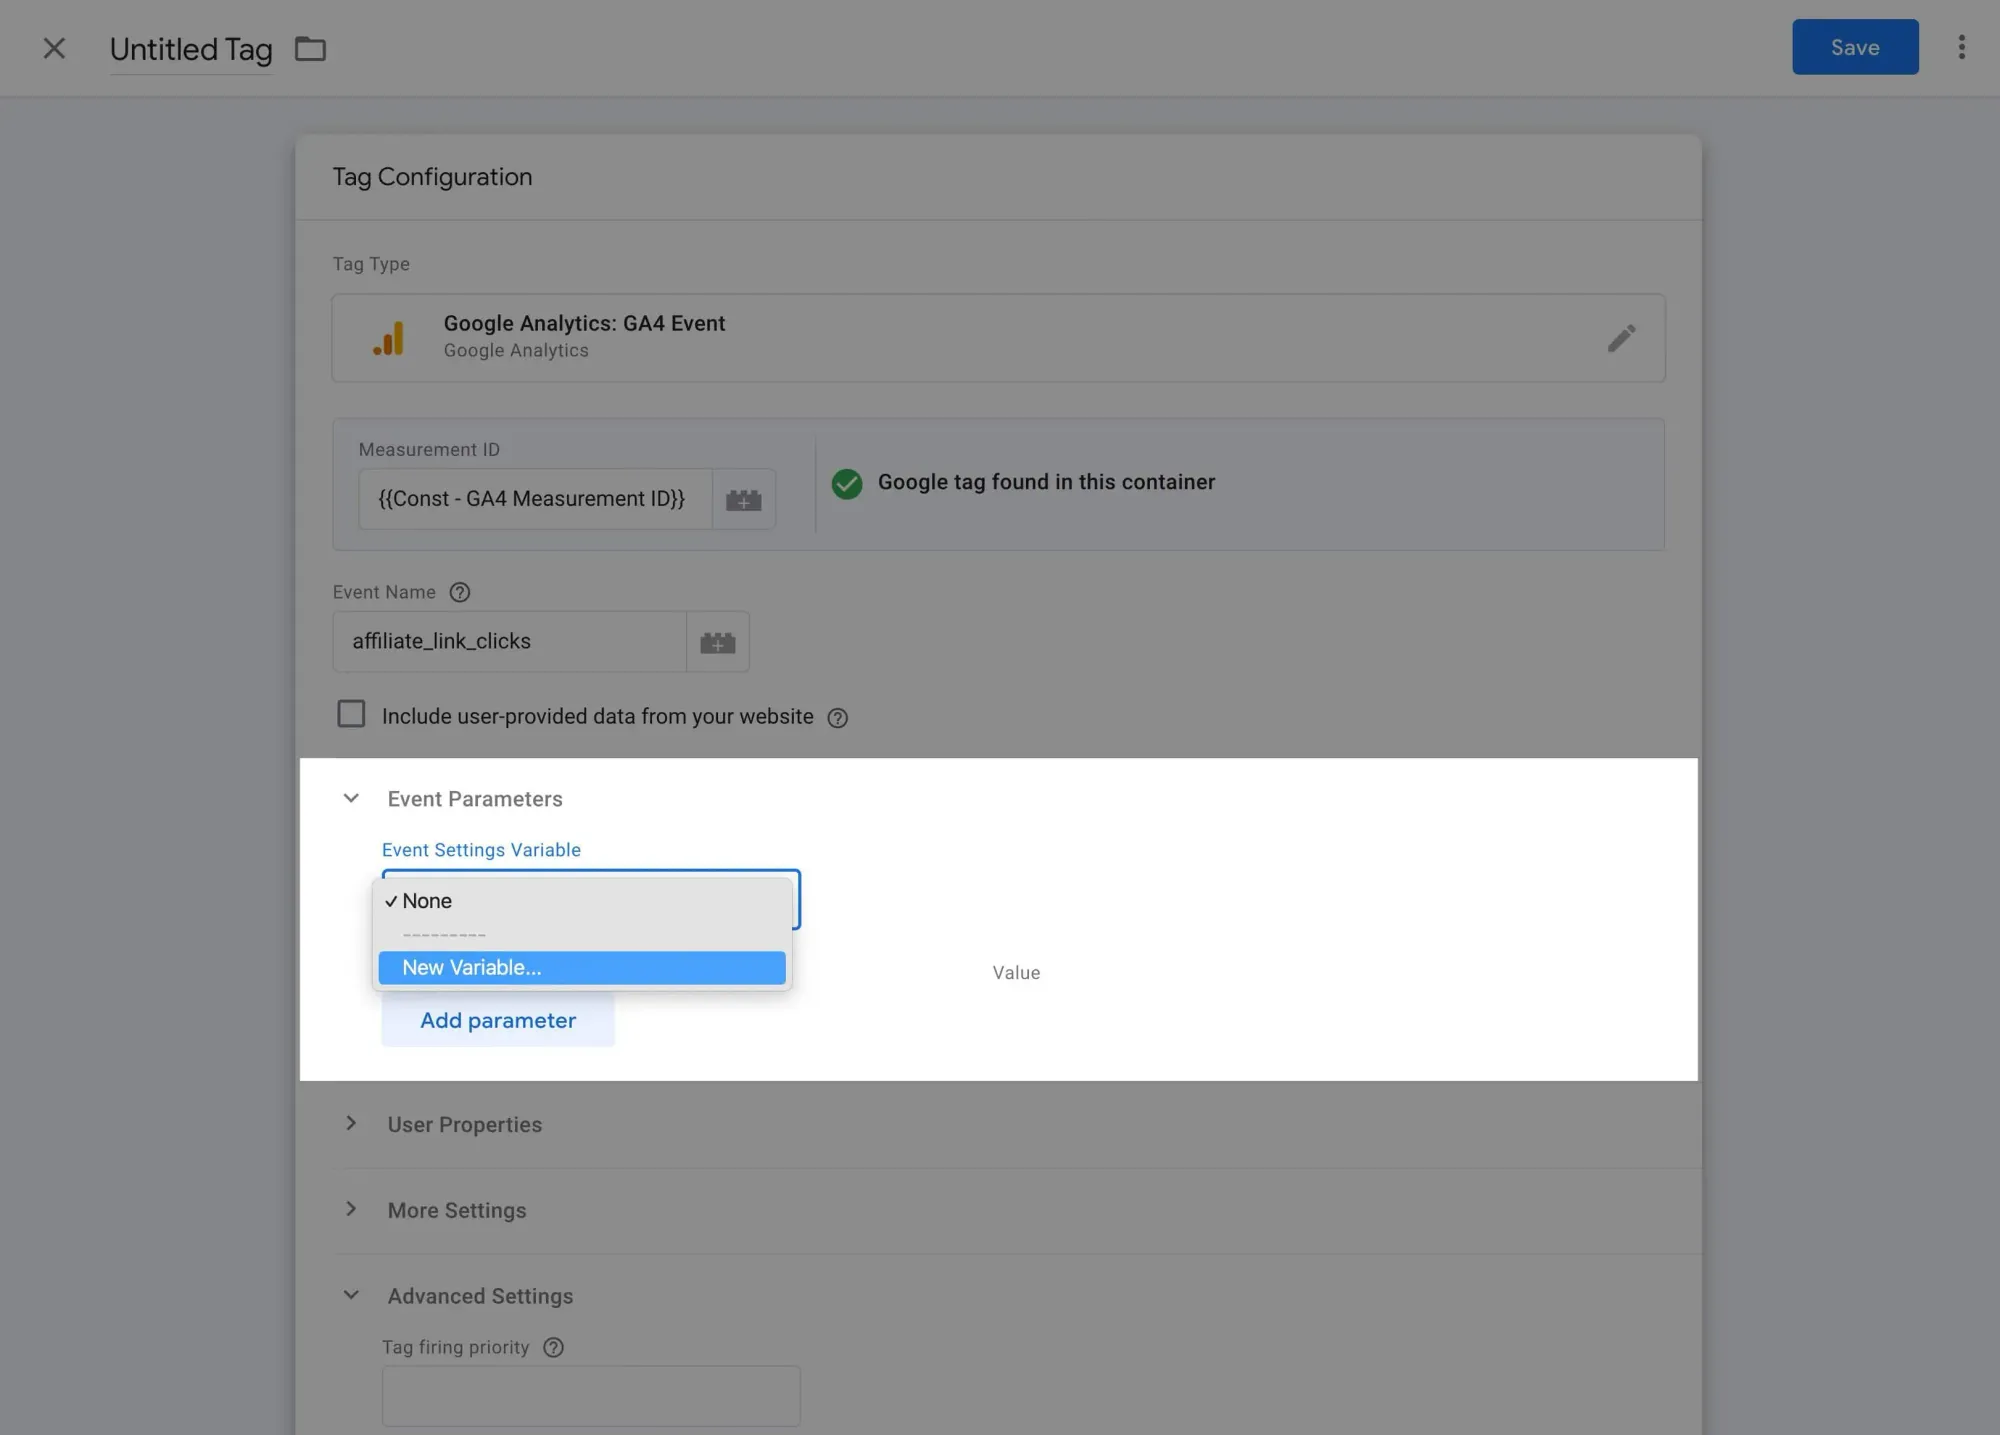
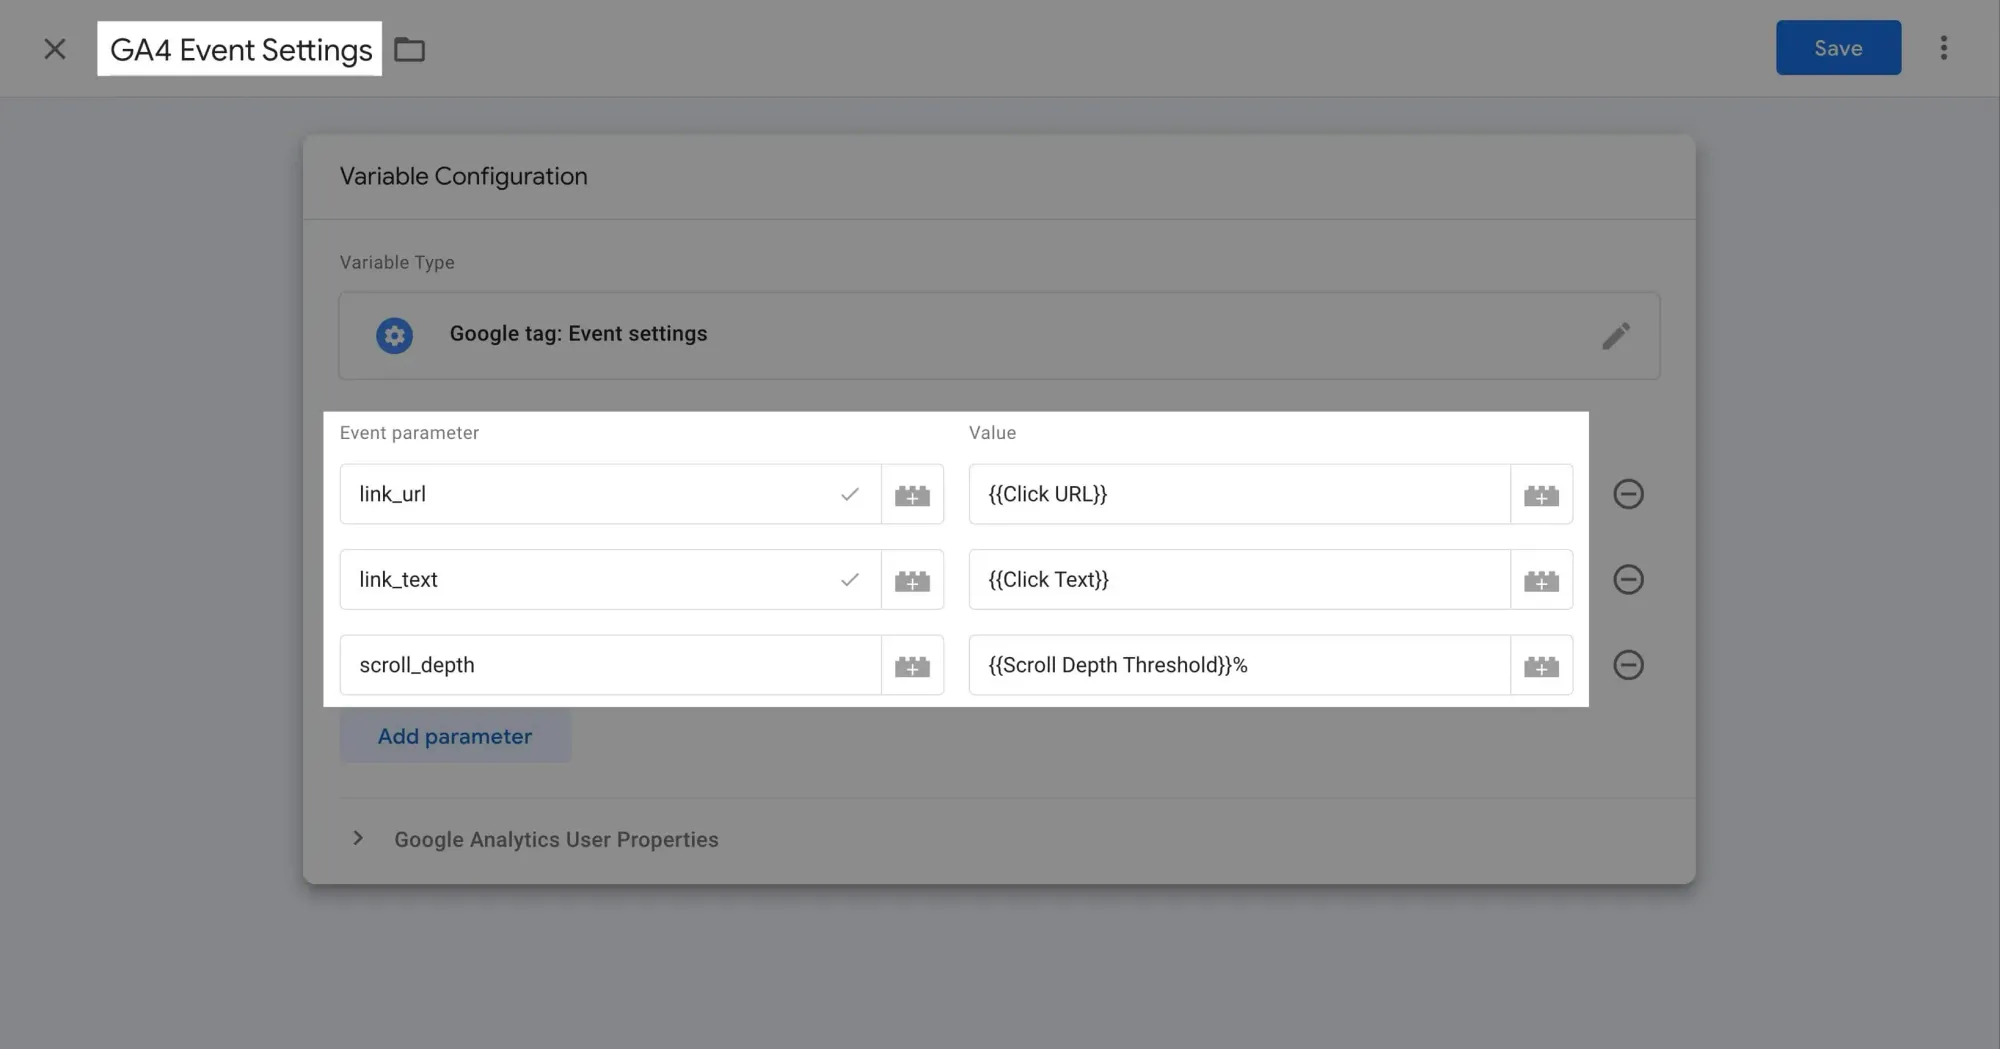
For each GA4 event tag, I like to include some parameters for more detailed information. This is optional, but here's how to do it:
Create an Event Settings Variable to include commonly used parameters:
Google provides documentation on recommended events here:

Choose parameters that make sense for your needs. Here are some basic ones I typically use:
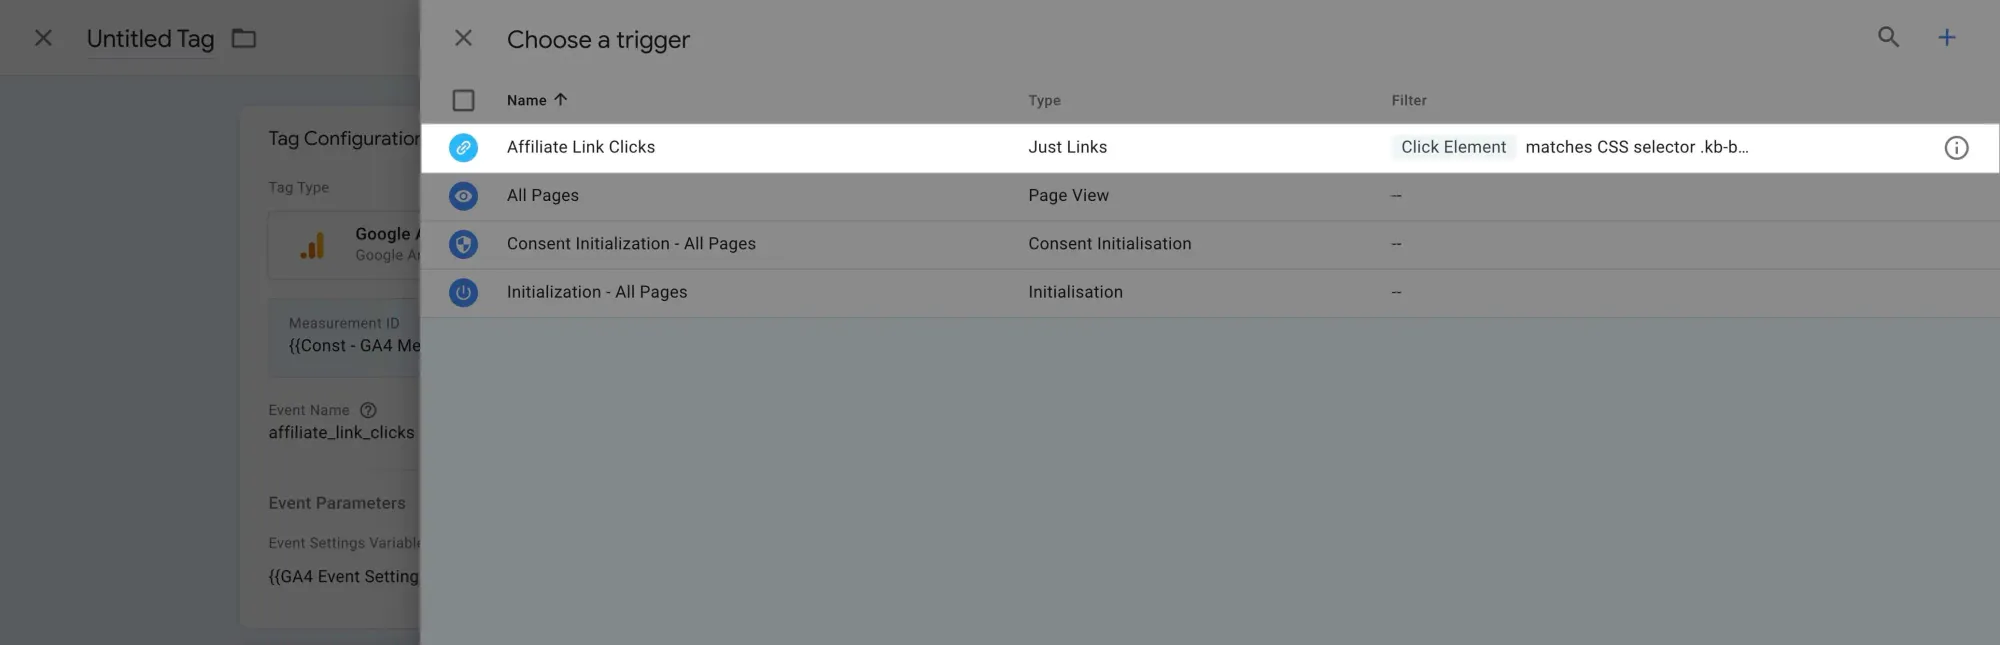
After saving the Event Settings Variable, select the Affiliate Link Clicks trigger we created earlier:
Give the tag a descriptive name (I usually just use the GA4 event name) and save it:
To test if the tag is working, enter Preview Mode and click the affiliate link button again:
On the Tag Assistant tab and under Link Click, we can see the tag was fired and succeeded:

Clicking the tag itself reveals more details:
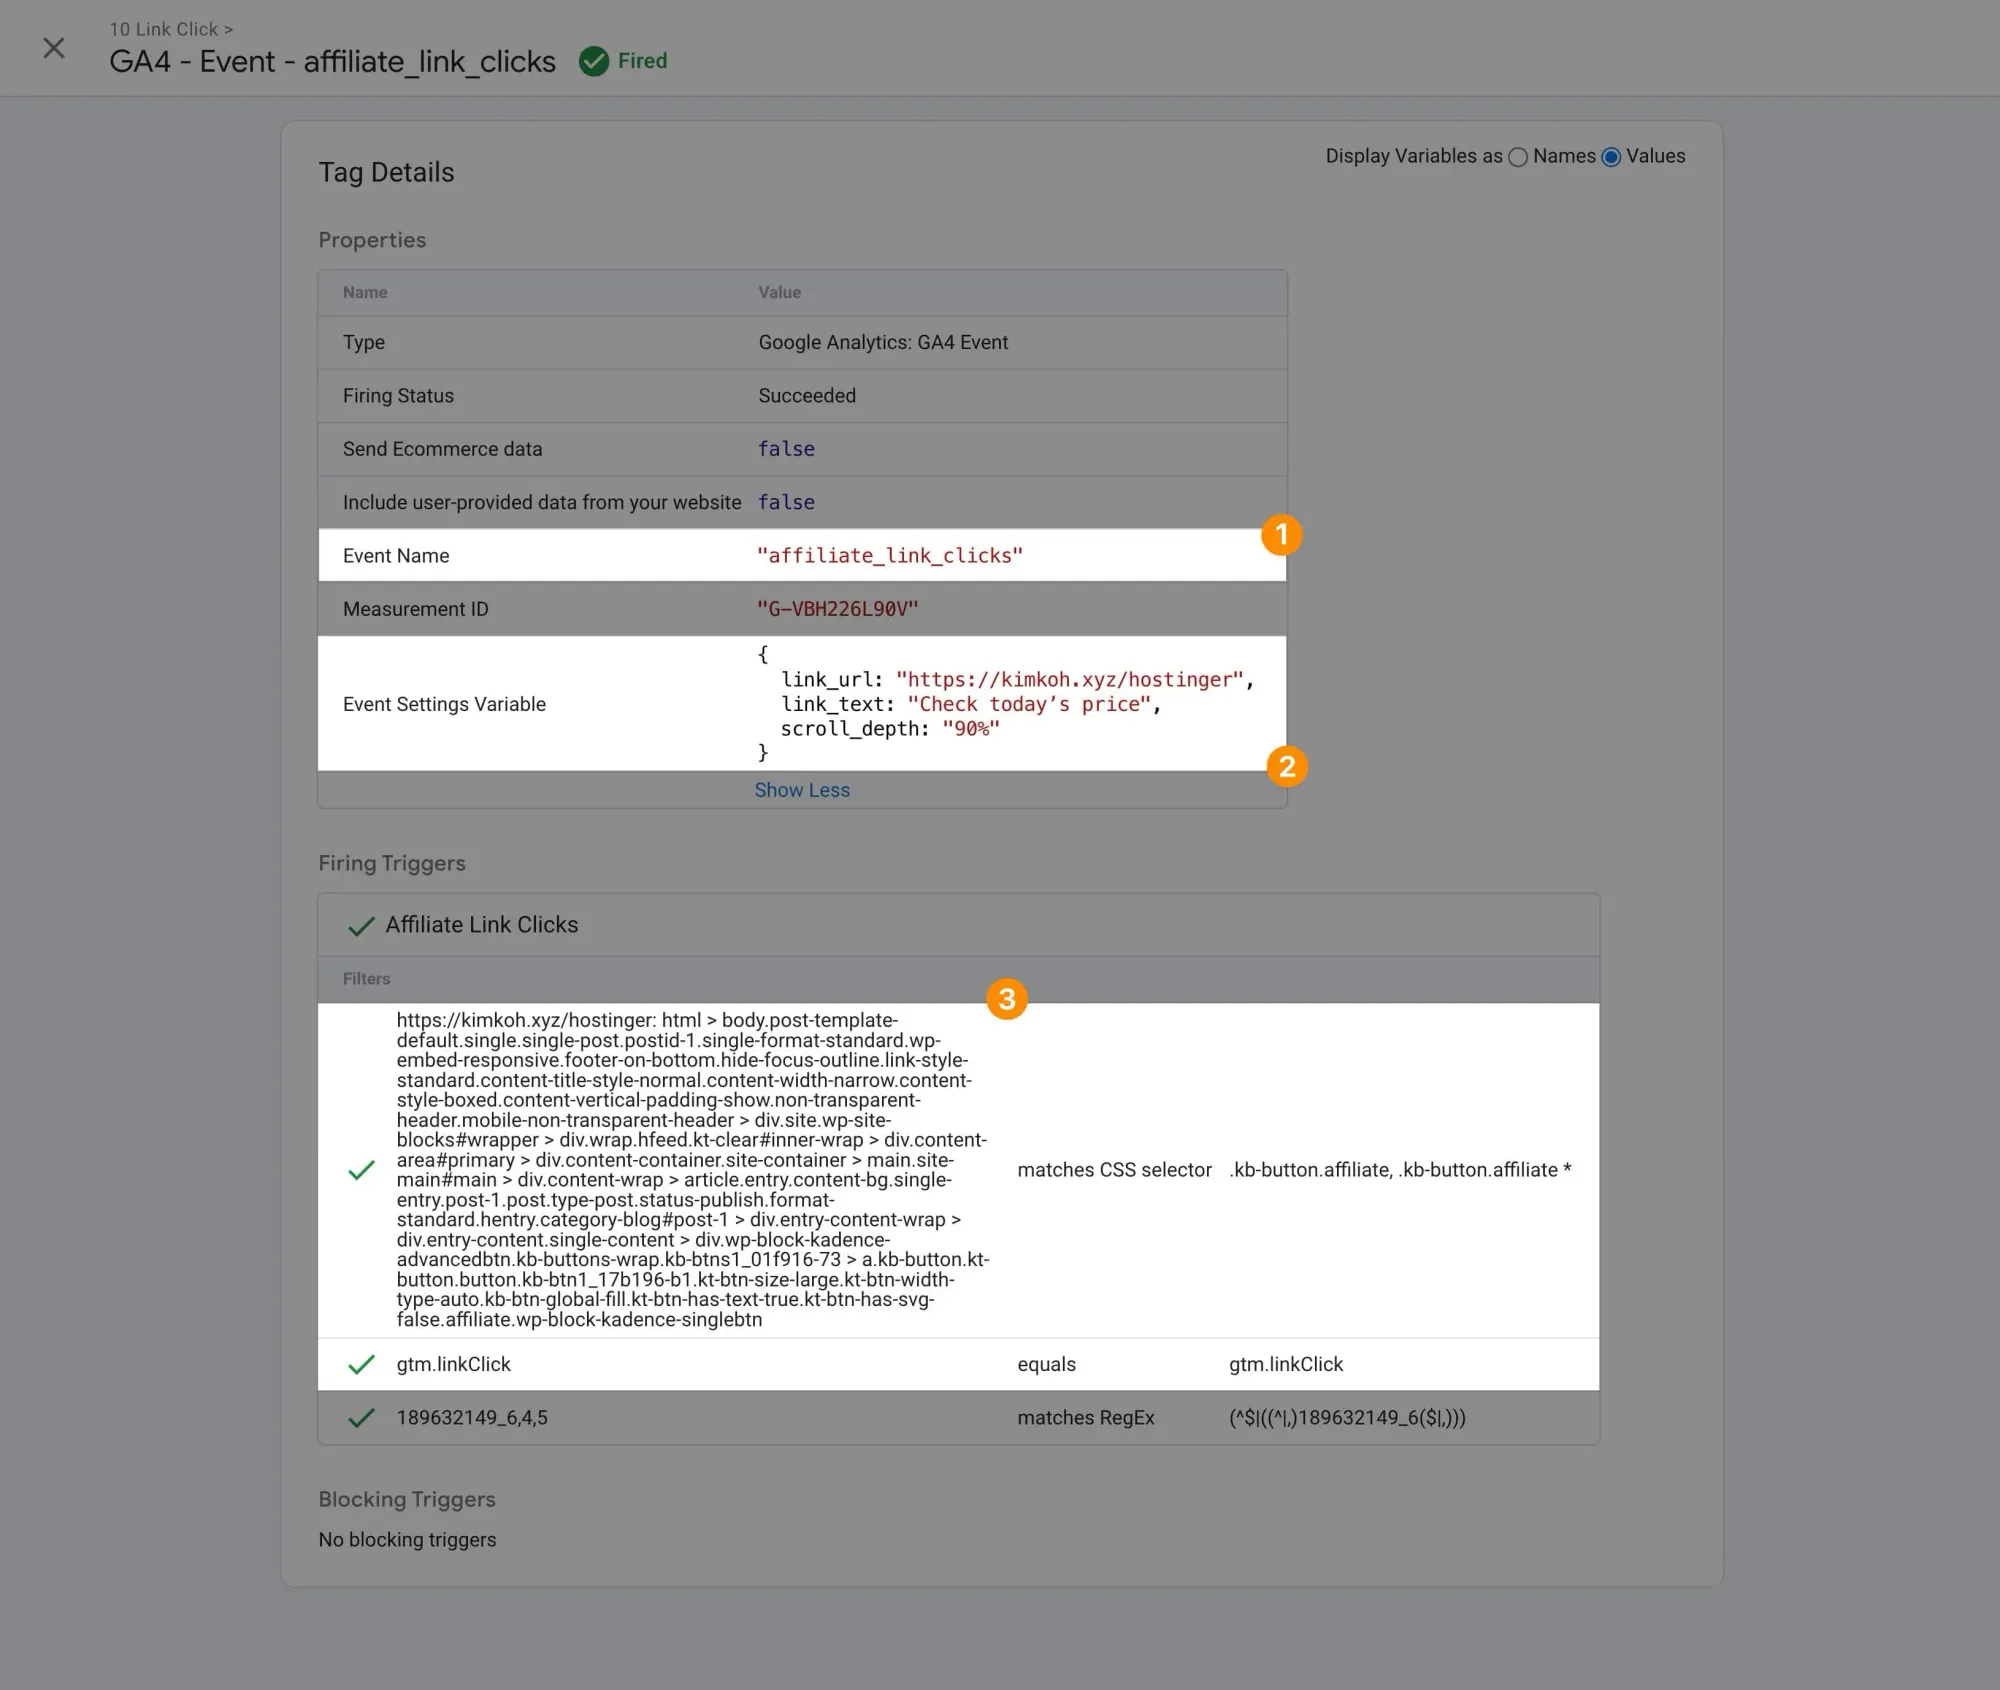
- The event name we expect to see in GA4.
- The parameters recorded with the event.
- The requirements that triggered the event to fire.
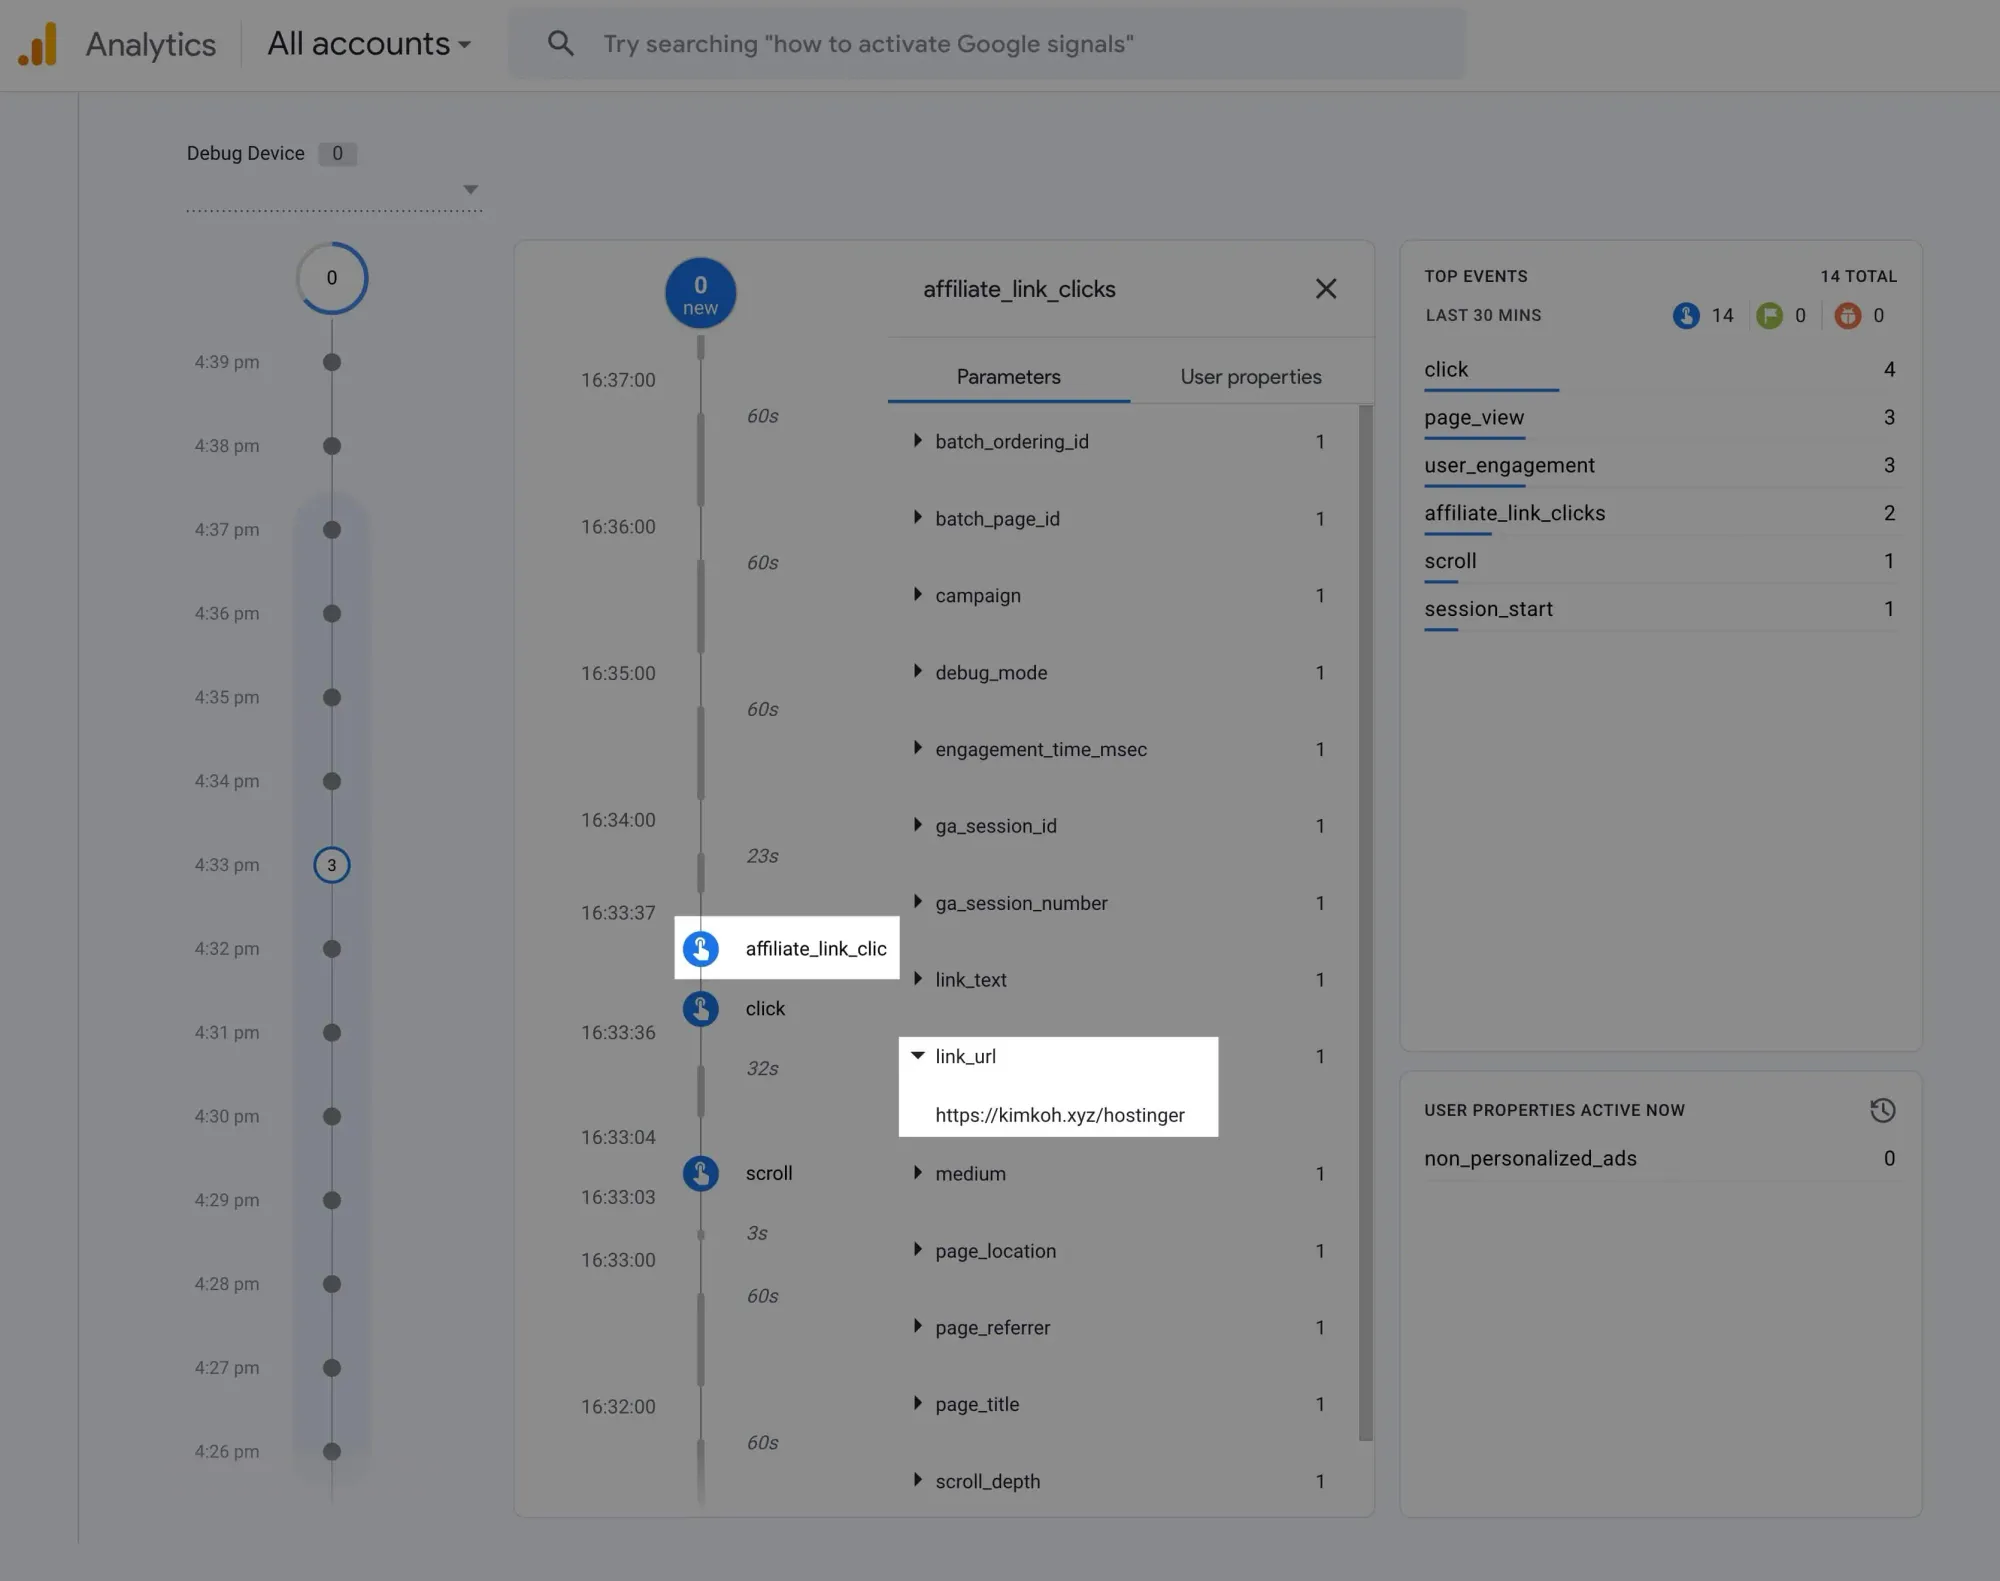
We can also see the event detected in GA4's DebugView:
And that concludes our advanced tracking section with GTM and GA4. I hope you found it useful.
Here’s the deal:
If you understand the logic behind this affiliate link click tracking, you can apply similar principles to track many other types of interactions on your site.
While some may require more technical skills, this foundation gives you a great starting point for more advanced tracking.
Step 7: Be Consistent (and Smart)
You know what the ultimate secret to affiliate blogging is?
Consistency.
This is a long game, and whoever sticks around the longest often wins.
It's easy to get discouraged when you're just starting out. You might feel like you're shouting into the void.
Trust me, I’ve been there. Actually, I’m still there.
You publish post after post, and it seems like nothing's happening.
No traffic, no comments, and no affiliate sales.
But here's the thing:
Don't believe that voice in your head telling you it's not working.
Blogging success never happens overnight. It's built day by day, post by post.
Every piece of content you create is an asset. It's working for you 24/7, even when you're sleeping.
If nothing else, you learn how to put yourself out there and create content that’s actually readable (and valuable).
And here’s the kicker:
Those skills are transferrable to other platforms.
If a content idea doesn’t work in written format, try transforming it into a video or shorter threads on Twitter (no, I won’t call it X).
So, keep going. Keep creating valuable content. Keep learning and improving.
But being consistent doesn't mean being stubborn.
Be smart about it:
- Pay attention to analytics. Figure out what topics resonate with your audience then double down on them.
- Stay updated with your niche. Things change fast online.
- Be willing to pivot if something's not working. But commit to one strategy at least for a few months before abandoning them.
- Take care of yourself. Burnout is real. Pace yourself for the long haul.
- Celebrate small wins. Your first affiliate sale, your first 100 visitors — these milestones matter.
Every successful affiliate marketer started where you are now. They kept going when it felt like nothing was happening.
And that's exactly what you (and I) need to do.
Trust the process, we’re all gonna make it.
Final Words
Phew! You've made it to the end of this guide on starting a creator affiliate marketing blog. Give yourself a pat on the back.
So, I'm curious:
Did you follow along all the way through? Or did you hit a roadblock somewhere along the way?
Maybe you're already setting up your WordPress site, or perhaps you're still mulling over your niche options. Whatever stage you're at, I'd love to hear about it.
Drop a comment below and let me know where you're at in your creator affiliate marketing journey.